Do you want to learn how to add expires headers in WordPress?
Expires headers are rules that let web browsers know whether to load a web page resource like images from the visitor’s browser cache or from your server. These can help improve the performance of your site.
In this article, we’ll show you two ways to add expires headers in WordPress.

How Are Expires Headers Used in WordPress?
The first time someone visits a web page on your WordPress site, all of the files are loaded one by one. All of these requests between the browser and your WordPress hosting server increase the web page loading time.
Browser caching stores some or all of those files on the visitor’s computer. That means that the next time they visit the page, the files can be loaded from their own computer, boosting your WordPress performance.
Now you might be wondering, how do the browsers know which files to save, and how long to keep them?
That’s where expires headers come in.
The rules about which files to save and how long to save them are set using either expires headers or cache-control headers. In this article, we’ll focus on expires headers because they’re simpler to set up for most users.
Expires headers set an expiration date for each type of file stored in the browser cache. After that date, the files will be reloaded from your server to give visitors the most recent version of the page.
We’ll show you how to add expires headers using two different methods. The first method is easier and recommended for most users. You can click the links below to jump ahead to your preferred section:
- Method 1: Add Expires Headers with WP Rocket WordPress Plugin
- Method 2: Add Expires Headers in WordPress Using Code
Method 1: Add Expires Headers with WP Rocket WordPress Plugin
WP Rocket is the most beginner-friendly WordPress caching plugin in the market. Once enabled, it works immediately to speed up your site without having to mess with complicated configuration settings like many other caching plugins.
WP Rocket is a premium plugin, but the best part is that all features are included in their lowest plan.

The first thing you need to do is install and activate the WP Rocket plugin. For more details, see our step by step guide on how to install a WordPress plugin.
Once installed and activated, WP Rocket will automatically turn on browser caching. By default, it add expires headers and cache-control headers with the best settings to speed up your WordPress site.
That’s all you need to do. If you want to learn more about the plugin, then see our guide on how to properly install and setup WP Rocket in WordPress.
If you’d prefer to use a free caching plugin to add expires headers to your website, then we recommend you take a look at W3 Total Cache.
W3 Total Cache offers some of the same features as WP Rocket, but it’s not as beginner-friendly. You’d have to manually enable expires headers, since it doesn’t enable them automatically.
Method 2: Add Expires Headers in WordPress Using Code
The second method to add expires headers in WordPress involves adding code to your WordPress files. We don’t recommend it for beginners, since a mistake in the code could cause serious errors and break your site.
Before making these changes, we recommend that you first back up your WordPress site. For more details, see our guide on how to backup and restore your WordPress site.
With that said, let’s take a look at how to add expires headers by adding code to WordPress.
Determine if Your Website is Running Apache or Nginx
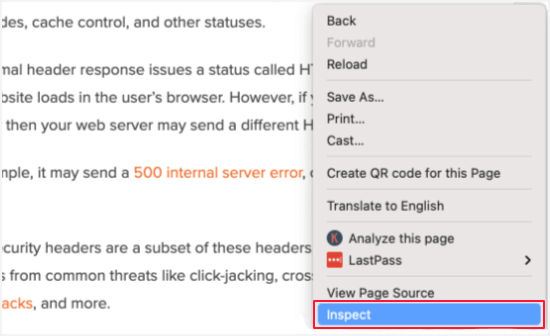
First, you need to figure out whether your website is using Apache or Nginx servers. To do this, browse to your website and right click the page, then select the ‘Inspect’ option.

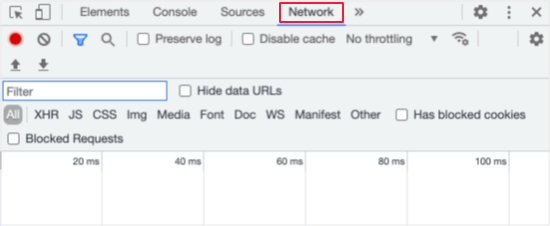
Next, you need to click the ‘Network’ tab at the top of the page. You may need to refresh the page for the results to load.

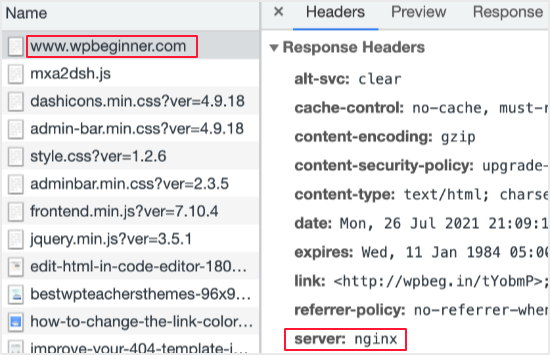
After that, you can click your domain name at the top of the ‘Name’ column. Then you should scroll down to the ‘Response Headers’ section and check for an item called ‘server’.

This will show you which web server is being used. In this case, the site is running on an Nginx server.
Now that you know which web server your site is using, use then links below to jump ahead:
How to Add Expires Headers in Apache
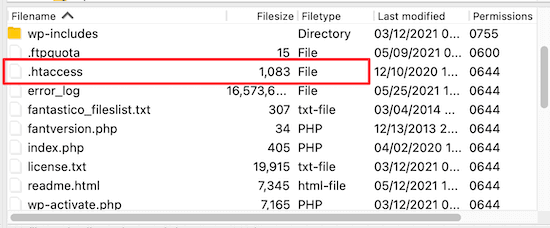
To add expires headers to an Apache server, you need to add code to your .htaccess file.
To edit this file, you need to connect to your WordPress hosting account with an FTP client or your host’s file manager tool. You’ll find your .htaccess file in your website’s root folder.

Sometimes the .htaccess file can be hidden. If you need help finding it, then see our guide on why you can’t find .htaccess file on your WordPress site.
Next, you need to add expires headers to turn on browser caching. This tells the web browser how long it should store your website resources before they are deleted.
You can add the following code near the top of your .htaccess file to add expire headers:
## EXPIRES HEADER CACHING ##
<IfModule mod_expires.c>
ExpiresActive On
ExpiresByType image/jpg "access 1 year"
ExpiresByType image/jpeg "access 1 year"
ExpiresByType image/gif "access 1 year"
ExpiresByType image/png "access 1 year"
ExpiresByType image/svg "access 1 year"
ExpiresByType text/css "access 1 month"
ExpiresByType application/pdf "access 1 month"
ExpiresByType application/javascript "access 1 month"
ExpiresByType application/x-javascript "access 1 month"
ExpiresByType application/x-shockwave-flash "access 1 month"
ExpiresByType image/x-icon "access 1 year"
ExpiresDefault "access 3 days"
</IfModule>
## EXPIRES HEADER CACHING ##
These values should work fine for most sites, but you can adjust the time periods if your needs are different.
Notice that the code sets different cache expiration dates based on the type of file. Images are cached longer than HTML, CSS, Javascript, and other file types because they usually stay the same.
How to Add Expires Headers in Nginx
If you’re using an Nginx server to host your WordPress blog, then you need to edit the server configuration file to add expires headers.
How you edit and access this file depends on your host, so you can reach out to your hosting provider if you need help accessing the file.
Then, you need to add the following code to add expires headers:
location ~* \.(jpg|jpeg|gif|png|svg)$ {
  expires 365d;
}

location ~* \.(pdf|css|html|js|swf)$ {
  expires 3d;
}
This code will set the expiration times for the different file types. Notice again that images are cached longer than HTML, CSS, JS, and other file types since images usually stay the same.
We hope this tutorial helped you learn how to add expires headers in WordPress. You may also want to see our ultimate WordPress security guide to improve your website security, and see our comparison of the best email marketing services to grow your traffic.
If you liked this article, then please subscribe to our YouTube Channel for WordPress video tutorials. You can also find us on Twitter and Facebook.
The post How to Add Expires Headers in WordPress (2 Methods) appeared first on WPBeginner.
Post a Comment