Do you want to automatically drip content in your WordPress members area?
If you are running a WordPress membership website or selling premium content, then you may want to set up drip content instead of showing all course content right away.
In this article, we will show you how easily to add automatic drip content in your WordPress site.

What is Drip Content?
Drip content allows you to gradually release content instead of giving it all away at once.
It enables membership websites to automatically release content at regular intervals to their users. Instead of continuously creating new content, site-owners can efficiently use their existing content.
It is also useful when selling online courses. Instead of giving away your complete online course at once, you can spread your course across a pre-defined training period, so your students or members aren’t overwhelmed.
Why Add Drop Content in WordPress?
Normally, you can simply make a membership website and give away premium content to your paid subscribers.
However, if you are offering monthly subscriptions, then you would want to hold on to your existing customers.
Offering drip content at a regular pace allows you to keep users engaged for a long time. You can reuse your existing content and deliver it sequentially.
Drip feed also allows you to make your content more effective. For example, if you are offering an online classes, then this gives users a chance to submit assignments or quizzes before moving on to the next lesson.
Perhaps the best advantage is that you get the time needed to create new content, promote your business, and increase traffic and sales.
What Do You Need to Offer Drip Content in WordPress
The first thing you need is a WordPress membership plugin that allows you to easily schedule drip content on your website.
This is where MemberPress comes in.
It is the best WordPress membership plugin on the market. It allows you to create paid subscriptions on your website and easily set up automatic drip content in WordPress.
You’ll also need content that you want to deliver to your audiences. You can restrict access to any type of content using the powerful rules feature.
Let’s get started.
Adding Drip Content in WordPress
First, you need to install and activate the MemberPress plugin. For more details, see our step by step guide on how to install a WordPress plugin.
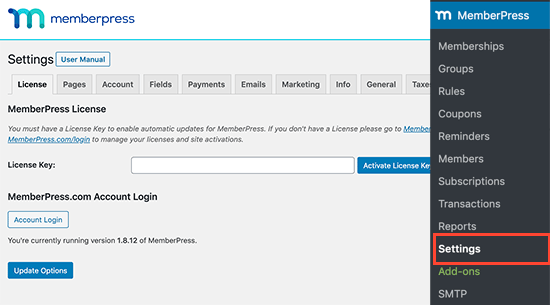
Upon activation, you need to visit MemberPress » Settings page to enter your license key. You can find this information under your account on the MemberPress website.
Next, you need to add a payment method to accept payments on your membership website. Simply switch to the Payments tab on the plugin’s Settings page and then click on the ‘+’ icon to add a payment method.
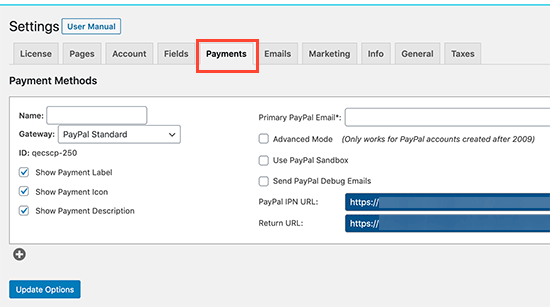
MemberPress supports PayPal and Stripe payments under their basic plan. It also supports Authorize.net, but you’ll need their Plus plan for that.
Simply select your preferred payment gateway from the drop-down menu and enter the required details. You can also add multiple payment methods by clicking on the + icon again and adding another payment method.
Now that you have done the basic set up. It is time to add a membership plan.
Simply go to MemberPress » Memberships page and click on the Add New button at the top.
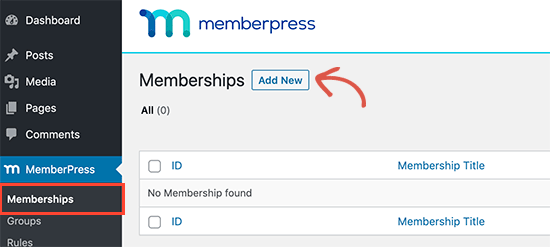
On the next screen, you need to provide a title for your membership plan and then enter the price. MemberPress allows you to choose different types of pricing including lifetime, expiring, and recurring.

You can provide a description of the plan in the text editor. Below that, you can configure different settings for your membership plan under the membership options box.
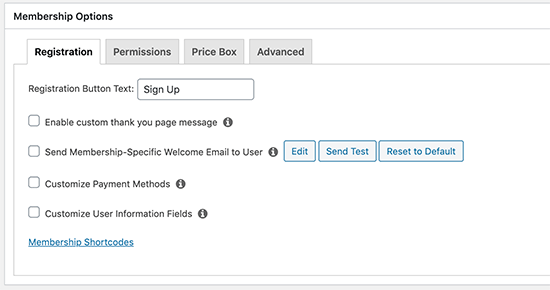
Once you are finished setting up your membership plan, don’t forget to click on the Publish button to save your changes.
Repeat the process to create more membership plans if needed.
Scheduling Automatically Drip Content Rules
MemberPress comes with a powerful set of rules. These allow you to restrict access to your content based on a user’s subscription and membership.
These rules also allow you to drip content and schedule any content to be released at your own pace.
Simply head over to the MemberPress » Rules page and click on the Add New button at the top.
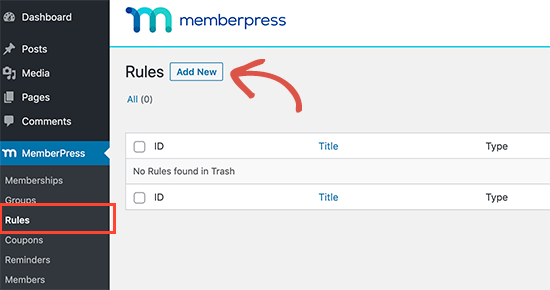
On the next screen, you need to choose the rules criteria.
MemberPress offers a whole range of options. You can select posts that match certain tags, categories, pages that are under the same parent page, single posts, or any URL.
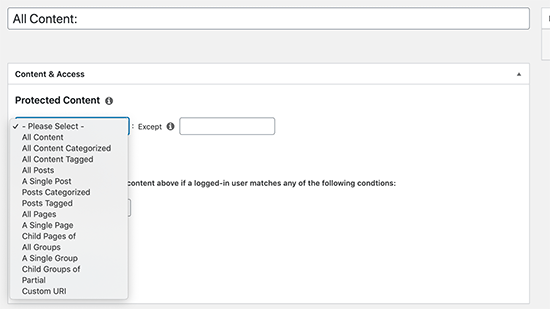
For instance, we chose all posts tagged ‘firstweek’. These are the articles that we want to release to the users during their first week of the subscription.
Next, you need to select the membership plan or members that this rule would apply to.
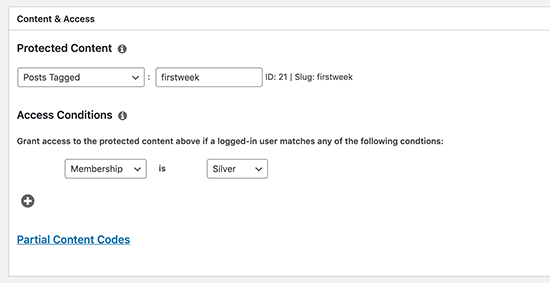
Now that you have selected the content and membership plan, it’s time to set when to drip content.
Scroll down a little and check the box next to ‘Enable Drip’ checkbox. This will reveal the drip rules options.
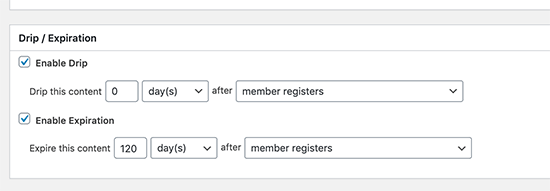
You can select after how many days the content becomes available to the user. After that, you can match it with criteria like when user buys a specific subscription, registers for an account, buy any product, and so on.
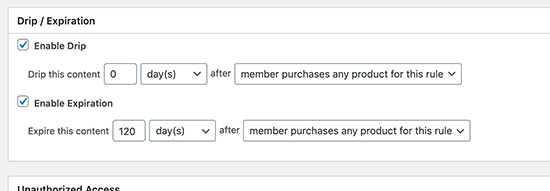
Optionally, you can also enable the drip expiration rule. This allows you to make content available for a limited time after which content will expire and users will not be able to access it.
Below that you can customize how to handle unauthorized access. You can choose to show users a custom excerpt, message, and login form.
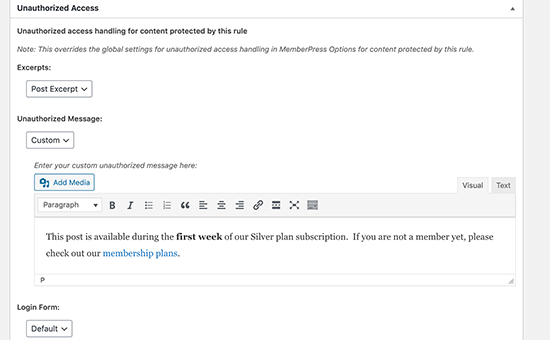
Once you are done, don’t forget to click on the Save Rule button to apply these settings.
You can add new rules by visiting MemberPress » Rules page again and repeat the process.
For instance, you may want to set up a rule for the content you want to show to the users during their second week of subscription.
How Drip Content Looks to The Users on Your Site
MemberPress will show the default unauthorized access message to all users, if you don’t set a custom message for each rule.
This is why we recommend setting your own custom message for unauthorized access when setting up your drip content rules.
This is how it looked on our demo site which showed an article excerpt, custom message, and login form.
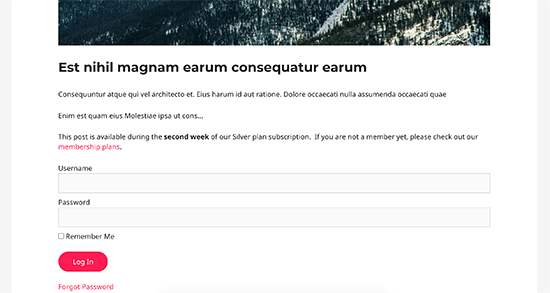
Note: You can selectively hide these content from being visible entirely using MemberPress filters, so users won’t see this content until it becomes available.
Tips on Managing Drip Content in WordPress
Drip content is a powerful tool to grow your membership website and online community. However, it could easily get messy and may create bad user experience.
The following are a few tips that will help you use drip content more effectively on your site.
1. Plan a Smooth Content Strategy
Plan the content you’ll be releasing way ahead. You don’t want to give away all the content, but it should be enough to satisfy your customers.
You can prepare your content and set it up before launching your campaign. However, make sure your site is under maintenance mode so that your paid content does not get cached by search engines.
2. Create an Email List
Integrate your drip content strategy with your email marketing. This allows you to set up a drip-email campaign that automatically sends users email notifications when new content is available.

We recommend using Constant Contact. It is the best email marketing service for small businesses and comes with easy automation tools that help you set up automated campaigns for new subscribers.
For more powerful marketing automation tools, you can look at Drip or ConvertKit (although they’re more expensive than Constant Contact).
3. Promote Products with On-Site Retargeting
Many membership websites rely on members upgrading their membership plans, buying other products, or renewing their subscriptions.
This is where you’ll need OptinMonster. It is the best conversion optimization tool and helps you convert existing users with on-site retargeting.
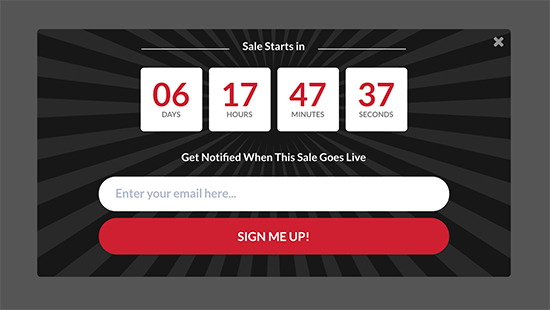
You can show users targetted messages with lightbox popups, countdown timers, slide-in boxes, and more.
4. Learn from User Behavior
As your memberships grow, you would want to know what’s encouraging users to sign up for your membership plan and what’s stopping them.
You can easily track that with MonsterInsights. It is the best Google Analytics plugin for WordPress and helps you see where your users are coming from and how they use your site.

With this data, you can make informed decisions and adjust your marketing strategy to grow your business. See our guide on conversion tracking in WordPress for detailed instructions.
We hope this article helped you learn how to add automatically drip content in WordPress. You may also want to see our ultimate WordPress security guide to keep your membership site secure, and our comparison of the best WordPress page builders to customize your site design.
If you liked this article, then please subscribe to our YouTube Channel for WordPress video tutorials. You can also find us on Twitter and Facebook.
The post How to Add Automatically Drip Content in Your WordPress Site appeared first on WPBeginner.
Post a Comment