If you’re looking for a reliable way to back up your WordPress site to OneDrive, then you’re in luck. We know a lot of our readers are Microsoft Windows users, so we’ve done the research and found 2 easy ways to back up WordPress to the Windows cloud storage solution.
From Google Drive and Dropbox to OneDrive, we’ve tried plenty of cloud storage options. In our opinion, OneDrive offers some unique benefits that make it stand out. Its starting price can be a lot more cost-effective than Google Drive, and the access controls are more advanced.
In this article, we’ll show you how to set up a WordPress backup to OneDrive (free option included) to keep your site safe.

Why Use Microsoft OneDrive to Backup WordPress?
Backing up your WordPress site to Microsoft OneDrive is a smart choice, especially if you’re already using Microsoft products.
It puts your WordPress backup files in the same place as your other important files. That way, you can manage your website backup without switching between different storage services.
What’s more, OneDrive offers some unique benefits compared to other cloud storage options.
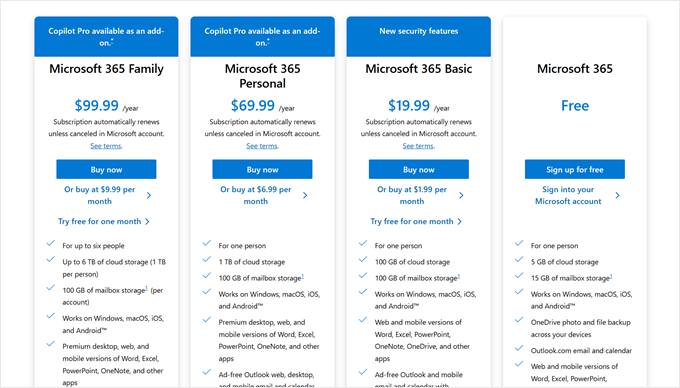
First of all, it’s more cost-effective. OneDrive’s starter plan costs $19.99 per year, which is a better deal than Google Drive’s $1.99 per month plan. Over time, this difference can add up, saving you money on your backup storage.
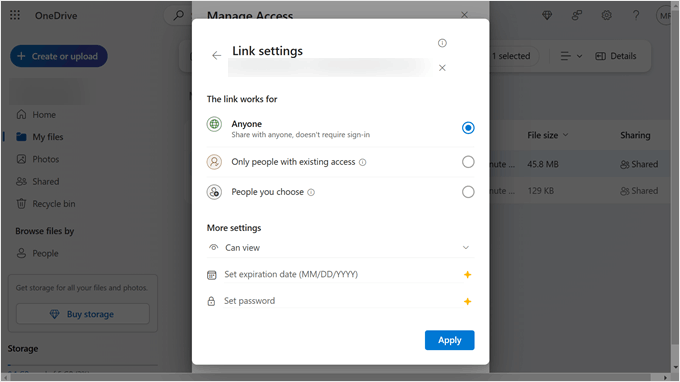
OneDrive is also pretty impressive when it comes to permissions and secure access. In addition to sharing files, you can set expiration dates for access or even add password protection. These features ensure your WordPress backup remains secure and accessible only to those you trust.
When it comes to WordPress backup plugins for OneDrive, you have several options. Thankfully, we’ve done the research to help you choose the best ones for your needs.
In this guide, we’ll explore both free and paid WordPress backup solutions for OneDrive. That way, you can choose what works best for you.
So, let’s dive into the tutorial. Feel free to use the links below to navigate to the section you need:
Method 1: Use Duplicator to Backup WordPress to OneDrive (More Customizable)
Of the two methods, we recommend following this one the most. It uses Duplicator, which is a backup plugin we’ve personally used for our partner websites and personal projects.
The reason why we recommend Duplicator is it comes with advanced features to manage your WordPress backups. These include automatic backup scheduling, website migration, and cloud storage integrations like Dropbox.
You can learn more about the plugin in our full Duplicator review.
The downside with this method is you need Duplicator Pro to back up your WordPress site to OneDrive. However, you can check out the free version if you want to get familiar with how Duplicator works before upgrading.
Let’s walk through the steps to set up Duplicator for OneDrive backups.
Step 1: Install and Activate Duplicator
First things first, you need to install Duplicator on your WordPress website. If you’re not familiar with this process, you can read our beginner’s guide on how to install a WordPress plugin for more information.
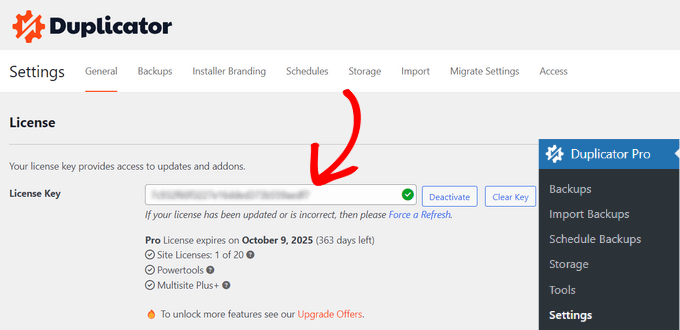
Next, you need to activate your Duplicator Pro’s license key. To do this, go to Duplicator Pro » Settings in your WordPress admin dashboard. Then, enter your license key in the appropriate field and click on the ‘Activate’ button.
Step 2: Add OneDrive as a Remote Storage
The next step is to connect your WordPress website with OneDrive via Duplicator.
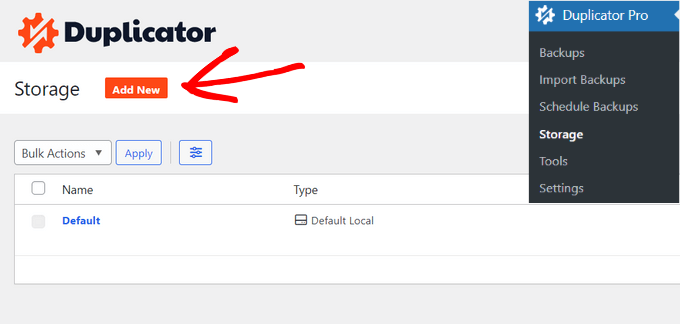
To do this, head to Duplicator Pro » Storage in your WordPress admin and click on the ‘Add New’ button.
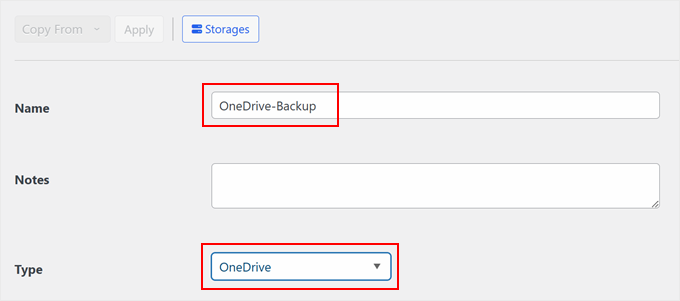
Now, give your new OneDrive backup a name. It can be something simple like ‘OneDrive-Backup.’
In the ‘Type’ dropdown menu, select ‘OneDrive.’
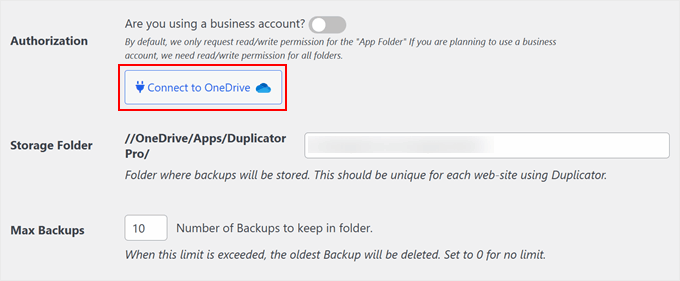
After that, scroll down the page until you find the ‘Authorization’ section.
Here, click on the ‘Connect to OneDrive’ option. You can also enable the ‘Are you using a business account?’ setting, but we’re going to leave it disabled.
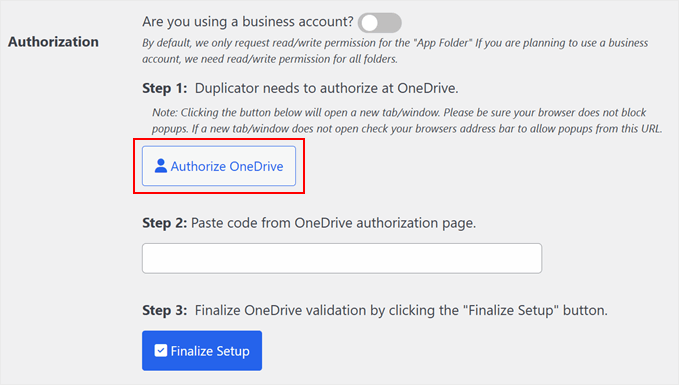
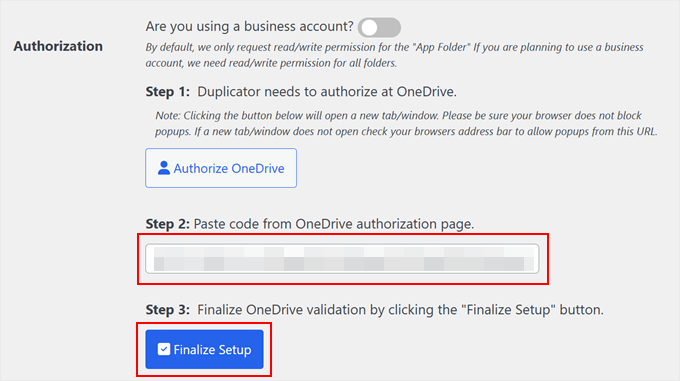
Next, you will see a button to authorize the OneDrive connection and a field to paste some code from the next step.
Go ahead and click on the ‘Authorize OneDrive’ button.
Your browser will now open a new tab, directing you to the OneDrive website. Here, make sure to log in to your account first.
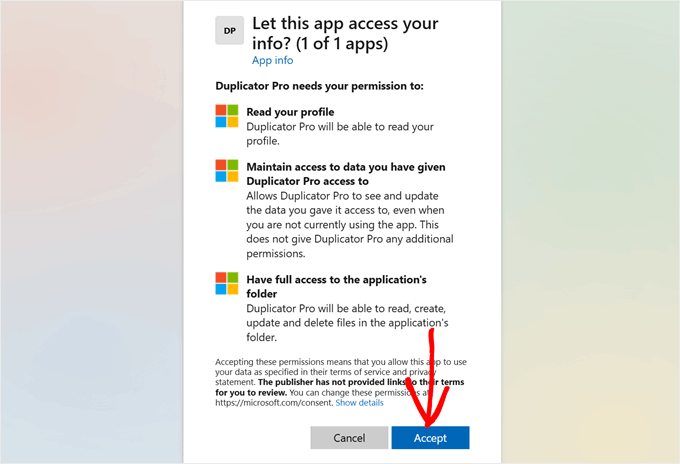
Then, you will see a message asking for your permission to connect Duplicator with OneDrive. Simply click ‘Accept.’
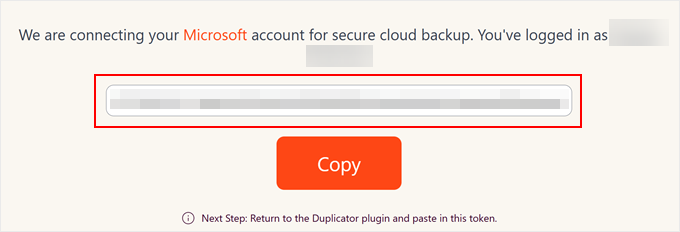
You should now see a page with some code you need to copy to the Duplicator plugin page.
Go ahead and click on the ‘Copy’ button.
Once you’ve done that, just go back to the Duplicator-OneDrive settings page in your WordPress dashboard from earlier.
Paste the code in the appropriate field, and click ‘Finalize Setup.’
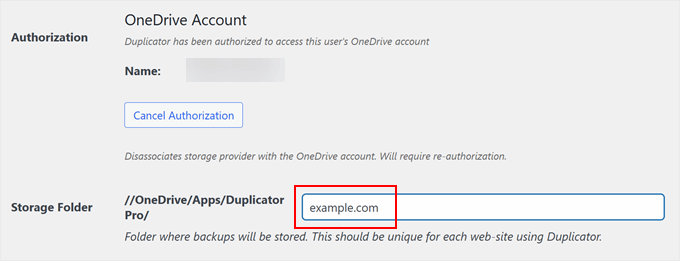
Once the connection is successful, you will see your account name in the ‘Authorization’ section.
Next, you can give the Duplicator storage folder a new name. By default, the plugin will use your website’s domain name to make it easier to identify it.
Now, scroll down a bit and specify the number of backups Duplicator should keep in the storage folder. If the limit is reached, the oldest backup will be deleted. Otherwise, you can set the number to ‘0’ if you don’t want to set any limit.
After that, just click ‘Save Provider.’
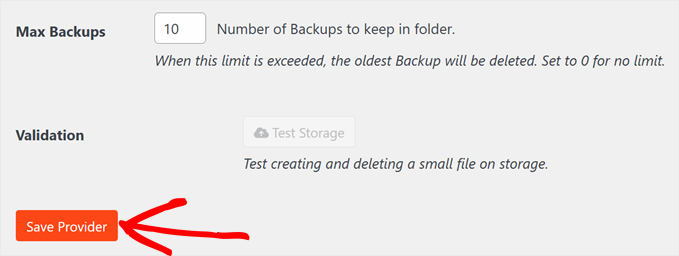
Once you have saved the new cloud storage provider, the ‘Test Storage’ button will be activated.
To make sure everything works fine, you can click on that button.

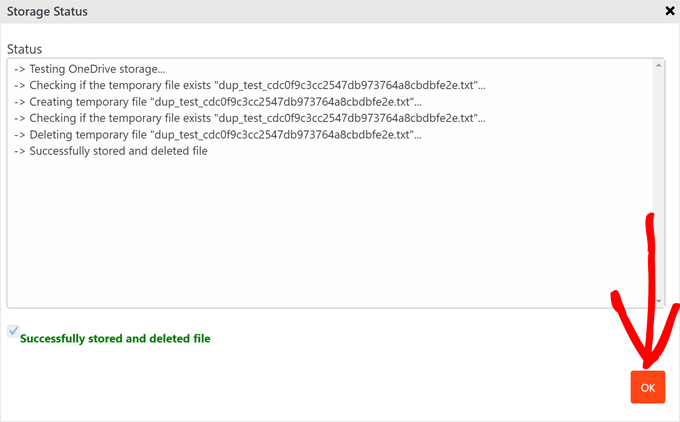
If the test backup works, a popup will appear saying that the plugin has successfully stored and deleted the file.
You can close this popup by clicking ‘OK.’
Step 3: Store Backups to OneDrive
Now, let’s try backing up your WordPress site to OneDrive.
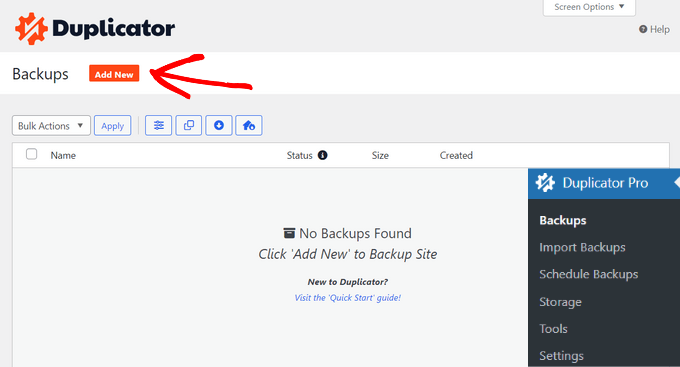
You can do this by heading to Duplicator Pro » Backups. Here, click ‘Add New’ to start the backup process.
Next, you need to choose a backup name format so that you can easily identify the backup based on important information like date and time.
Duplicator offers several dynamic tags for this so that you don’t need to manually rename each backup. You can use tags like %year%, %day%, and even %hour% if you do multiple backups in a single day.
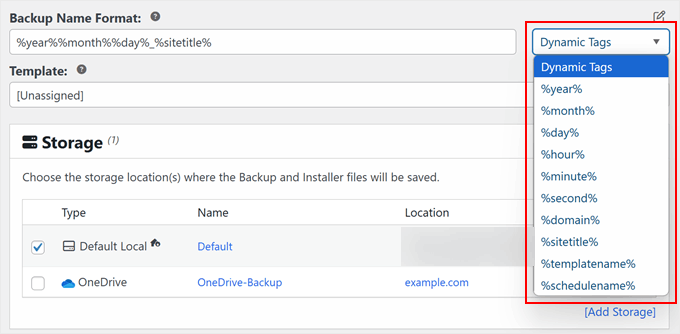
At this stage, you can scroll down to the ‘Storage’ tab.
Here, check the box next to ‘OneDrive’ to ensure your backup is stored in your Microsoft OneDrive cloud storage.

Next, move down to the ‘Backup’ section. This is where you can choose to create complete WordPress backups, database-only, media-only, or custom backups.
For this example, we’ll go with ‘Full Site’ to back up your entire WordPress website.
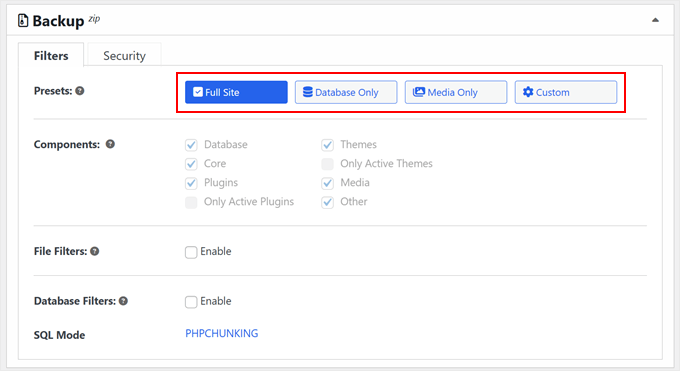
You can also navigate to the ‘Security’ tab in this section.
Here, you can choose to add a password to your backup installer file or your archive zip file so that your backups remain secure from unauthorized users.

Moving down, you’ll find the Installer section, but you can leave the default settings as they are.
Then, click ‘Next.’
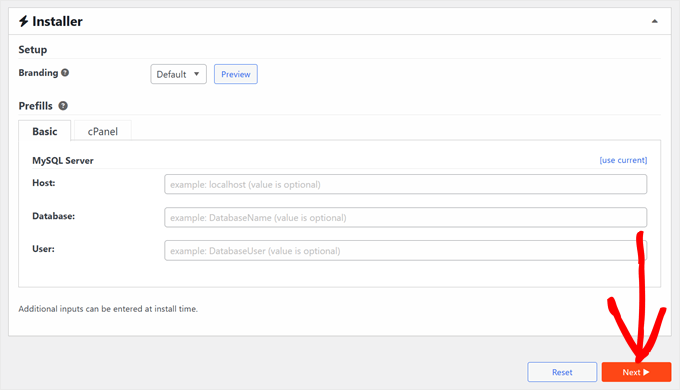
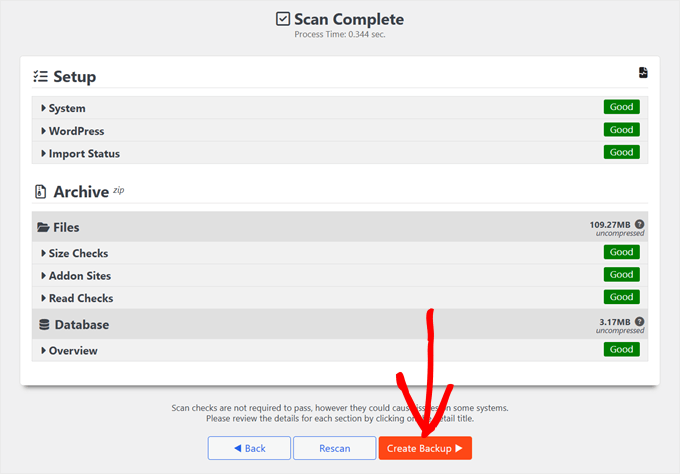
Duplicator will now scan your website to see if there are any problems before backing the files up.
If things aren’t looking good, you will see a label that says ‘Notice’, showing you what the problem is and how to fix it. Otherwise, it will just say ‘Good’ and you can continue.
Just click the ‘Create Backup’ button to start the process.
Once done, you will go back to your Duplicator dashboard.
This is where you can see the newly created OneDrive backup and even use it to restore your WordPress site if needed.

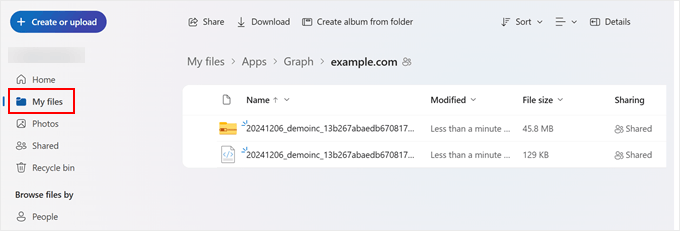
To confirm if the backup works, you can go to your OneDrive storage. Then, go to ‘My Files’ and navigate to the folder path where you set up your backups.
You should now see your WordPress backup files stored safely in OneDrive.
By following these steps, you’ve successfully set up a backup of your WordPress site to OneDrive using Duplicator. This method provides a secure and customizable way to store backups of your WordPress website in the cloud.
Method 2: Use WPvivid to Backup WordPress to OneDrive (Free)
We’ve tried several WordPress backup solutions besides Duplicator, like Jetpack, CodeGuard, and UpdraftPlus. Unfortunately, none of them offer a free WordPress-OneDrive backup solution.
However, after a bit of research, we found WPvivid, which is a free plugin that works well.
The good thing about this plugin is that the OneDrive storage option is free by default, so you can back up your WordPress site to OneDrive at no cost.
However, with the free version, the features are pretty limited. You can’t use multiple cloud storage options or create custom backups. Still, it can be a good option if you are on a tight budget.
To get started, you’ll first need to install this WordPress plugin in your admin area. If you’re not sure how to do this, you can read our beginner’s guide on how to install a WordPress plugin.
After the plugin is installed, go to WPvivid Backup » Backup & Restore and navigate to the ‘Remote Storage’ tab.
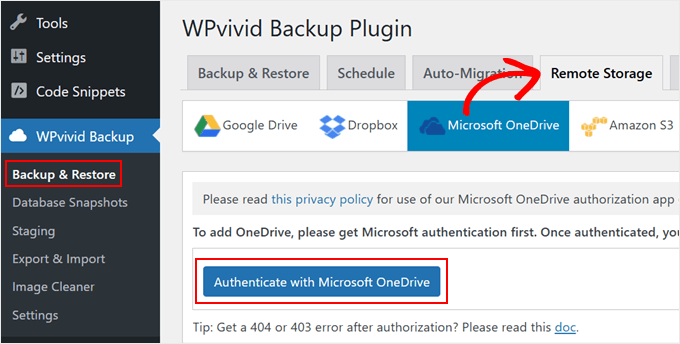
Here, select ‘Microsoft OneDrive’ and click on the ‘Authenticate with Microsoft OneDrive’ button.
You will now be redirected to the OneDrive website, where you’ll allow WPvivid to access your OneDrive storage.
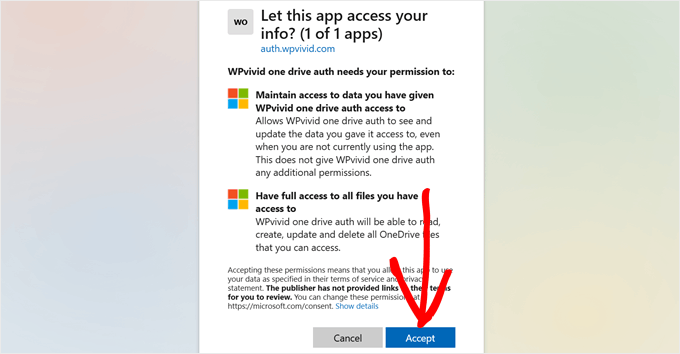
Simply click ‘Accept’ to continue.
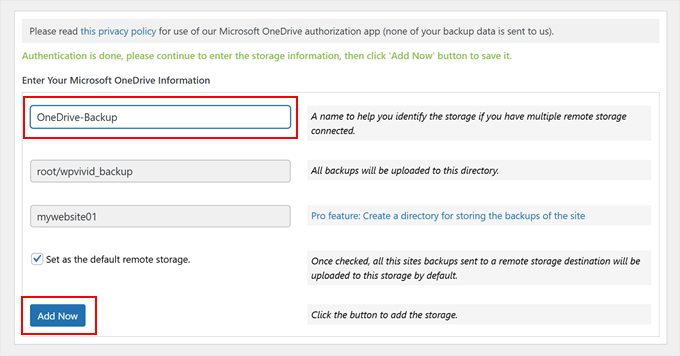
After that, go back to the WPvivid plugin page and give your new OneDrive storage a name. If you want to use OneDrive for all your future backups, you can also check the box next to the ‘Set as the default remote storage’ option.
Then, click ‘Add Now.’
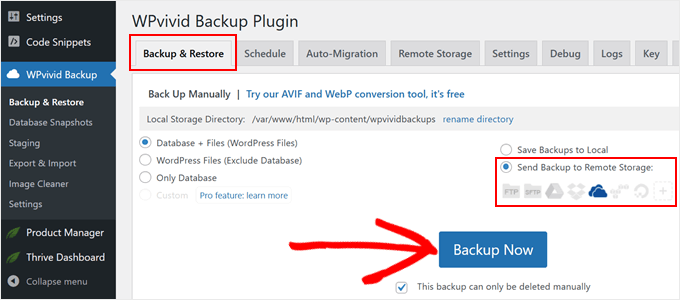
Now, switch to the ‘Backup & Restore’ tab to try backing up your WordPress site. Here, you can choose whether to back up the database and files, WordPress files only, or database only.
You also need to select the box next to the ‘Send Backup to Remote Storage’ option and choose the OneDrive logo.
Below the ‘Backup Now’ button, you can check the box next to the ‘This backup can only be deleted manually’ option. Remember, this is up to you.
You can enable this if you don’t want this backup to be automatically deleted whenever there is a new backup in the OneDrive folder.
Then, click ‘Backup Now.’
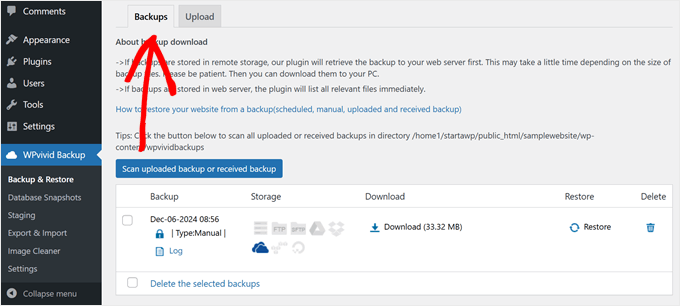
Once the backup is done, scroll down to the ‘Backups’ section.
You should see your new backup file listed there.
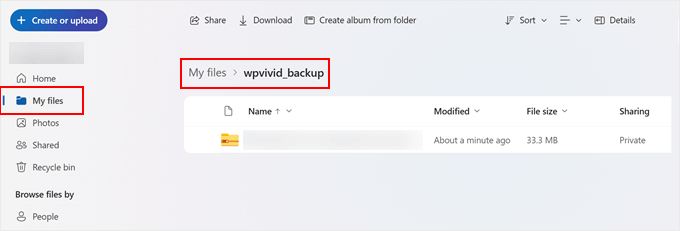
You can also go to your OneDrive dashboard to confirm if the backup was successful.
Just go to ‘My Files’ and navigate to the wpvivid_backup folder. You should then see your backup file stored safely in your Microsoft OneDrive cloud storage.
Bonus Tip: Use a WordPress Maintenance Service
Keeping your WordPress site running smoothly involves more than just backups. You also need to update your website regularly, make sure your pages load fast, check for security vulnerabilities, and so much more.
This can be overwhelming, especially if you’re already super busy running your own business.
That’s why lots of WordPress website owners turn to all-in-one solutions like WPBeginner Pro Services. We offer comprehensive WordPress maintenance services to take the technical burden off your shoulders.

Our services include routine cloud backups, malware removal, continuous uptime monitoring, and more. You’ll also receive detailed maintenance reports and have access to on-demand emergency support for unexpected issues.
Want to free up your time and ensure your WordPress site stays in top shape? Book an appointment with our experts today. Let us handle the technical details while you focus on growing your business.
We hope this article has helped you learn how to back up WordPress to OneDrive. You may also want to check out our guide on how to back up WordPress to Google Drive and our expert picks of the best Dropbox plugins for WordPress.
If you liked this article, then please subscribe to our YouTube Channel for WordPress video tutorials. You can also find us on Twitter and Facebook.
The post How to Backup WordPress to OneDrive (Free + Paid Options) first appeared on WPBeginner.
Post a Comment