Over the years, we’ve managed several WordPress multisite networks. Along the way, we’ve learned that having the right people with the correct permissions to manage all those websites can make a huge difference. This is where the Super Admin user role can be super helpful.
However, adding a user with the Super Admin user role in WordPress multisite is slightly different from adding a new user to a single site.
This process can be a bit confusing for beginners. They may be unable to locate the option to add a super admin user.
We have also seen some people forget the login details of Super Admin users, locking them out of their WordPress multisite admin area.
In this article, we will show you how to add a Super Admin user role in WordPress multisite. We will show you two easy methods, with additional tips on securing your WordPress multisite properly.

Here is a list of topics we will cover in this guide:
What Is a Super Admin User Role in WordPress?
WordPress comes with a built-in set of user roles. They have different permissions to do specific things on a WordPress site. For details, see our beginner’s guide on WordPress user roles and privileges.
A ‘Super Admin’ is a special user role in WordPress only available on websites that have the WordPress multisite feature turned on.
The multisite feature allows you to create multiple websites on a single WordPress installation. Each website can have its own ‘Administrator(s)’ to manage a specific website.
However, a user with the Super Admin user role can manage all websites on that WordPress multisite network. They can install plugins and themes and manage settings that affect all the sites.
Regular Administrators can only manage one site at a time. Super Admins, on the other hand, can make changes that impact every site in the network.
Be cautious when assigning the Super Admin role. Since Super Admins have access to everything, you should only give this role to people you fully trust. One wrong change can affect every site in the network.
Method 1: Adding a New Super Admin User in WordPress Multisite
This method is easy, and if you are already logged in to your WordPress multisite as a Super Admin, then you can use it to add new users with Super Admin user roles.
Simply log in to the WordPress admin area and take the mouse over to the ‘My Sites’ menu at the top left corner of the screen.
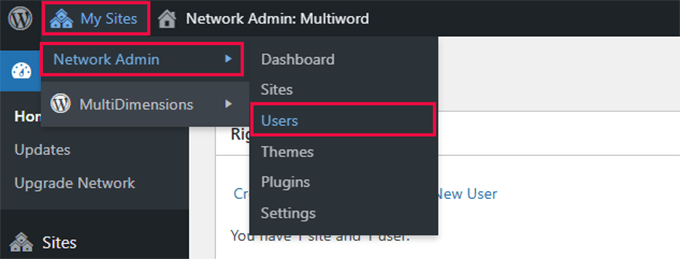
From there, navigate to the Network Admin » Users page.
Here, you can manage all the users on your site. Go ahead and click on the ‘Add New User’ button at the top.
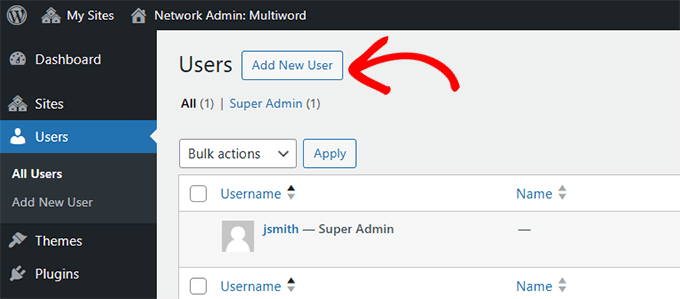
This will bring you to the Add New User page.
Experienced WordPress users will notice that this page looks different from what you would see on a single site. Here, you can only add a username and email address, and there is no option to select a user role.
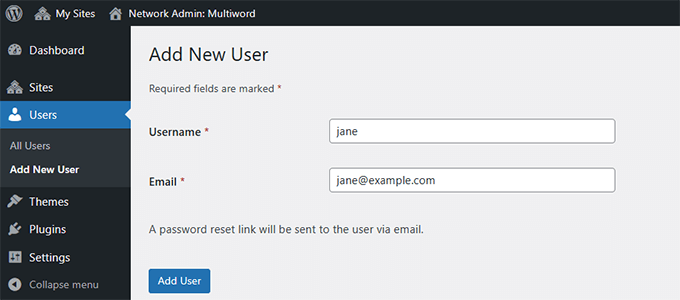
For now, you just need to add the username and email address of the user you want to add and click the ‘Add User’ button.
WordPress will now save the information and automatically send an email to the user to set their password.
Next, you need to assign this user ‘Super Admin’ privileges.
To do that, head over to the Users » All Users page and locate the user you just added.
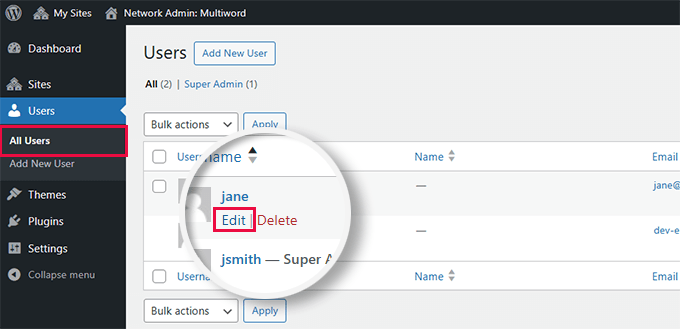
Take the mouse over to the username and then click the ‘Edit’ link.
This will open the ‘Edit User’ page.
Here, you need to scroll down to the ‘Super Admin’ section and check the box next to the ‘Grant this user super admin privileges for the Network’ option.
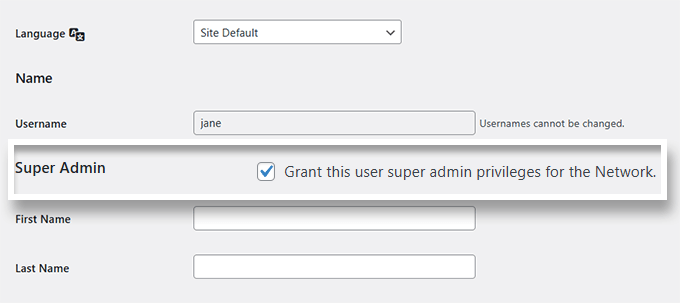
After that, you need to scroll down to the bottom of the page.
Ensure you click the ‘Update User’ button to save your changes.

WordPress will now save the changes you made to the user account and grant them the Super Admin permissions.
You will see a success message that the user has Super Admin privileges.
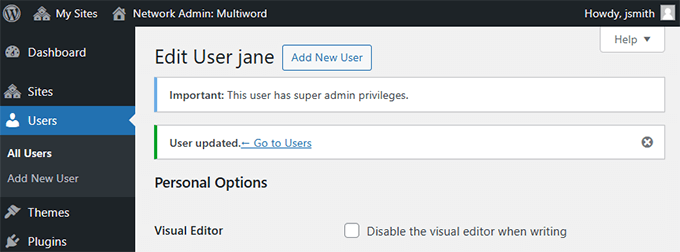
That’s all. You have successfully added a new user with the Super Admin user role in WordPress.
Method 2: Adding a Super Admin User in WordPress Manually
This method is recommended for users locked out of the WordPress admin area who cannot add Super Admin users using the dashboard.
First, you need to connect to your website using an FTP client or the File Manager app in your hosting control panel.
Once connected, navigate to the /wp-content/themes/ folder and open the folder for the theme you are using on your root site.
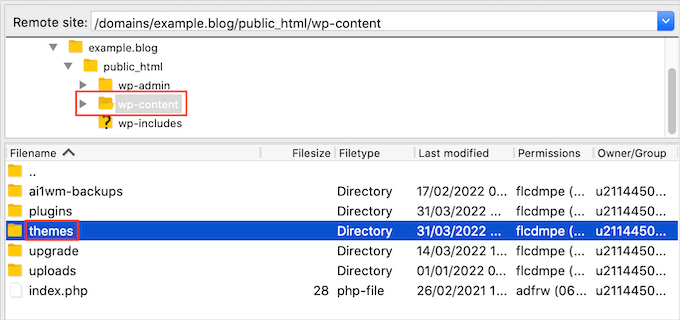
Here, you will see several files and templates used by your WordPress theme.
You need to locate the functions.php file and download it to your computer.
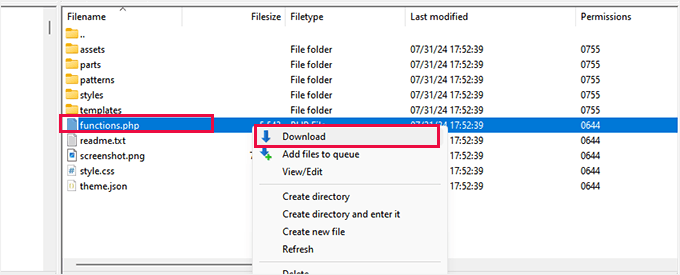
You can now open this file using a plain text editor app like Notepad or TextEdit.
After that, add the following code at the bottom of your functions.php file:
function wpb_create_super_admin() {
    $username = 'newuser';  // Replace with the desired username
    $password = 'password123';  // Replace with the desired password
    $email = 'newuser@example.com';  // Replace with the user's email

    if ( !username_exists( $username ) && !email_exists( $email ) ) {
        $user_id = wp_create_user( $username, $password, $email );

        if ( !is_wp_error( $user_id ) ) {
            // Assign the Super Admin role to the new user
            grant_super_admin( $user_id );
        }
    }
}
add_action( 'init', 'wpb_create_super_admin' );
Ensure you fill in the values for $username, $password, and $email with the values you want to use for the new Super Admin user account.
Finally, don’t forget to save your changes and upload the file back to your website.
You can now log in to your root site’s WordPress admin area using the details you added to your functions file.
Important ⚠️: Don’t forget to delete the code you added to the functions file after successfully logging in to your Super Admin account.
Securing Super Admin Accounts in WordPress Multisite
We have seen many beginners losing access to the Super Admin accounts of their WordPress multisites.
Some people simply forget the login credentials, and others are attacked by hackers who get access to their multisite, causing severe financial and reputational damage.
We recommend all users follow our complete WordPress security guide to protect their websites.
Here are some tips that you can implement right away.
1. Set Up Automated WordPress Backups
Make sure that you are using a WordPress backup plugin to automatically create and store backups for your WordPress site to a remote location.
We recommend Duplicator. It is easy to use and set up, creates secure backups, and safely stores them on the cloud. More importantly, it also makes it easy to restore your website with one click from a backup.
We use Duplicator on our own websites. For more details, see our complete Duplicator review.
Note: A free version of Duplicator is also available with limited features. We recommend upgrading to a paid plan to unlock all features, including multisite support.
For details, see our tutorial on how to back up your WordPress website.
2. Set Up Two-Factor Authentication
We use two-factor authentication for all user accounts. It adds an extra layer of security to your WordPress website, making it harder for someone to gain access to your Super Admin accounts.
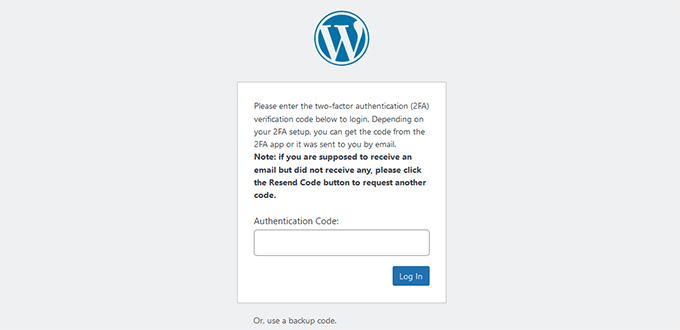
We have put together a complete step-by-step tutorial on setting up two-factor authentication in WordPress for beginners. Following it will only take a few minutes but will make your multisite accounts more secure.
3. Ensure WordPress Emails Are Working
We often hear from users who are unable to receive a password reset email from their WordPress websites. Their WordPress website is not set up to ensure email deliverability.
By default, WordPress sends emails using the PHP mail() function. This function can be abused to send spam, so email service providers like Gmail and Outlook consider these emails suspicious and block them.
To fix this, you need to use an SMTP service like WP Mail SMTP. It allows you to use proper SMTP protocol to send WordPress emails, ensuring all your emails are securely delivered.
Note: A free version of WP Mail SMTP is also available.
We use WP Mail SMTP on all our websites to ensure all users can get their password reset and other important emails. See our WP Mail SMTP review to learn more.
Do you need help setting it up? We have a guide that shows how to set up WP Mail SMTP in WordPress.
Bonus WordPress Multisite Resources
The following are some additional guides to help you efficiently manage your WordPress multisite network as a Super Admin:
- Best WordPress Multisite Plugins You Should Use (Expert Pick)
- How to Create a WordPress Multisite with Different Domains (4 Steps)
- How to Move a Site from WordPress Multisite to Single Install
- Should You Network Activate All Plugins on WordPress Multisite
- How to Add / Remove Default Pages in WordPress Multisite
Maintainance Service: Maintaining a WordPress multisite network can be a lot of work. If you’d rather offload the work to the professionals, then you can check out our WordPress Maintenance service. For a small fee, our team of WordPress engineers will manage WordPress updates, security, and monitoring for you 24/7.
We hope this article helped you learn how to add a Super Admin user role in WordPress multisite. You may also want to see our article on tips on customizing the WordPress admin dashboard or look at our pick of the best plugins to Improve the WordPress admin area.
If you liked this article, then please subscribe to our YouTube Channel for WordPress video tutorials. You can also find us on Twitter and Facebook.
The post How to Add a Super Admin User Role in WordPress Multisite first appeared on WPBeginner.
Post a Comment