
Do you want to connect your WordPress forms to Google Sheets?
Google Sheets makes it easy for you manage your form data inside a spreadsheet, and they have built-in collaboration tools to improve workflows.
In this article, we’ll show you how to easily connect any WordPress forms to Google Sheets, so you can automatically send WordPress form data to Google sheets.

Why Connect WordPress Forms to Google Sheets?
Google Sheets is a popular free spreadsheet software from Google. Connecting your WordPress forms to Google Sheets makes it easier to manage and sort your form data.
No matter if you’re creating a questionnaire, gathering testimonials, building a survey form, or something else, you can connect your WordPress forms to Google Sheets with just a few clicks.
Integrating your form entries with Google Sheets can help your WordPress website in a lot of ways.
- Makes it easy to give your team access to form data without creating a new WordPress login
- Makes it easier to interpret and analyze your form / survey data
- Set up automatic data collection and reduce errors from manual data entry
With that said, let’s take a look at how you can connect any WordPress forms to Google Sheets, the easy way.
Step 1. Create a WordPress Form Using WPForms
First thing, you need is to have an active contact form on your WordPress site which will act as the data collection source.
For the sake of this tutorial, we’ll be using the WPForms plugin. It’s the best contact form plugin for WordPress used by over 4 million websites.
Their beginner friendly form builder can be used to create nearly any kind of WordPress form. You can start with one of their 150+ form templates or simply use the drag and drop builder to add form fields and customize them to your liking.
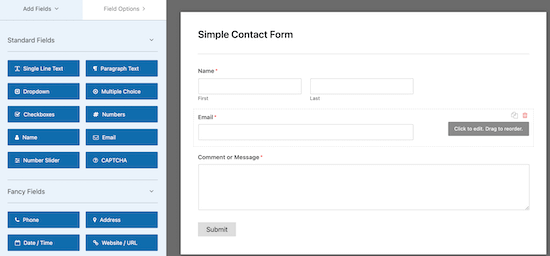
For more details, see our step by step guide on how to create a contact form in WordPress.
If you haven’t created a Google Sheets spreadsheet, then you’ll need to do that now.
Head over to the Google Sheets website and click ‘Blank’ to add a new spreadsheet.

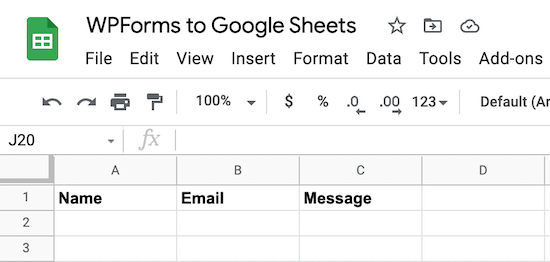
Then, when you’re adding spreadsheet columns, you want these to match your WordPress form fields.
In this case, we’ll have three columns for the ‘Name’, ‘Email’, and ‘Message’.
Step 2. Install and Activate the Uncanny Automator WordPress Plugin
To connect your WordPress forms to Google Sheets, we’re going to be using an automation plugin.
The best WordPress automation plugin is Uncanny Automator. It acts as a connecter between WordPress plugins and other third-party apps, so they can easily talk to each other.
It’s the most powerful way to automate your WordPress blog processes without any code.
The best part about Uncanny Automator is that it doesn’t charge you a tax on each data transfer like other SaaS providers such as Zapier.
Uncanny Automator also works with all major form solutions including, WPForms, Formidable Forms, Gravity Forms, Ninja Forms, WooCommerce, and more.
However, the focus of this tutorial will be on the integration with WPForms.
Note: there is a free version of the plugin available, but we’ll use the Pro version for this tutorial since it has the Google Sheets integration we need.

For more details, see our guide on how to create automated workflows in WordPress with Uncanny Automator.
Step 3. Connect Your Google Account to Uncanny Automator
After Uncanny Automator is activated and set up, you need to connect the plugin to your Google account.
To do this, navigate to Automator » Settings and then click the ‘Google’ menu item.
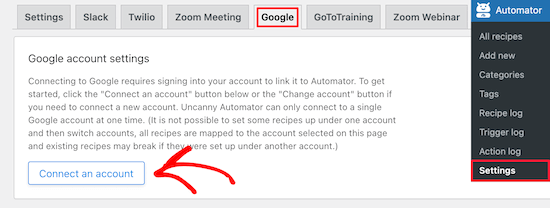
After that, click the ‘Connect an account’ button.
This will bring you to a screen where you need to authorize your Google account.
Simply select the Google account you want to use and then click the ‘Allow’ button.

Then, you’ll need to click ‘Allow’ one more time to confirm your choices.
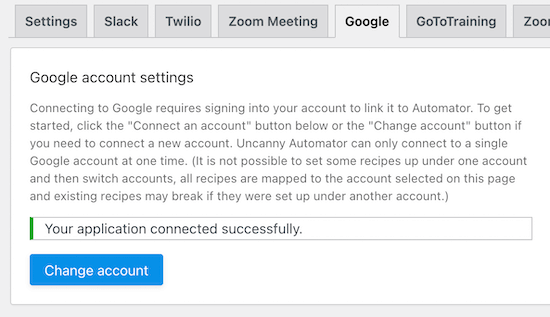
Once your account is successfully connected, you’ll be taken back to the plugin settings screen in your WordPress dashboard.
Step 4. Connect Your WordPress Form to Google Sheets with Uncanny Automator
Now, it’s time to connect your WordPress form to the Google Sheet you created earlier.
Uncanny Automator uses what are called “recipes” to connect different apps and plugins.
To create one, go to Automator » Add new, click the ‘Anonymous’ option and then click ‘Confirm’.
You want to choose Anonymous because most of the time it will be new anonymous visitors filling out the forms on your website.
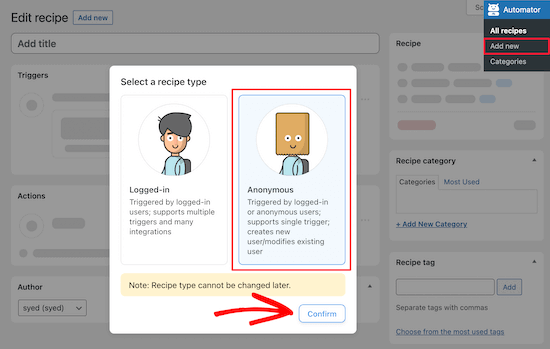
Next, you can give your recipe a name.
After that, select ‘WPForms’ in the ‘Anonymous trigger’ meta box.
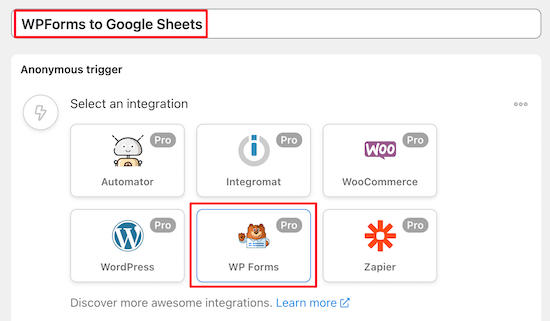
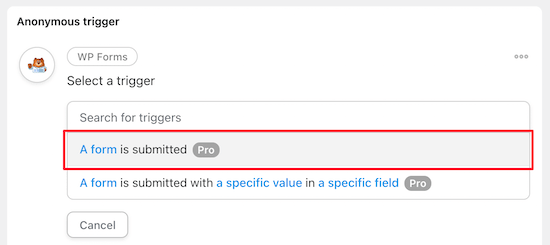
Then, you’ll have two different options to choose from.
We’ll select the ‘A form is submitted’ option since this will send all form submissions to Google Sheets.
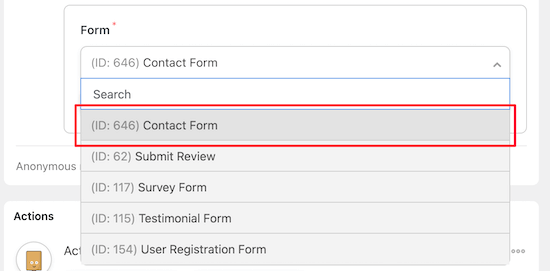
Then, select your form from the drop down list.
After that, click the ‘Save’ button.
Since you chose an Anonymous recipe above, you need to create a new ‘Subscriber’ user in WordPress. This new Subscriber role will be used to send the form data through.
For more details, see our guide on how to add new users and authors to your WordPress blog.
Then, choose the ‘Existing user’ option in the ‘Actions’ meta box.

This will bring up a popup where you can choose the new user account.
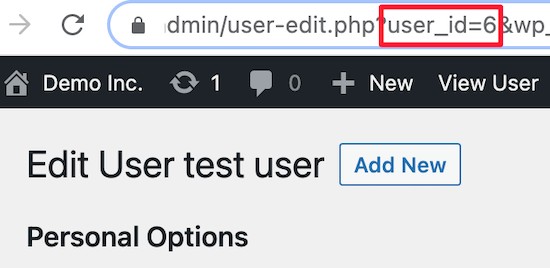
Select the ‘ID’ field and enter the ID number from the new user you created.

To find this go to Users » All Users in your WordPress dashboard.
Then, open up the new user and locate the ID in the URL for the page.
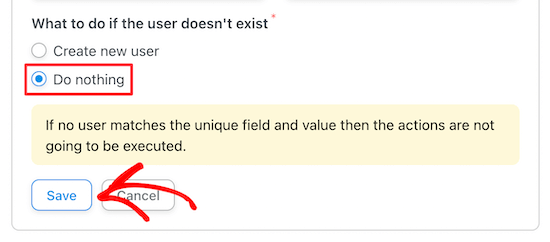
Once you’ve done that, select ‘Do nothing’.
Make sure to click ‘Save’ to save the recipe so far.
After that, click the ‘Add action’ button.
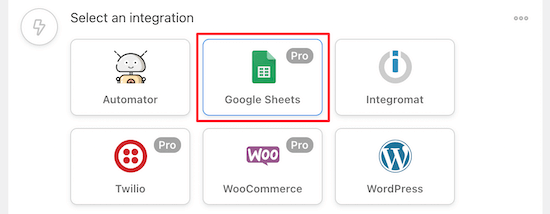
Next, you need to select ‘Google Sheets’ from the list of integrations.
Then, choose the ‘Create a row in a Google Sheet’ option under the ‘Select an action’ section.

This will bring up a menu to select the spreadsheet that you created earlier.
You can search for the name of your spreadsheet, and it will bring up a list of options.

After you’ve selected the spreadsheet, click the ‘Get columns’ button in the ‘Row’ section.
This will bring up a list of columns from the spreadsheet.
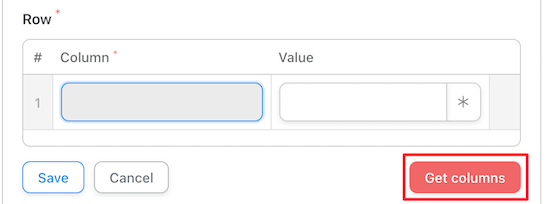
You’ll want to map the form fields to your spreadsheet columns.
Next to each form column, find the matching spreadsheet field. The ‘Column’ name should be the same as the ‘Value’ name.
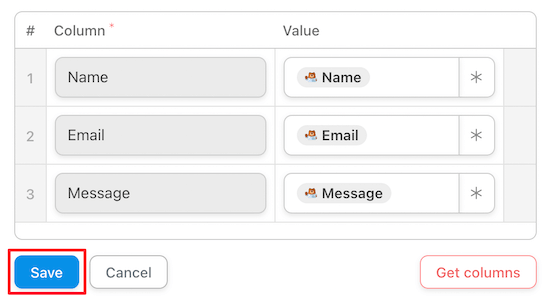
Once you’ve matched up all the fields, it will look similar to the settings above.
Make sure you click ‘Save’ once you’re done creating the recipe.
After that, you need to publish your new recipe. This will make sure that form entries will automatically be sent to your Google Sheets spreadsheet.
To publish the recipe, all you have to do is switch the recipe toggle to ‘Live’.

Now, whenever a visitor fills out your form, the information will instantly appear in Google Sheets.
There are many other no-code integrations and automations that you can create with this plugin like integrating Slack with WordPress, and even setting up SMS notifications in WooCommerce.
We hoped this article helped you connect any WordPress forms to Google Sheets the easy way. You may also want to see our expert picks of the best no-code drag and drop WordPress page builders, and our list of the must have WordPress plugins for businesses.
If you liked this article, then please subscribe to our YouTube Channel for WordPress video tutorials. You can also find us on Twitter and Facebook.
The post How to Connect Any WordPress Forms to Google Sheets (Easy Way) appeared first on WPBeginner.
Post a Comment