Do you want to increase ad impressions in WordPress with ad refresh?
Ad refresh lets you rotate ads in the same location as visitors browse your website. This simple change can increase your total ad impressions and overall ad revenue.
In this article, we’ll show you how to increase your ad impressions in WordPress by using ad refresh in your ad spots.

Why Use Ad Refresh to Increase Ad Impressions in WordPress?
Ad refresh lets you display multiple ads in the same location, which can get your ads more impressions and clicks. This also lets you show new ads to your visitors without reloading the page.
Traditional display advertising will show a single ad in a single location. If you’ve found that one spot has better ad performance, then you can earn more revenue by showing multiple ads in that location.
Ad refresh can be a useful part of your advertising strategy beyond increasing ad impressions.
- You can test different ads in the same location to see which performs better
- You can reduce ad blindness by showing new unique advertisements
However, there are a few important things to mention before adding the ad refresh feature to your WordPress website.
- When you enable ad refresh, the total number of visible ads on your site may be limited by ad networks
- Counting impressions for rotating ads can potentially slow down your website speeds
- This type of ad can go against Google AdSense guidelines, so you need to be careful or use other advertising networks
That being said, we’re going to share two different WordPress ad plugins that can help you add the ad refresh feature to WordPress. Simply use the quick links below to choose the WordPress plugin you want to use.
- Set up Ad Refresh in WordPress with Advanced Ads
- Set up Ad Refresh in WordPress with Ad Refresh Control
Method 1: Increase Ad Impressions with Ad Refresh Using Advanced Ads
We recommend using the Advanced Ads plugin to add ad refresh to WordPress. It’s very easy to use and lets you simply set up ad refresh for specific ad locations.
Note: there is a free version of the plugin available, but we’re going to use the premium version since it has the ad refresh features we need.
First thing you need to do is install and activate the Advanced Ads plugin. For more details, see our step by step guide on how to install a WordPress plugin.
Upon activation, you’ll have a new menu item called ‘Advanced Ads’ in your WordPress admin menu.
You need to enter the license key for the pro version of the plugin. To do this, navigate to Advanced Ads » Settings and then click the ‘Licenses’ menu option.
Once you’ve done that, enter your license key into the ‘Pro’ box and click ‘Update License’.

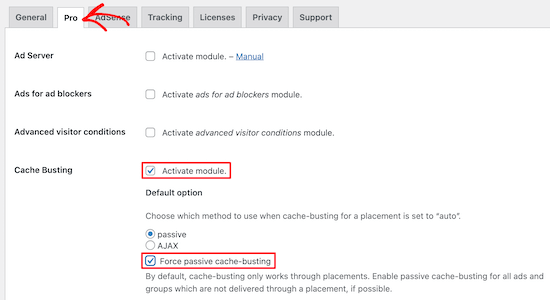
Next, click the ‘Pro’ menu option. On this screen, you need to enable the ‘Cache Busting’ option. This will turn on the refresh rate for your ad groups.
All you have to do is click the ‘Activate module’ checkbox next to ‘Cache Busting’. You also need to check the ‘Force passive cache-busting’ checkbox as well.
Once you’ve made these changes make sure you save your settings.
Following that, you need to create an ad group that will rotate your ads.
Navigate to Advanced Ads » Groups & Rotation and then click the ‘Add New Ad Group’ button, give your ad group a name, and click save.

Then, you need to add individual ads to your ad group. First, navigate to Advanced Ads » Ads and click ‘New Ad’.
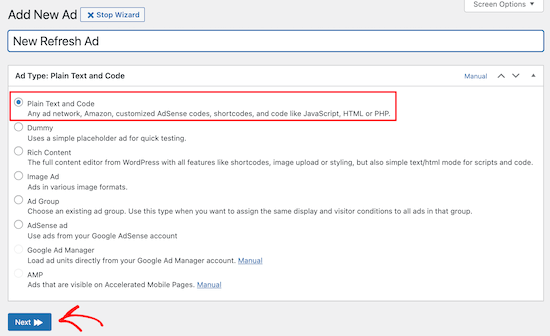
Next, add your title and select ‘Plain Text and Code’, then click ‘Next’.
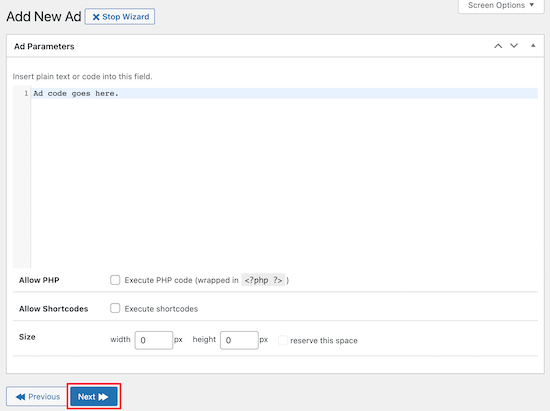
Once you’ve done that, you can add your ad code. This can be from a third party advertising network like Mediavine or Ezoic, or code from the ads you sell on your WordPress blog.
Then, click ‘Next’.
On the next screen, you can choose to hide the ad from some users and pages. However, we’ll leave the default settings since we want our ads to display to all visitors. After that, click ’Next’.
Now, you have the option to choose where to display your ad. We won’t select a placement option here, because we’re going to use the included ad widget.
You can review your ad parameters and display settings on this page as well.
Next, you need to add this ad to the ad group you created earlier. Locate the ‘Ad Groups & Rotations’ meta box and click the checkbox for the ad category.
Then click ‘Update’ to save your changes.
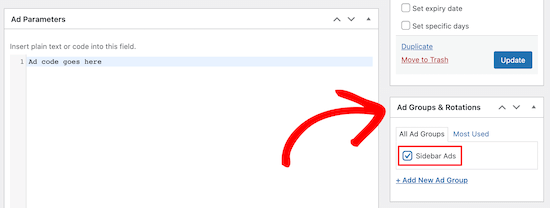
You need to repeat the process above for every ad you want to add to your ad group. These ads will rotate for your WordPress blog visitors.
Now you’re ready to change the display settings for how your ads will refresh. Navigate back to Advanced Ads » Ad Groups & Rotations and click on the name of the ad group you created earlier.
This will bring up a drop-down menu where you can customize how the ad group will display.

You can display random ads, ordered ads, an ad grid, or an ad slider. We will select the ‘Ad Slider’ option since this will slide through our ads simply.
Next, you need to set the amount of time each ad will pause before sliding to the next ad.
After that, choose the ads that you want to add to your ad group. Once you’re finished, make sure you click ‘Update Groups’ to save your changes.

Add Refresh Ad Groups to WordPress
To add your rotating ads to your sidebar, or other widget area, navigate to Appearance » Widgets.
Then locate the ‘Advanced Ads’ widget.
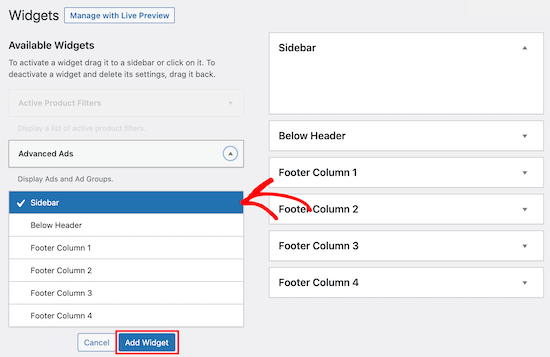
Choose the widget area where you want the ad group to display and then click ‘Add Widget’.
After that, give your widget a name, select your ad group from the drop-down list, then click ‘Save’.
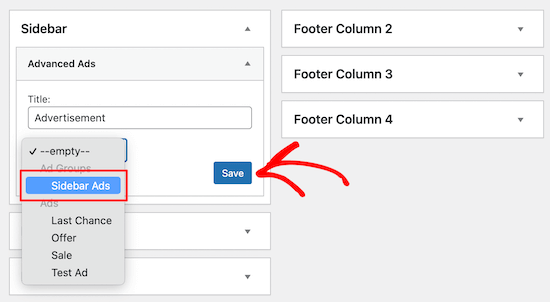
The rotating ad unit is now live on your website.
Your visitors will see the ad unit refresh based on the time limit you set earlier.

You can also use the following shortcode to add your rotating ad group to WordPress. Simply copy and paste the shortcode into any page or post where you want the ads to appear.
[the_ad_group id="4"]
For more details, see our beginner’s guide on how to add a shortcode in WordPress.
You need to change the ‘id’ in the shortcode to your ad group.
You can find your ad group ID by going to Advanced Ads » Ad Groups & Rotations and your ID will be listed under the ‘Details’ column.

Method 2: Increase Ad Impressions with Ad Refresh Using Ad Refresh Control
This method involves using the free Ad Refresh Control plugin. This plugin simply adds the ad refresh feature to your existing ad slots.
Keep in mind, this plugin is not an ad management plugin. You need to use a separate plugin to add your ads to WordPress.
You can use the Advanced Ads plugin highlighted above or another ad management plugin. For help finding the right plugin, see our list of the best ad management plugins and solutions for WordPress.
Once you add your ad units to WordPress, you can add the ad refresh feature to your ad units.
First thing you need to do is install and activate the plugin. For more details, see our step by step guide on how to install a WordPress plugin.
Upon activation, navigate to Settings » Ad Refresh Control.
On this screen, you will set your ad refresh settings. These settings are global and will apply to all of the ad units on your website.
The most important plugin settings are ‘Viewability Threshold’, ‘Refresh Interval’, and ‘Maximum Refreshes’.
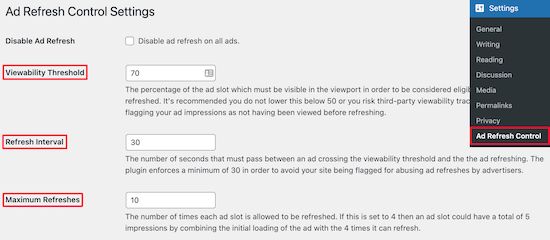
The ‘Visibility Threshold’ refers to how much of the ad needs to be viewable to be considered an impression.
The ‘Refresh Interval’ is how long an ad will be displayed before refreshing.
The ‘Maximum Refreshes’ will set the number of times an ad slot can be refreshed.
You can change these numbers, however, we will leave the default settings since they comply with most existing ad network guidelines.
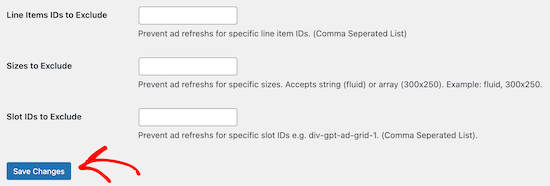
The final plugin settings can be left empty. However, if you want to exclude specific ad units or ad sizes, then you can add the add unit sizes or ad unit IDs.
Once you’re finished making changes, click the ‘Save Changes’ button.
Your ad units will now automatically refresh for your visitors based on the settings above.
Bonus: Set Up Tracking to See How Your Refresh Ads Are Performing
After you set up ad refresh in WordPress, you’ll want to monitor how your ads are performing. This will tell you which ad units are converting the best and if your ad refresh units are getting more impressions.
The best way to do this is by using Google Analytics. However, it can be difficult to set up analytics properly.
We recommend using MonsterInsights, it’s the best analytics solution for WordPress used by over 3 million websites.
It lets you simply set up conversion tracking in WordPress, so you can create unique ad tracking codes and see how your ads are performing across your WordPress blog.
![]()
For more details, see our step by step guide on how to set up conversion tracking in WordPress.
We hoped this article helped you learn how to increase ad impressions in WordPress with ad refresh. You may also want to see our list of the best email marketing services for WordPress, and our expert picks of the must have WordPress plugins for business websites.
If you liked this article, then please subscribe to our YouTube Channel for WordPress video tutorials. You can also find us on Twitter and Facebook.
The post How to Increase Ad Impressions in WordPress with Ad Refresh (2 Ways) appeared first on WPBeginner.
Post a Comment