Do you want to optimize core web vitals for WordPress?
Core Web Vitals is an initiative by Google which helps website owners improve user experience and quality of their websites. These signals are crucial for the success of any website.
In this guide, we’ll show you how to easily optimize Google Core Web Vitals for WordPress without any special technical skills.

Here is a quick overview of what we’ll cover in this guide.
- What are Google Core Web Vitals?
- How to Test Your Google Core Web Vitals Score
- Why are Core Web Vitals Important?
- How to Improve Your Core Web Vitals in WordPress (7 Tips)
What are Google Core Web Vitals?
Google Core Web Vitals are a set of website performance metrics that Google considers important in a website’s overall user experience. These web vital scores will be a part of Google’s overall page experience score that will impact your SEO rankings.
The truth is that nobody likes a slow-loading website including Google.
Even if your website loads fast, it may not be fully functional for users to do what they want to do or access the information they need.
This is what Web Vitals helps you measure. How quickly does your website loads, becomes visible, and is ready for your users?
To do that, Google uses three quality tests (Web Vitals).
- Largest Contentful Paint (LCP)
- First Input Delay (FID)
- Cumulative Layout Shift (CLS)
Now the names of these tests may sound too technical but what they do is quite easy to understand.
Let’s see how each Web Vitals test works, what they measure, and how you can improve your score..
Largest Contentful Paint – LCP
Largest Contentful Paint or the LCP, looks for how quickly the main content (whether it is an image, article, or description) becomes visible to the users.
For example, your website might load fast, but the largest content may not appear on the screen as quickly as the rest of the page.
Other speed test tools will give you a high score, but from user’s point of view, the page is still slow.
This is why Google measures the LCP as part of their web vital score, so website owners can have a more clear understanding.
First Input Delay (FID)
First Input Delay (FID) measures the time it takes a user’s browser to actually be able to begin processing event handlers in response to a user’s interaction.
In plain english, let’s suppose a user is on your contact form page. They fill out the form and click on the Submit button. FID, will measure how quickly your website processes that interaction.
An even simpler example would be the time from when a user clicks on a link to the time their browser starts processing the next sequence of events.
Cumulative Layout Shift (CLS)
Cumulative Layout Shift (CLS) measures the time it takes for a website to become visually stable.
As a website loads, some elements take more time to load than others. During this time, your website’s content may keep moving on the screen.
For instance, if a user is reading a paragraph on a mobile device and a video embed loads above it, this makes the entire content move down. This can be really frustrating if a user was trying to accomplish an action such as adding a product to cart where the button shift down due to other items moving on the page.
How to Test Your Google Core Web Vitals Score
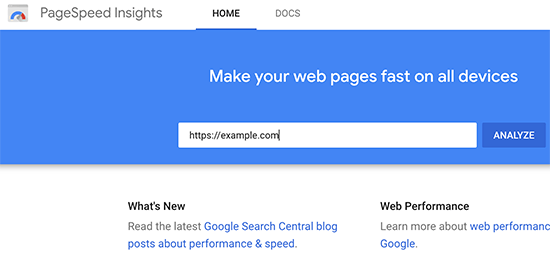
The easiest way to test your Google Core Web Vitals Score is by using the Page Speed Insights tool. Simply enter the URL you want to test and click on the Analyze button.
The core vital results are displayed under the section titled ‘Field Data’ section.
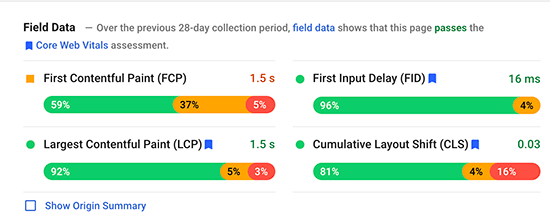
To make it simpler, you will see a message at the top saying ‘[…] field data shows that this page passes the Core Web Vitals assessment’.
In the chart below, you can view the actual score of all three core vitals. Here is how much you need to score to pass the core Web Vitals tests for each item.
- Largest Contentful Paint (LCP) – 2.5 seconds
- First Input Delay (FID) – Less than 100 milliseconds
- Cumulative Layout Shift (CLS) – Less than 0.1
How to View Google Core Web Vitals for Full Website?
Now Page Speed Insights tool allows you to check an individual page. If the page you are checking is the root of your domain name, then you can also click on the ‘Show Origin Summary’ checkbox.
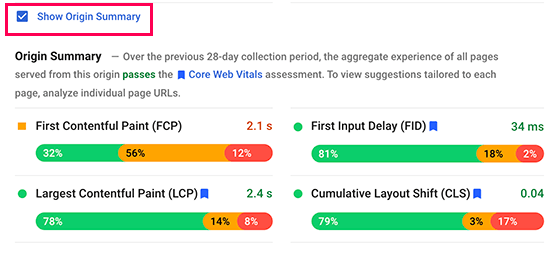
This will show you the score for all pages served from this origin.
However, to really drill down deep, you can access the Core Web Vitals report in your Google Search Console dashboard as well.
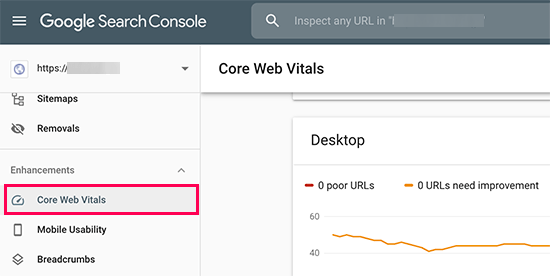
This allows you to see how many URLs on your website passed the tests, which URLs need improvement, and which pages have a poor score.
To get even more detailed reports for Web Vitals, you can use the lighthouse speed test by going to Web.dev Measure tool, or by using the built-in test inside Google Chrome browser.
Simply open a website in Chrome, right click anywhere on the screen, and then select the Inspect option. In the tabs, you will see an option called Lighthouse.
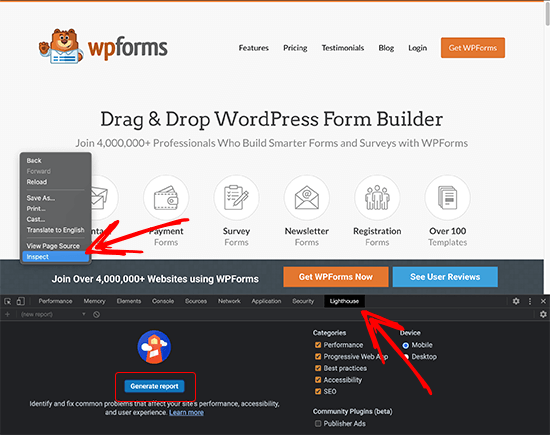
After that, click the Generate Report button.
Note: You must do the Chrome test in Incognito mode for the most accurate results. Otherwise your browser extensions may negatively impact the core web vital score it shows you.
Why are Core Web Vitals Important?
Core Web Vitals are important because they reflect how your website performs for the users. It is focused not just on the faster loading of a website but on how quickly users can actually use it.
According to a recent study, a 1 second delay in page load time can lead to 7% loss in conversions, 11% fewer page views, and 16% decrease in customer satisfaction.
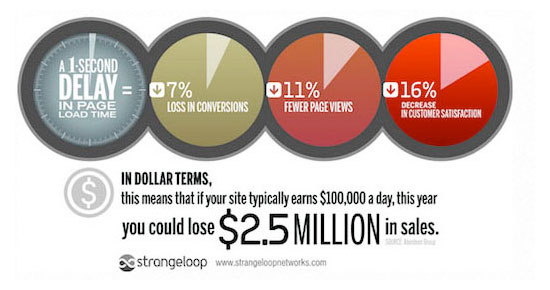
That’s why it is crucial to optimize your website for speed and performance. However, most performance measuring tools didn’t really account for the quality of user experience.
A faster website with poor user experience is still costing you conversions, fewer page views, and poor customer satisfaction. Improving core Web Vitals helps you remedy that.
User experience is also an important factor in SEO rankings. Google has already announced that starting in May 2021 the search algorithm update will include page experience as one of the ranking factors.
That being said, let’s see how you can easily improve your core Web vitals to offer a better user experience on your website.
How to Improve Your Core Web Vitals in WordPress (7 Tips)
Improving your core Web Vitals score in WordPress is not that difficult. Using some essential performance optimization tips you can easily pass the Web Vitals score.
1. Optimize Your WordPress Hosting
Your WordPress hosting company plays the most significant role in your website’s performance.
They are able to optimize their servers for WordPress which gives your website rock-solid platform to build upon.
We recommend using SiteGround for a high-performance website. They are one of the officially recommended WordPress hosting companies, and we use SiteGround for WPBeginner website.
To give your website the performance boost it needs, SiteGround uses Google Cloud Platform for their servers along with ultrafast PHP.
Their SG Optimizer plugin is used by over a million websites. It automatically makes further performance enhancements and turns on built-in caching which does everything WP Rocket does and more.
It’s important to note, that their SG Optimizer plugin only works on SiteGround hosting accounts, and these performance optimizations are available for all plans including the lowest option.
If you’re using another WordPress hosting provider, then we recommend using WP Rocket along with few other tools to achieve better core web vitals score.
WP Rocket is the best WordPress caching plugin on the market. It allows you to easily set up caching on your WordPress website without going into any technical details of server management.
2. Improving Largest Content Paintful (LCP) Score
As mentioned earlier, the Largest Content Paintful (LCP) is literally the largest content part within the viewport of a page. For instance, on a blog post, this could be the featured image or the article text.
The quicker this content loads the higher your LCP score would be.
How do you know which content is considered the largest by the test? Well, you need to scroll down to the test results and expand the ‘Largest Contentful Paint element’ tab.
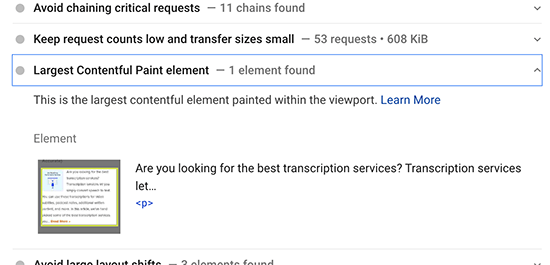
You’ll see the elements considered for the LCP score. If it is a larger image, then you can try replacing it with a smaller image or an image with lower file size and quality. See our guide on how to optimize images for web performance.
If it is text, then you can try breaking it into paragraphs and headings.
3. Improving First Input Delay (FID) Score
First Input Delay score measures the time between a user clicking on something on your website and their browsers starting processing elements.
The most important tip to improve that is by using a better web hosting or even managed WordPress hosting platform.
Another easy way to improve FID score is by using a caching plugin like WP Rocket. It comes with a built-in feature that allows you to optimize file delivery.
First you would need to install and activate the WP Rocket plugin. For more details, see our step by step guide on how to install a WordPress plugin.
After that, go to Settings » WP Rocket page and switch to the File Optimization tab.
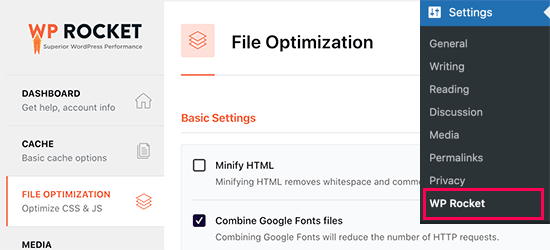
Scroll down to the bottom of the page and check the box next to the ‘Load JavaScript deferred’ option.
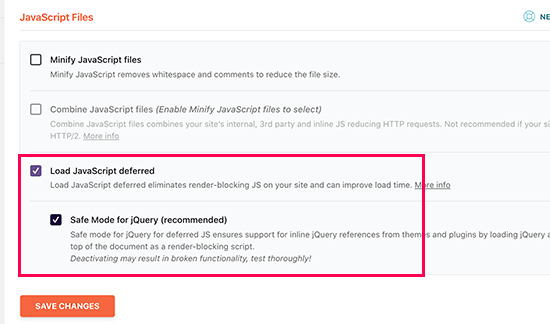
Don’t forget to click on the Save Changes button to store your changes.
Deferring JavaScript allows your website to load without waiting for JavaScript to be loaded. This improves First Input Delay (FID) Score for pages where JavaScript may be the cause.
4. Improving Cumulative Layout Shift (CLS) Score
Cumulative Layout Shift (CLS) score is affected when different elements on a web page are loading slowly and making other elements on the screen move.
You can view which elements are affecting the CLS score by expanding the ‘Avoid large layout shifts’ tab in the Page Speed Insights results.
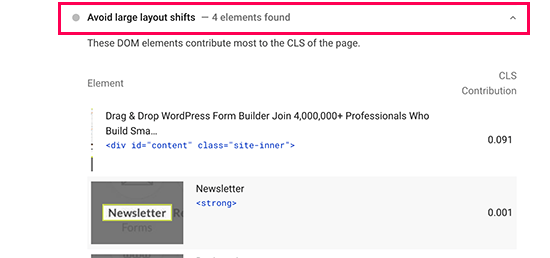
This will show you the elements that are causing the most layout shift impact during page load.
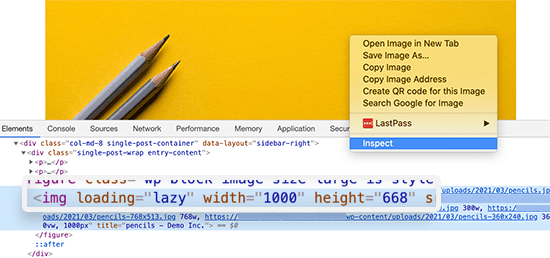
To make sure that the visual layout of your page does not shift as other items load, you need to tell browsers about the dimensions (width and height) of the elements like images, video embeds, Ads such as Google AdSense, and more.
WordPress automatically adds height and width attributes to images you add. However, you can still check all other media particularly embeds to make sure that all of them have height and width attributes.
One way to do that is by using the Inspect Tool. Simply right-click in your browser and select Inspect to open the developer console.
You can then point and click on different page elements to highlight their source code. There, you can see if the element has width and height attributes defined.
5. Eliminate Render Blocking Elements
Render blocking elements are the elements that are slower to load but are blocking other elements from loading first. This affects your overall Web Vitals score and user experience on your website.
Page Speed Insights results will show you the render blocking elements. These are usually JavaScript or CSS files added by your WordPress plugins, third-party tools like Google Analytics, Facebook Pixel, Google Ads, and more.
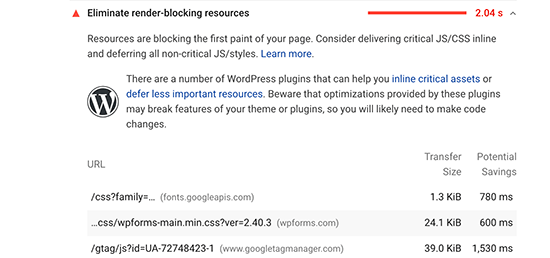
However, most such elements are programmatically added to your site by different plugins or theme. This makes it harder for a beginner user to remove or properly load them.
We have a step by step guide on how to easily eliminate render blocking elements in WordPress without messing with any code on your website.
6. Properly Size Images in WordPress
Another common cause of lower core Web Vitals score is very large images. Many WordPress users upload high-resolution images to their websites which take longer to load and in most cases are not necessary.

This becomes even more problematic for users on mobile devices. Your responsive WordPress theme and WordPress will automatically fit the image to user’s mobile screen but they would still be loading a larger file.
We have a detailed guide on how to properly optimize images for your WordPress website without losing quality or affecting the performance.
7. Use a CDN to Server to Improve Web Vitals Score
CDN or content delivery network are third-party services that allow you to serve static content of your website from multiple servers around the globe.
This allows users to download those static files like images and CSS from servers that are nearest to them. It also reduces load on your website which can then continue loading other elements.
You can use a cloud firewall app like Sucuri which comes with a built-in CDN service. Sucuri also helps you block malicious and spam requests which further frees up your website resources.
You can also use Cloudflare free CDN as an alternative. It comes with a basic firewall protection and CDN service that would improve your website’s web vitals score.
We hope this guide helped you learn how to optimize core web vitals for WordPress. Another important aspect of good user experience is security. We recommend that you follow our WordPress security checklist to make sure that your website performance is not affected by spam or DDoS attacks.
You may also want to see our comparison of best video editing software and best webinar platforms to create performance optimized media content that doesn’t slow down your website speed.
If you liked this article, then please subscribe to our YouTube Channel for WordPress video tutorials. You can also find us on Twitter and Facebook.
The post How to Optimize Core Web Vitals for WordPress (Ultimate Guide) appeared first on WPBeginner.

Post a Comment