
Do you want to use a free SMTP server to send WordPress emails?
By default, WordPress uses the PHP mail function which is not reliable and often mark your emails as spam. Using an SMTP server is the best way to ensure deliverability of your WordPress emails.
In this article, we’ll show you how to use a free SMTP server to send WordPress emails.

Why Use an SMTP Server to Send WordPress Emails?
Often website owners complain about WordPress not sending email issue. The easiest way to fix that is by using an SMTP server, so your WordPress emails get to people’s inboxes.
By default, WordPress sends emails through PHP mail. Unfortunately, not all WordPress hosting servers are correctly configured to use PHP mail.
Even when the emails are sent successfully, they may get incorrectly identified as spam. This means they could be automatically deleted without ever being seen.
The best way to ensure deliverability for your WordPress emails is by using an SMTP server. It is the standard protocol to send emails on the internet.
SMTP servers use proper authentication to make sure that email is sent by an authorized sender. This improves deliverability, and your emails safely land in users’ inbox.
Now in order to connect your WordPress site to use your SMTP server, you need a plugin to make that connection. We’ll be using the WP Mail SMTP plugin which is the best SMTP plugin for WordPress.
There is a free version of WP Mail SMTP available as well.
That being said, let’s take a look at how to set up WP Mail SMTP and then how to connect it to popular free SMTP servers.
Installing WP Mail SMTP plugin for WordPress
The first step is to install and activate the WP Mail SMTP plugin. For more details, see our step by step guide on how to install a WordPress plugin.
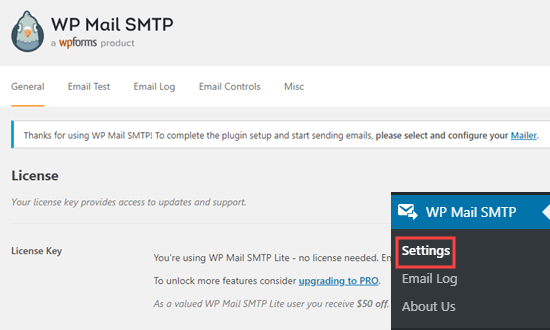
Upon activation, you need to go to the WP Mail SMTP » Settings page in your WordPress admin area to set up the plugin.
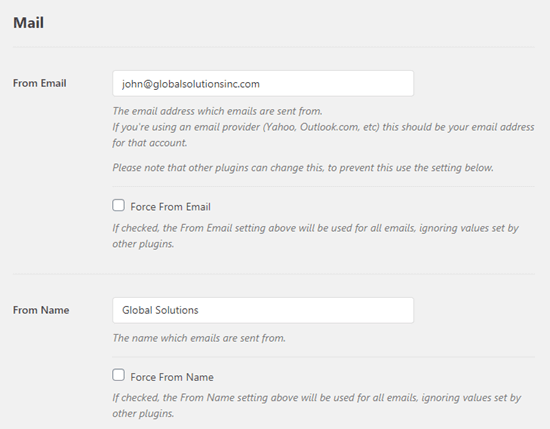
You need to start by entering your From Email and From Name. WordPress emails will be sent from this email address and name.
You should leave the ‘Force From Email’ box checked. This ensures that all emails from your WordPress site are sent from that email address, through your SMTP server.
Tip: Just check the ‘Force From Name’ to make all emails come from the same name, regardless of any settings in plugins such as WPForms.
Next, you need to choose an SMTP mailing service. Simply click on the one that you want to use.
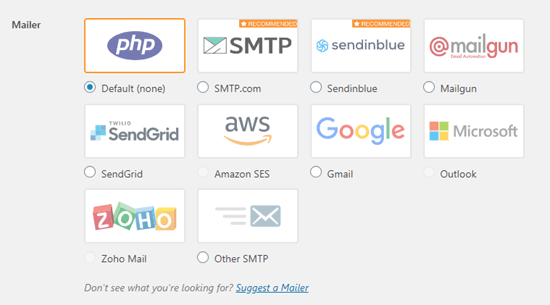
We are going to cover step by step instructions for a number of different free SMTP servers. You need to keep your WP Mail SMTP settings tab open and then follow the instructions for your chosen SMTP server.
- Sending WordPress Emails Using Sendinblue
- Sending WordPress Emails Using Gmail
- Sending WordPress Emails Using MailGun
- Sending WordPress Emails Using SendGrid
Note: If you don’t feel very confident with technical things, we recommend upgrading to WP Mail SMTP’s Elite account. They have a fantastic White Glove Setup service that will help you through the setup process.
Sending WordPress Emails Using Sendinblue SMTP Server
Sendinblue lets you send up to 300 free emails per day from your website.
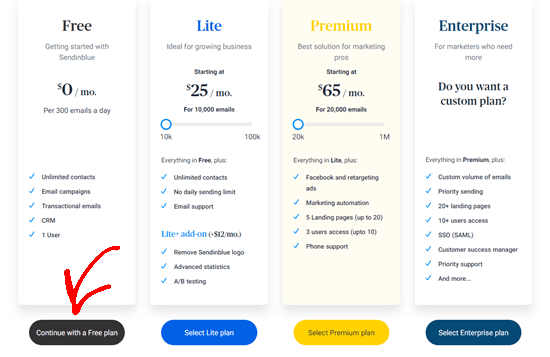
First, you need to create an account at the Sendinblue website. After confirming your email address, you’ll be asked to choose a Sendinblue pricing plan.
Simply click on the ‘Continue with a Free plan’ button.
You will receive a text message with a confirmation code to enter. Next, you’ll see your Sendinblue dashboard.
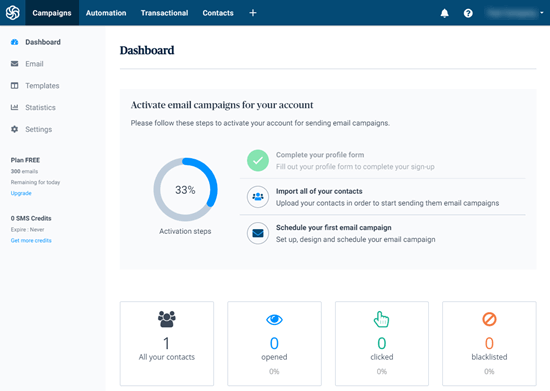
Before going further, you need to create a subdomain at your website, such as mail1.yourdomain.com.
To do this, log in to your web hosting or domain registrar account, and then follow their instructions for adding a subdomain.
If you’re using Bluehost, then you need to go to the Domains » Subdomains page under your hosting dashboard.
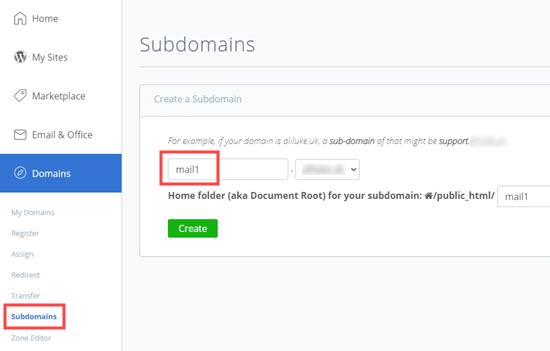
Simply enter the subdomain you want to use (e.g. mail1) and then click on the create button to continue. Bluehost will add the subdomain to your hosting.
After creating the subdomain, you need to add it into your Sendinblue account.
Adding Your Subdomain to Sendinblue
In your Sendinblue account, you need to go to the Settings page. On this page, scroll to the ‘Your Senders and Domains’ section and click the ‘Configure’ button below it.
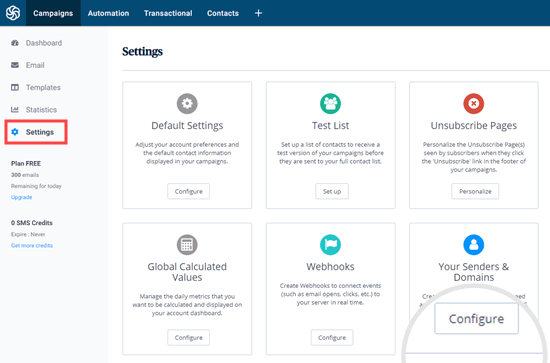
Next, click the Domains tab then the ‘Add a New Domain’ button.

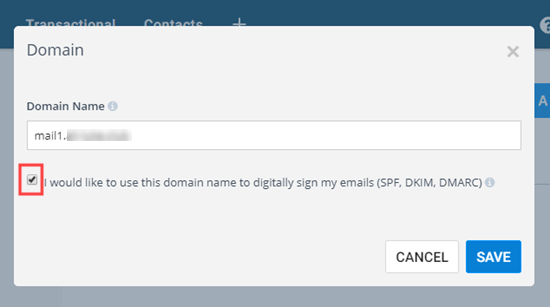
Go ahead and enter your whole subdomain, such as mail1.yoursite.com. Make sure you check the box to confirm you want to use the domain name to digitally sign your emails. Then, click the Save button.
After saving, you will see a popup listing ways for you to verify your domain. The default method is to host a file, but this requires you to create the HTML file and upload it via FTP.
We recommend instead using the ‘Add a DNS entry’ method. This gives you a special code that you need to use to verify your subdomain.
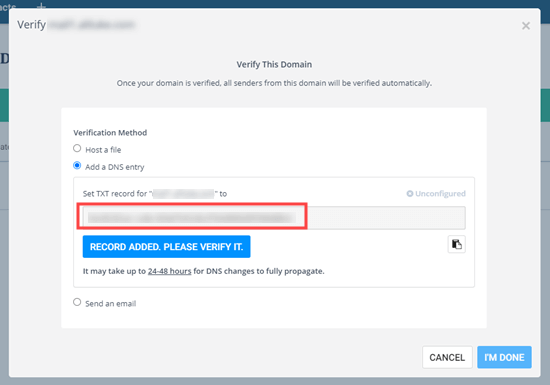
Tip: Don’t worry if you close this popup by mistake. You can get back to it by clicking the ‘Verify This Domain’ link next to your subdomain.

Next, you need to open the DNS settings for your domain in your web hosting account. Your web host should have instructions for this.
In Bluehost, you need to scroll down your DNS records to the TXT section.
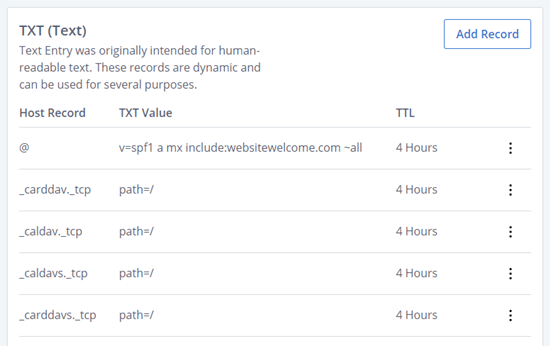
Then, create a new DNS TXT record.
For the Host Record (sometimes called Host or Name) you need to enter your subdomain, e.g. mail1.yourdomain.com. Depending on your web host, it may already be entered for you, or you may need to enter all or part of it.
For the Value (also called TXT Value or TXT data) you just need to copy the special code from Sendinblue.
Make sure you save your DNS TXT record. After doing so, return to Sendinblue and click the ‘Record Added. Please Verify It’ button.
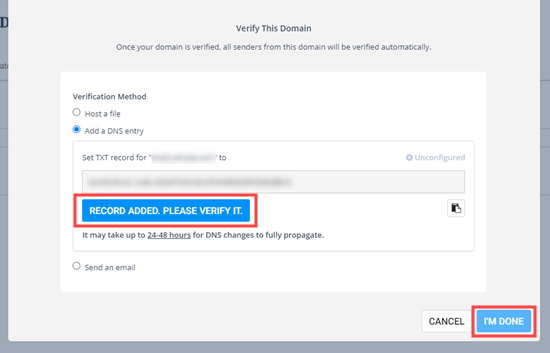
Tip: DNS changes can take as much as 24 – 48 hours to propagate across the internet. If the verification fails, try again in a few hours.
After doing this, you also need to enter two more DNS TXT records so that Sendinblue can authenticate the emails that are being sent from your domain. This improves deliverability.
In Sendinblue, click the ‘Manage’ dropdown next to your domain, then select the ‘Authenticate this domain’ option.
You will then see a popup with details of the DNS records that you need to add. You just need to add the first 2 DNS records. The 3rd is the one you have added already and the 4th is not needed.
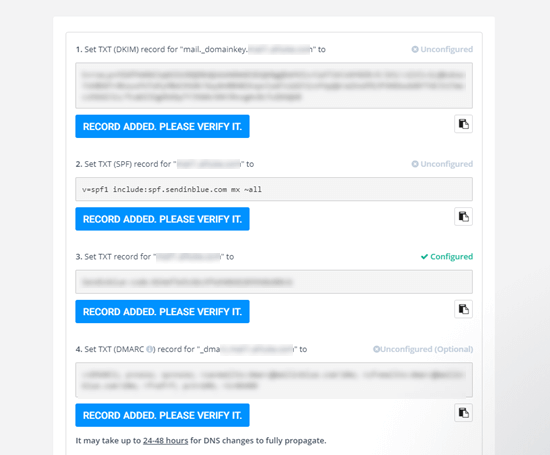
Simply add these to your domain in your web hosting account or domain registrar in the same way as before. Then, go ahead and click the ‘Record Added. Please Verify It’ button for each one.
Now, you just need to finish enabling Sendinblue on your WordPress site. Simply go back to the WP Mail SMTP Settings page that you opened up earlier, and find the API key box.
Then, click the ‘Get v3 API Key’ link.
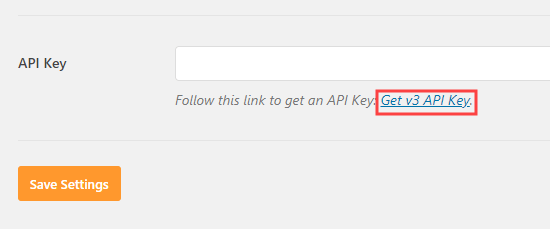
This link will open up the correct page of your Sendinblue account in a new tab. Here, you just need to copy the API key.
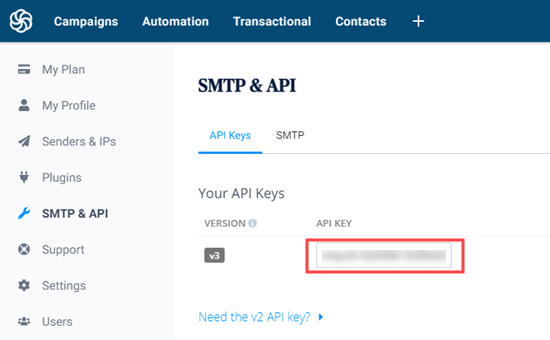
Once you’ve copied it, return to WP Mail SMTP and paste in the API key.
Make sure you click the ‘Save Settings’ after doing so.
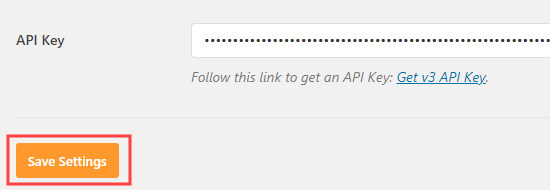
Everything is now set up. You just need to wait for Sendinblue to activate your account.
Now, it’s time to go ahead and test that your email is working.
Sending WordPress Emails Using Gmail SMTP Server
You can use a free Gmail account to send SMTP emails. If you don’t already have a Gmail account, then create one before following the rest of these instructions.
First, log in to your WordPress admin, where you should already have installed WP Mail SMTP. On the WP Mail SMTP » Settings page, select Gmail as your mailer.
You will see the options to enter your Client ID and Client Secret. There’s also a URL that you will need to copy later, so keep this tab open.
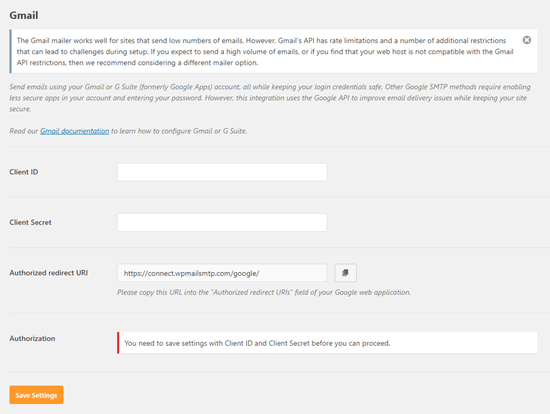
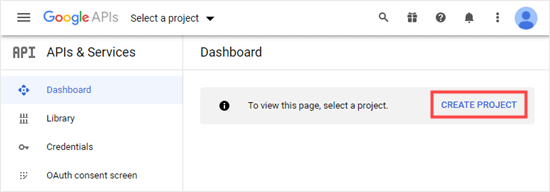
Next, go to the Google Developers Console website. You need to agree to the terms and conditions. Then, click the ‘Create Project’ button.
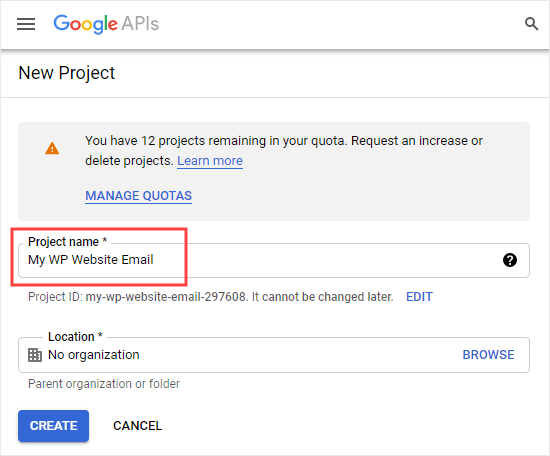
Now, it’s time to create your new project. All you have to do here is type in the name you want to use. Then, go ahead and click the Create button.
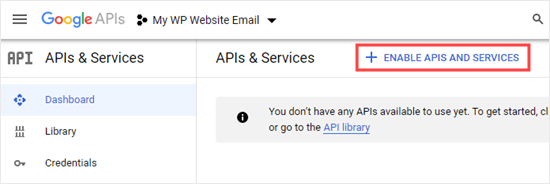
You will now see your dashboard, with your new project selected in the dropdown at the top of the screen.
You need to click the ‘Enable APIs and Services’ button.
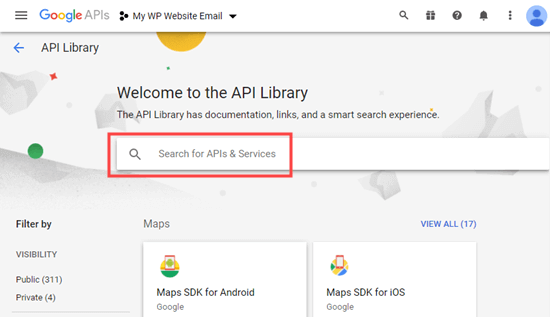
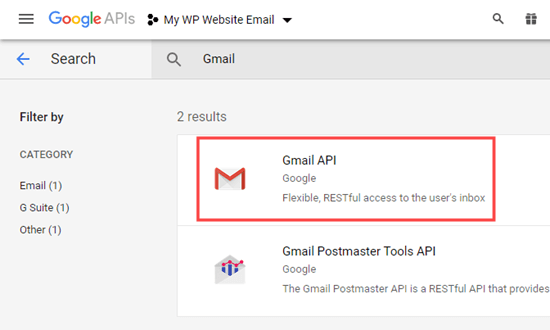
You will then see the API library. Simply type ‘Gmail’ into the search bar.
The page will then refresh. The first result should be the Gmail API. Go ahead and click on it.
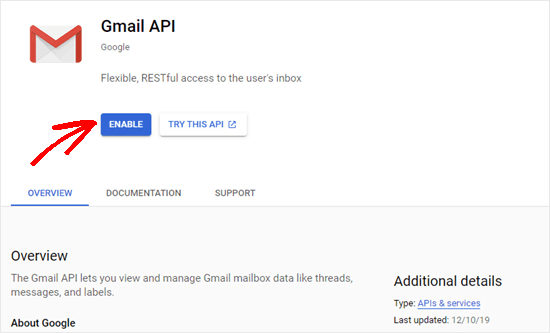
Next, you will see some information about the Gmail API. Simply click the Enable button.
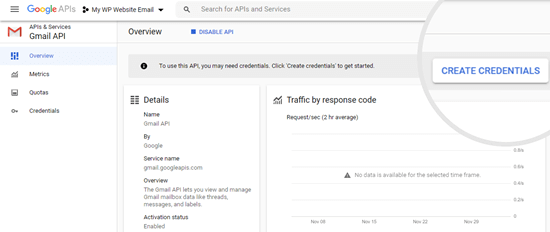
It may take a few seconds for the API to be enabled. Next, you need to click the ‘Create Credentials’ button.
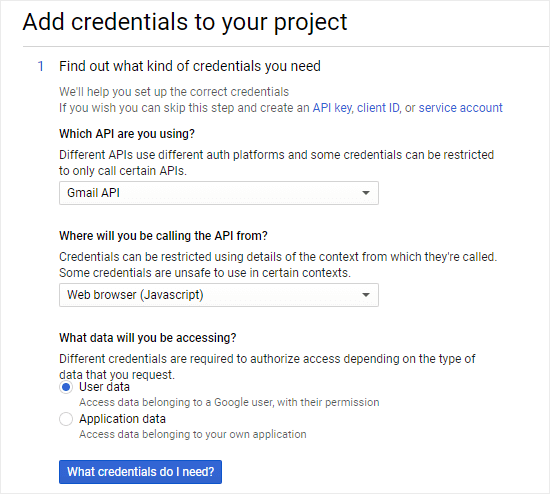
On the next screen, you need to select the following options.
Which API are you using? Gmail API
Where will you be calling the API from? Web browser (Javascript)
What data will you be accessing? User data
Then, click the ‘What credentials do I need?’ button.
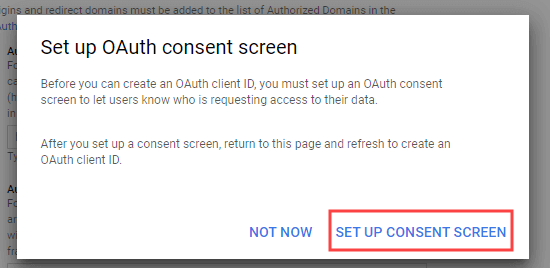
After this, you will see a popup prompting you to create an OAuth consent screen. Just click the ‘Set Up Consent Screen’ link to do that now.
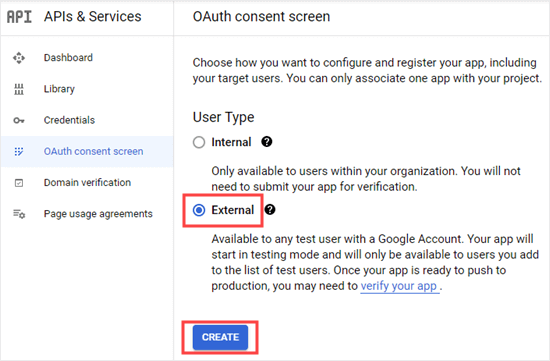
The OAuth consent screen will open in a new tab. Here, you need to select the ‘External’ type and then click the Create button.
Note: We’re going to keep the app in testing mode. It will not actually become available to the public.
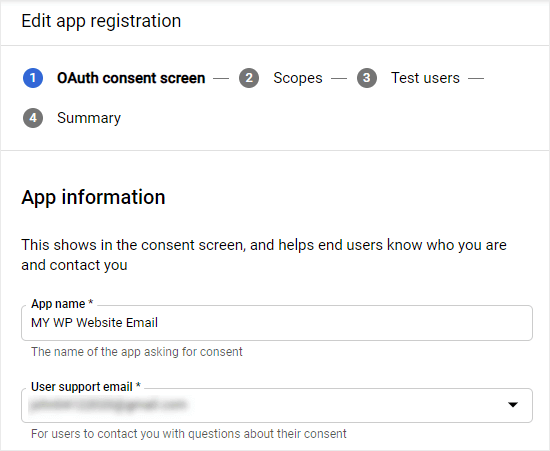
Next, enter a name for your app and select your email address for the support email.
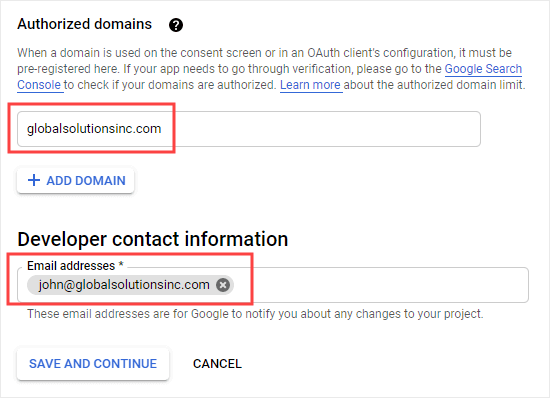
After that, scroll down to the Authorized domains section, click the ‘Add Domain’ button then enter the name of your domain.
Tip: You need to enter the domain name without http, https, or www at the start.
Next, enter your email address.
Then, click the ‘Save and Continue’ button.
Simply click the ‘Save and Continue’ button on the Scopes screen. On the ‘Test users’ screen, click the ‘Add Users’ button and enter your Gmail address.
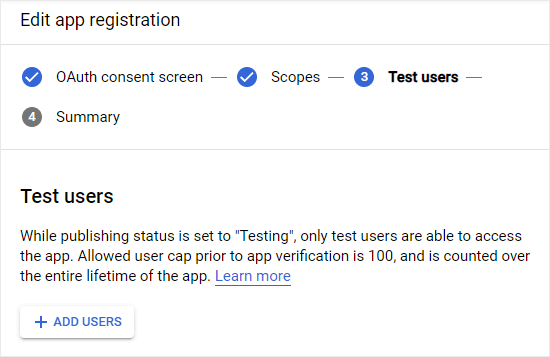
Then, press ‘Save and Continue’ again.
Once you reach the summary, go ahead and return to your other tab to set up your project’s credentials.
Here, you can enter any name you like or simply leave the default name in place.
In ‘Authorized JavaScript origins’, you need to enter your website’s domain name.
In ‘Authorized redirect URIs’, you need to enter the redirect URL from WP Mail SMTP’s settings.
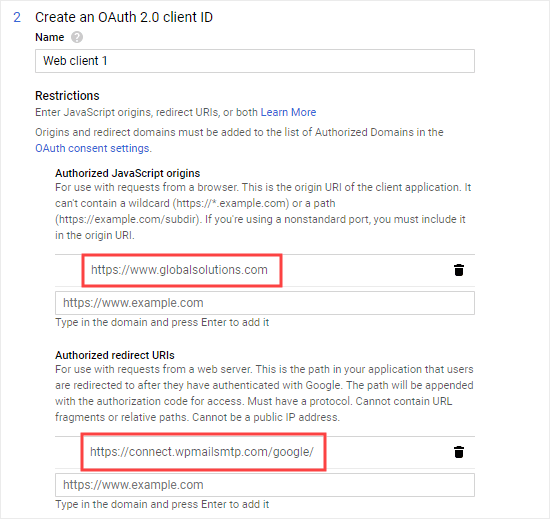
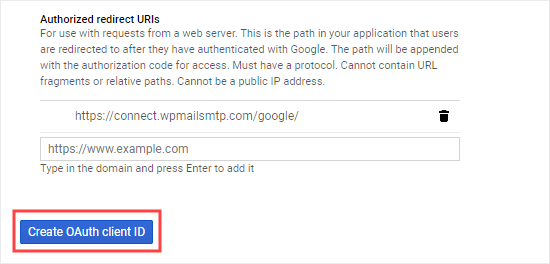
You will then see a ‘Refresh’ button below this. Click the button then click the ‘Create OAuth client ID’ button that appears.
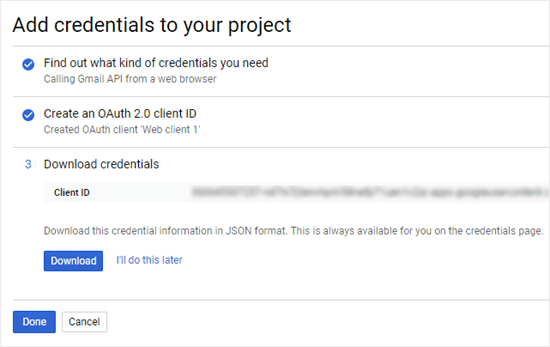
You have now finished creating your Google web application. Simply click the Done button.
You will now see your new web application listed. Go ahead and click the edit icon next to it.
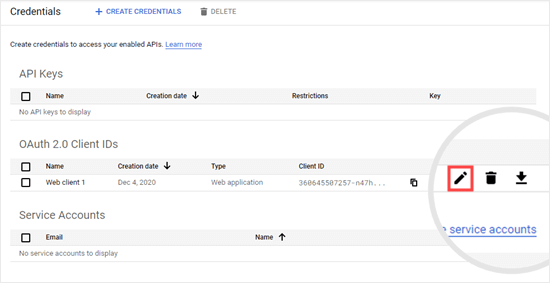
Here, you will see your Client ID and Client Secret.

You need to copy these and paste them into your WP Mail SMTP settings page. Then, go ahead and click the ‘Save Settings’ button.
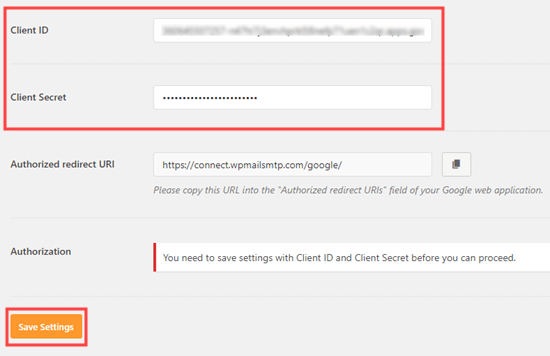
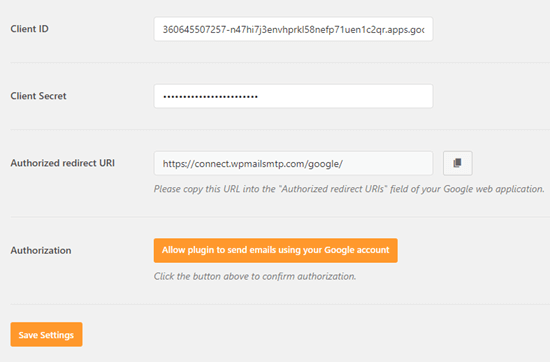
The page will then refresh. You need to scroll down again and click the ‘Allow plugin to send emails using your Google account’ button.
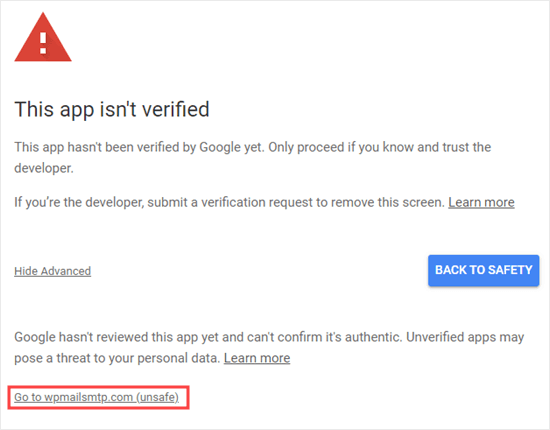
This will open a popup where you need to select your email account. You will then see a warning screen. Simply click the ‘Advanced’ link then click the ‘Go to wpmailsmtp.com’ link to continue.
Note: It’s perfectly safe to continue as this is your own app that you created.
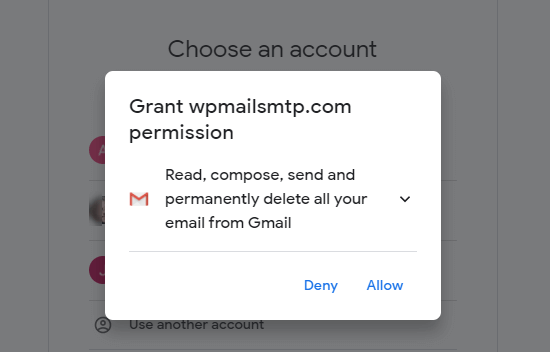
You will then see a popup asking you to grant permissions. Go ahead and click the Allow button.
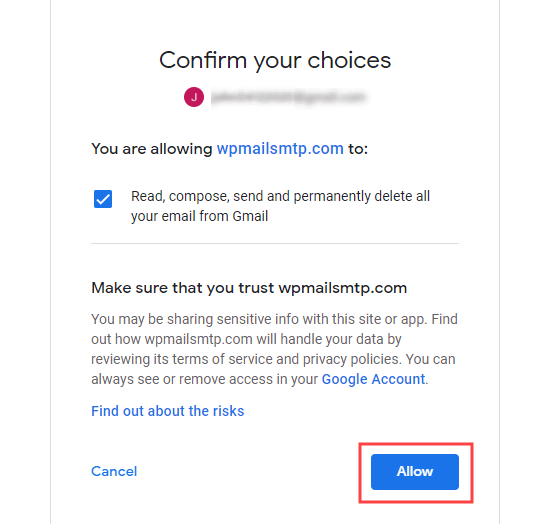
Finally, you need to confirm your choice and click the Allow button again.
After doing so, you will be directed back to WP Mail SMTP. You will see a message to confirm that you have successfully linked your site with your Google API project.
Now, it’s time to go ahead and test that your email is working.
Sending WordPress Emails Using MailGun SMTP Server
MailGun is another popular SMTP email provider. It lets you send up to 5,000 emails/month for free, for 3 months.
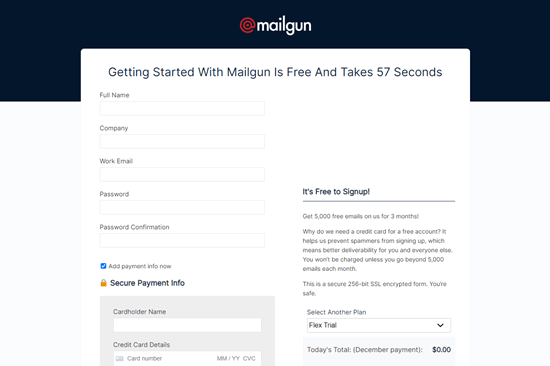
First, you need to go to the MailGun website and click the ‘Start Sending’ button to sign up for an account.
You need to enter your credit card details. If you send more than 5,000 emails, or continue after the first 3 months, then your card will be charged at a rate of $0.80 per 1,000 emails.
Once you’re done, click the ‘Create Account’ button at the bottom of the screen.
You will then see your account dashboard.
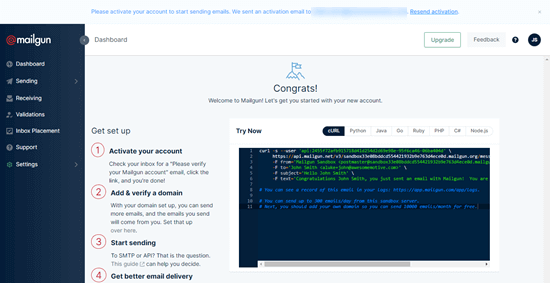
Before continuing, look for a verification email from Mailgun in your email inbox. You need to click a link in this email to activate your Mailgun account.
Tip: You will also have an email letting you know that an API key was added to your Mailgun account. This is normal.
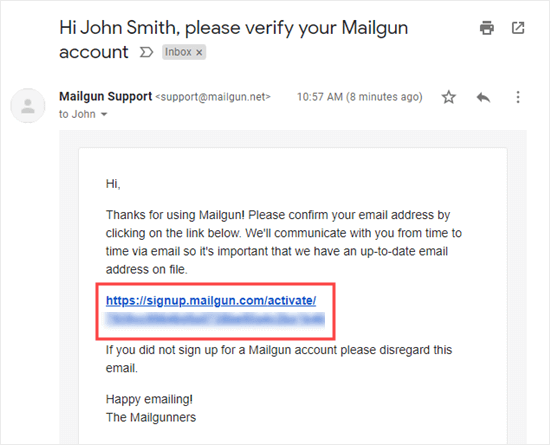
After clicking this link, you will be prompted to enter and verify your mobile number. Next, you will see your Mailgun dashboard again.
Now, you need to create a subdomain at your website, such as mg.yourdomain.com.
To do this, log in to your web hosting account and follow their instructions for adding a subdomain. If you’re using Bluehost, you need to go to the Domains » Subdomains page.
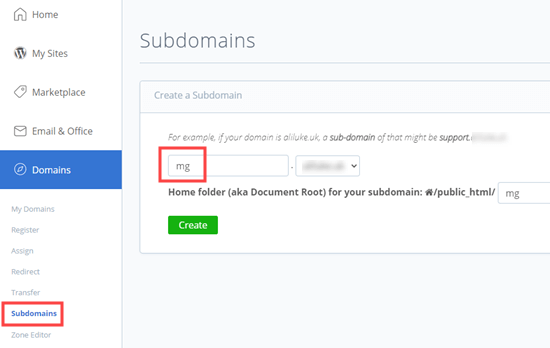
After creating the subdomain, return to your Mailgun dashboard and go to the Sending » Domains page.

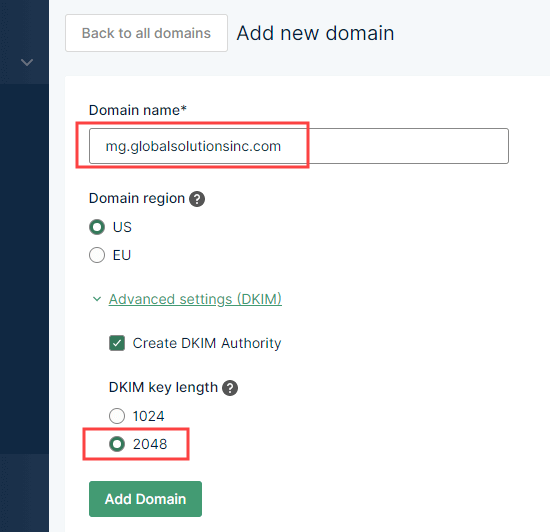
Next, you need to enter the subdomain that you created in your hosting account earlier.
Simply leave the ‘Domain region’ set to US, unless you’re in the EU.
Go ahead and click the ‘Advanced Settings (DKIM)’ link to open up the DKIM settings.
Here, you should leave the ‘Create DKIM Authority’ box checked and select 2048 for the ‘DKIM key length’.
Then, go ahead and click the ‘Add Domain’ button.
You will now see instructions to verify your domain under the ‘Add DNS records for sending’ step.
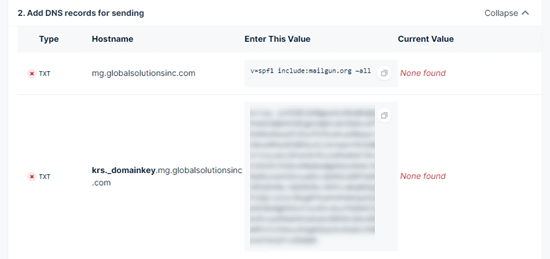
You need to login to your web hosting account and add specific DNS records to your subdomain. Your web host should be able to give you instructions for this.
In Bluehost, you need to scroll down your DNS records to the TXT section.

Then, create the first new DNS TXT record.
For the Host Record (sometimes called Host or Name) you need to enter your subdomain, e.g. mg.yourdomain.com. Depending on your web host, it may already be entered for you, or you may need to enter all or part of it.
For the Value (also called TXT Value or TXT data) you just need to copy the special code under ‘Enter This Value’ from Mailgun.
Make sure you save your DNS TXT record.
For the second DNS TXT record, you need to enter the Host Record shown in the ‘Hostname’ column. Then, enter the long code from the ‘Enter This Value’ column for the Value.
After saving your second DNS TXT record, you should also add the MX records from your Mailgun account.

You enter these in the same way as the TXT records. Just make sure you select MX for each one. For more help, check out our article on how to change MX records.
Tip: Your web host may not allow you to add MX records to a subdomain. If so, it’s fine to proceed without using the MX records. However, be aware that you may get a Sender Verification error when sending emails to yourself, if you’re using the same email address as your From address.
This is all you need to do. You don’t need to add the DNS records for tracking.
Once you’ve entered the TXT and MX records, simply click the ‘Verify DNS Settings’ button at the bottom of the page.
You will then see a screen asking how you’d like to send your emails.
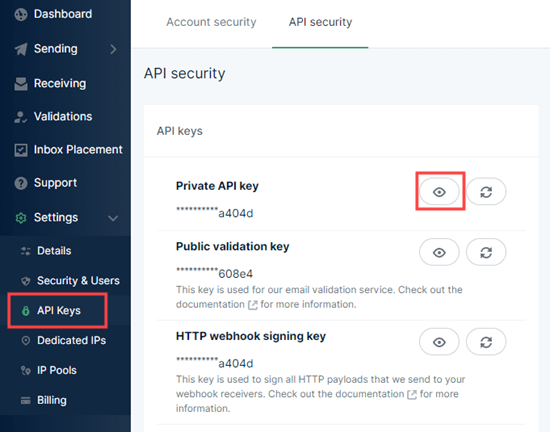
Ignore this, and go to the Settings » API key page. Here, you need to click the view button next to the Private API key, then copy it.
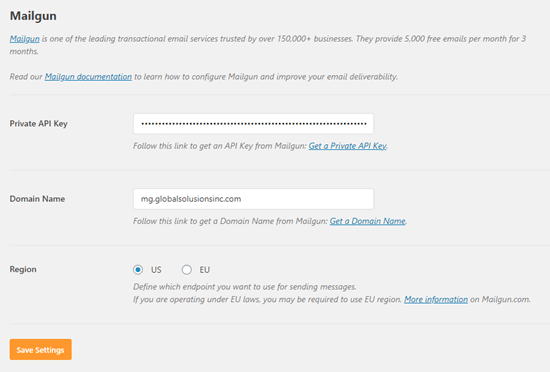
Next, you need to paste the private API key into WP Mail SMTP. Below that, enter your subdomain. Make sure the correct region is selected and then click the ‘Save Settings’ button.
The final step is to test that your email is working.
Sending WordPress Emails Using SendGrid SMTP Server
SendGrid lets you send up to 40,000 emails total during your first 30 days. After that, their plan gives you up to 100 free emails per day.
First, you need to visit the SendGrid website and click the ‘Start For Free’ button to create your free account.
After creating your account, you will see your SendGrid dashboard.
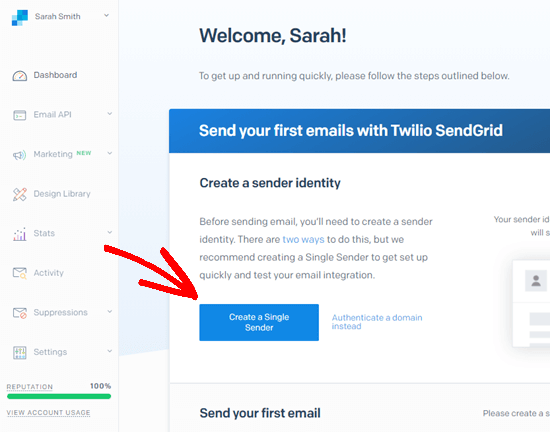
Your first step is to create a sender identity. Go ahead and click the ‘Create a Single Sender’ button.
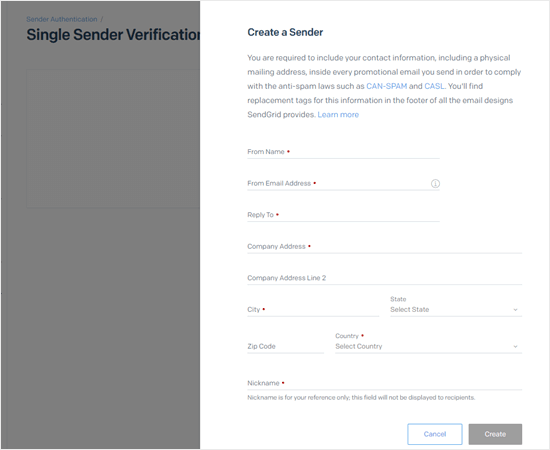
Then, simply enter the name, email address, and mailing address that you want to use for your emails.
Important: This email address needs to be the same as the one that you’re using as your From address in your WP Mail SMTP settings.
You will then see your details listed in the Senders table.
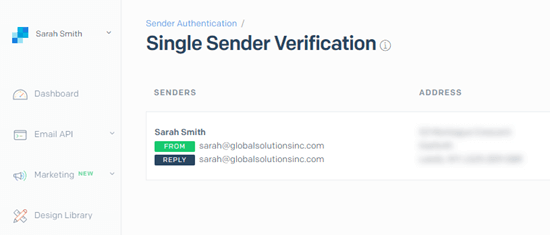
You will get a verification email with a button you need to click in order to verify this business email address.
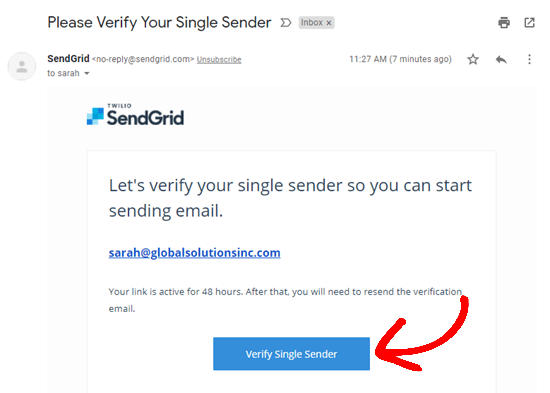
Once you’ve verified your email address, go ahead and return to your SendGrid dashboard by clicking the Dashboard link in the sidebar.
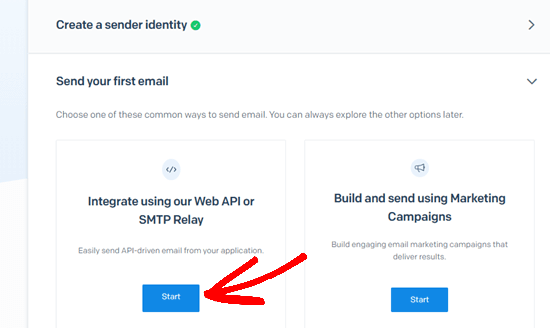
The next step is to click the Start button for the Web API and SMTP Relay option.
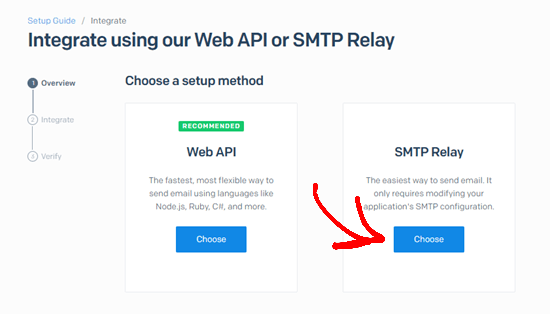
On the next screen, select the SMTP Relay option.
Next, you need to enter a name for your API key and click the ‘Create Key’ button.
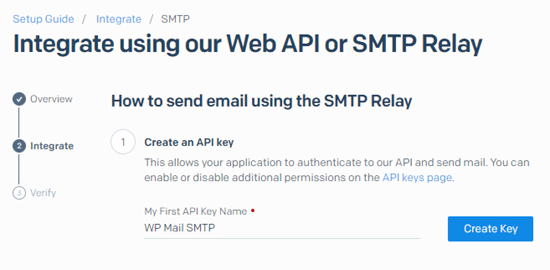
You will then see your API key.
Next, open up your WordPress admin in a separate tab and go to WP Mail SMTP » Settings. You should have already selected SendGrid for your mailer. If not, select it now.
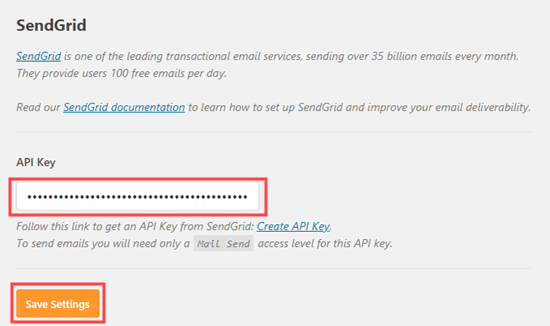
At the bottom of the screen, you will see a box for entering your SendGrid API key. Simply copy and paste it here, then click the ‘Save Settings’ button.
Next, you need to verify that your integration is working. First, go to the Email Test tab in your WP Mail SMTP settings. Then, enter your email address and click the Send Email button.
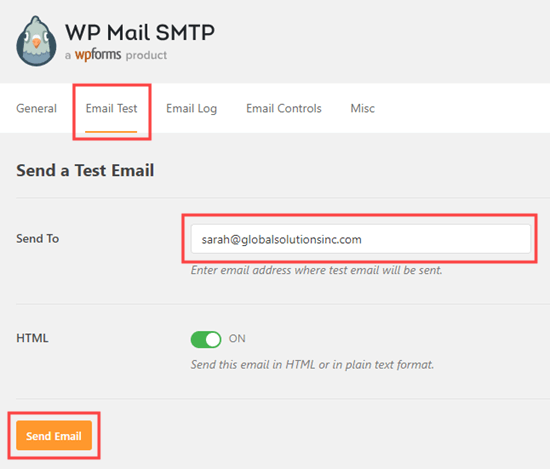
You should see a message that the test email was sent successfully. You can also check it in your inbox.
Now that your test email has been sent successfully, go back to the tab with your SendGrid API page. Go ahead and check the ‘I’ve updated my settings’ box. Then, click the ‘Next: Verify Integration’ button.
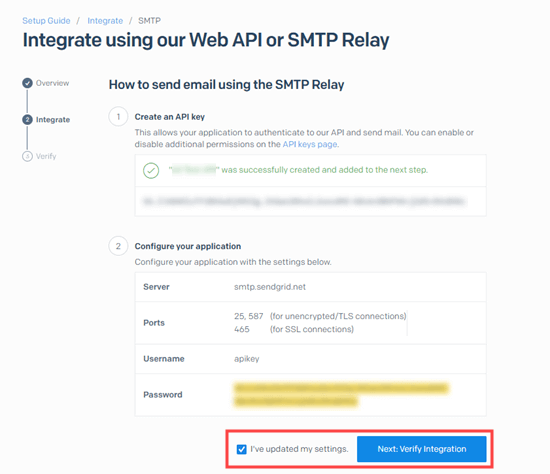
On the next screen, click the ‘Verify Integration’ button.
You should then see this message.
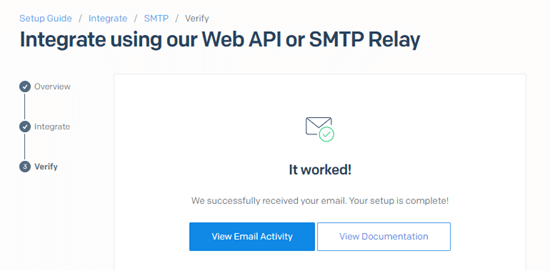
Next, you should create and authenticate a subdomain to help improve your emails’ deliverability.
Tip: If you aren’t able to create and authenticate your subdomain, the emails from your website will still go out. However, there is a possibility that some emails may not be delivered to their recipients.
Creating a Subdomain to Use with SendGrid
Now, you need to create a subdomain at your website, such as sg.yourdomain.com.
To create a subdomain, log in to your web hosting account and follow their instructions for adding a subdomain. If you’re using Bluehost, you need to go to the Domains » Subdomains page.
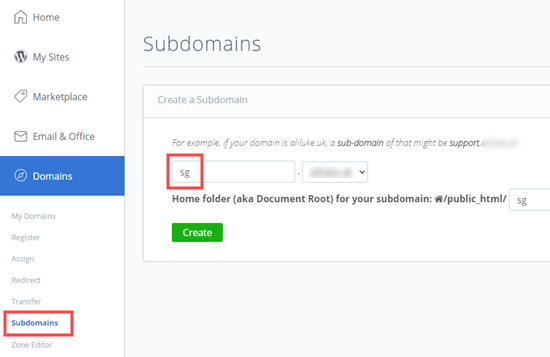
We suggest using sg.yourdomain.com for your subdomain.
After creating the subdomain, you need to add it in your SendGrid account.
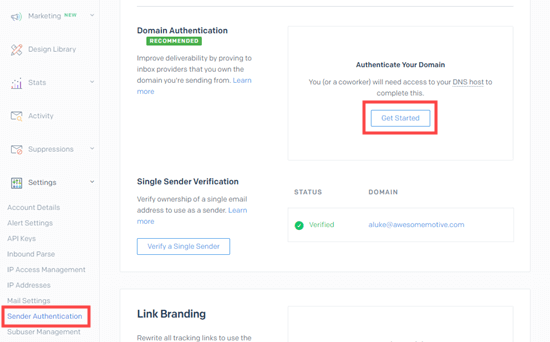
To do this, you need to go to the Settings » Sender Authentication page in your SendGrid account. Under ‘Authenticate Your Domain’ you need to click the ‘Get Started’ button.
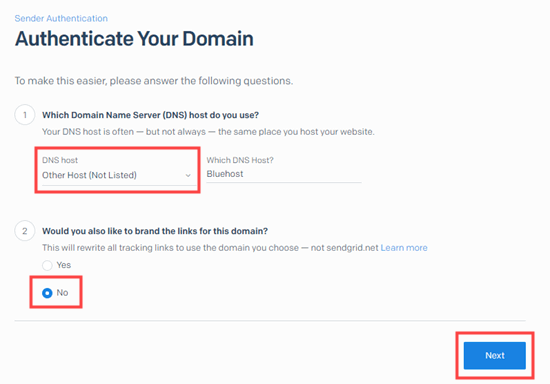
Now, you should select your DNS host. This is your website host, unless your domain name is registered with a different company.
In the second step, select Yes for ‘Would you also like to brand the links for this domain?’ This means that your emails will be shown as coming from your domain, not SendGrid’s.
Then, simply click the Next button.
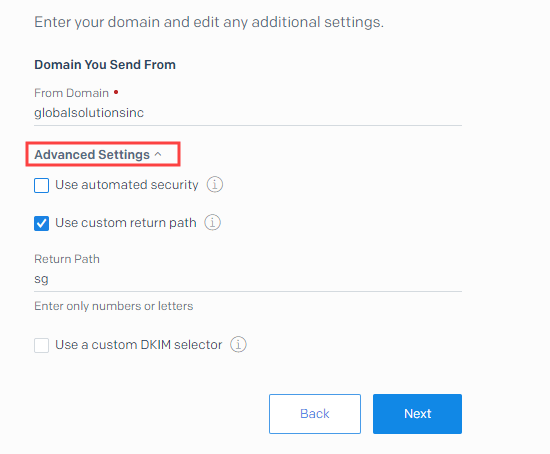
Now, enter your domain in the ‘Domain You Send From’ box. Below this, click the ‘Advanced Settings’ link. This will open up new options.
You need to uncheck the ‘Use automated security’ box and check the ‘Use custom return path’ box. Then, type the first part of your subdomain for the ‘Return Path’. For instance, if your subdomain is sg.example.com, then type sg.
Once you’ve done this, click the Next button.
Now, you will see some DNS records that you need to add to your domain. You can consult your web host’s documentation for help doing this.
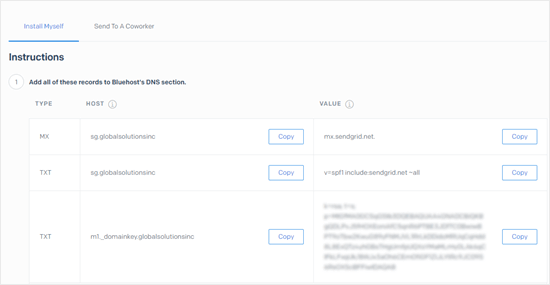
After you’ve added the records, go ahead and click the ‘Verify’ button at the bottom of the screen. You should then see a success message.
Finally, test your SMTP email again to be sure that emails are being sent correctly.
Testing That Your SMTP Mail is Working
The final step for all these methods is to send a test email to make sure everything is working.
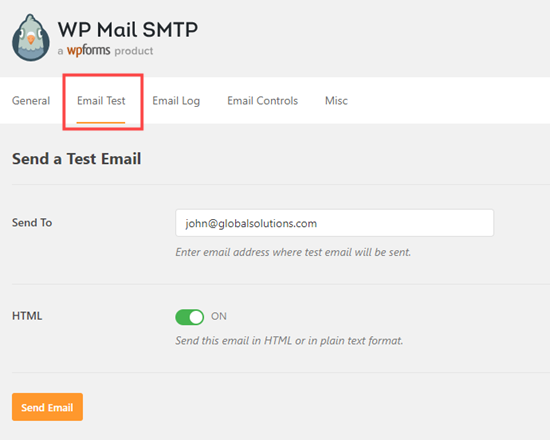
First, go to the ‘Email Test’ tab in the WP Mail SMTP settings. Then, enter the email address where you want the test email to be sent, if it’s different from the default.
Simply click the ‘Send Email button and your email will be sent. You should see a message to let you know that the email was sent successfully.
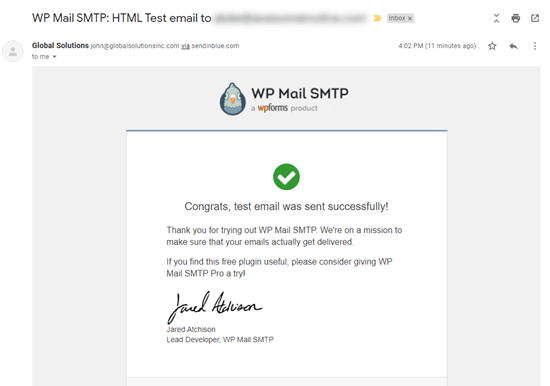
Next, go ahead and check your inbox to make sure that the test email has arrived.
Other Free SMTP Mailer Options
There are some other free SMTP mailer options you could use instead of the ones we have covered.
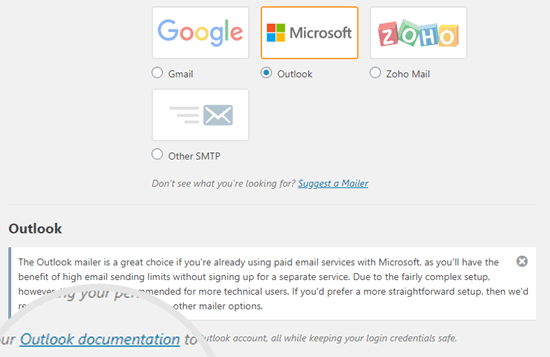
- Outlook: This involves a longer set up process than some other methods, but the advantage is that you can send a LOT of emails (up to 10,000 per minute).
- Amazon SES: This service is only recommended if you are confident with technology as the set up is quite complex. It is free for your first year.
- SMTP.com: This is a robust and reliable option. The drawback is that it is only free for your first 30 days, then you have to pay to use it.
For all these, you can get instructions by selecting the mailer on your WP Mail SMTP settings page then clicking the documentation link. This will open up instructions in a new tab.
We hope this article helped you learn how to use a free SMTP server to send WordPress emails. You might also like to check out our articles on the best email marketing services and our comparison of the best virtual business phone number apps (with free options).
If you liked this article, then please subscribe to our YouTube Channel for WordPress video tutorials. You can also find us on Twitter and Facebook.
The post How to Use Free SMTP Server to Send WordPress Emails (4 Methods) appeared first on WPBeginner.
Post a Comment