
Recently, one of our readers asked us how to submit their WordPress site to search engines like Google?
Search engines are the largest source of traffic for most websites. That’s why it is important to ensure that they can easily find and rank your website pages.
In this article, we’ll show you how to easily submit your website to search engines and start getting traffic to your site.

Since this is a comprehensive guide, please feel free to use the quick links below to jump straight to different sections in this article.
- Do You Need to Submit Your Website to Search Engines?
- How to Submit Your Website to Google
- Creating a WordPress Sitemap with All in One SEO
- How to Submit Your Website to Bing, Yahoo, and DuckDuckGo
- How to Check if Your Website Has Been Indexed
- Should You Use a Website Submission Service?
- Troubleshooting and FAQs about Submitting Your Website to Search Engines
Do You Need to Submit Your Website to Search Engines?
No, you do not have to submit your website to search engines. Most search engine bots can automatically find your website if it has been mentioned on other sites.
However for WordPress websites, we recommend submitting it manually because it will help you get discovered faster.
Why you should submit your website to search engines?
If you are just starting a new business or a blog, then search engines are the most important source of free website traffic. This means you can grow your business online without a lot of money.
Unlike paid traffic from ads, organic search traffic is free, and you don’t need to pay search engines for that.
More importantly, the submission process is quite simple, free, and gives you access to several tools that will help you grow your business later on.
That being said, let’s take a look at how to submit your WordPress website to search engines.
Submitting Your Website to Google
Google is the largest and most popular search engine on the planet. For most websites, Google is often the biggest source of their traffic.
To submit your website to Google, you need to sign up for Google Search Console. It is a free tool offered by Google to help website owners see how their website is performing in search results.
Signing up is free and easy. Simply go to the Google Search Console website and click on the ‘Start now’ button.
You can use your existing Google account to sign in or create a new account.
Next, Google will prompt you to enter your website domain name. We recommend using the URL prefix option here as it’s easier to verify.
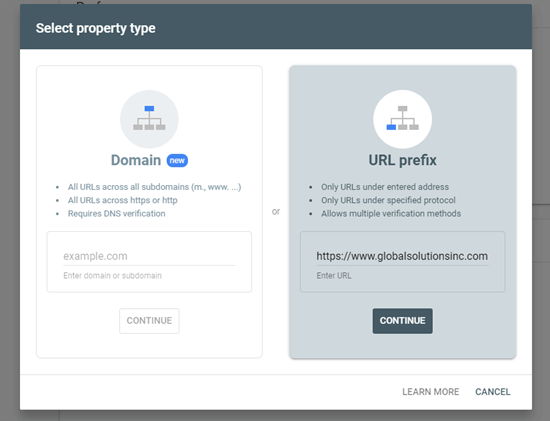
After choosing this option, use the HTML tag method to verify your website and submit it to Google. You simply need to click on the HTML tag option to expand it, and then copy the code by clicking the ‘Copy’ button.
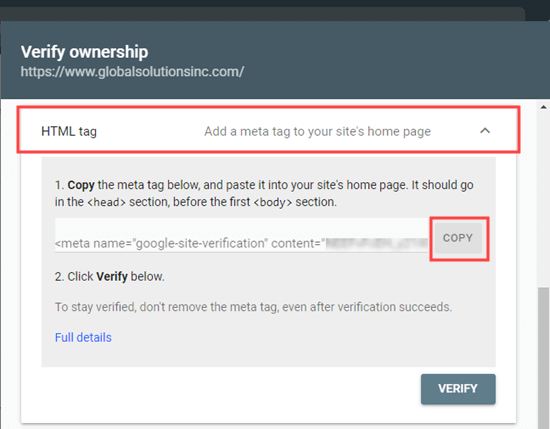
Now there are multiple ways to do add this code to your website. We will show you the two easiest methods, and you can choose one that best suits you.
1. Adding Verification Code in WordPress using All in One SEO
The easiest way to do this is using All in One SEO, which is the best WordPress SEO plugin on the market. It allows you to optimize your website for search engines without learning any SEO jargon.
First, you need to install and activate the All in One SEO plugin. For more details, see our step by step guide on how to install a WordPress plugin.
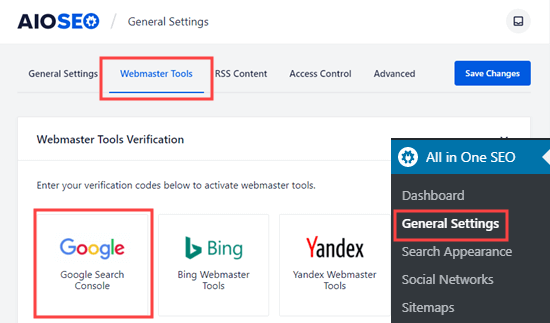
Next, you need to visit the All in One SEO » General Settings » Webmaster Tools page and click on the Google Search Console option.
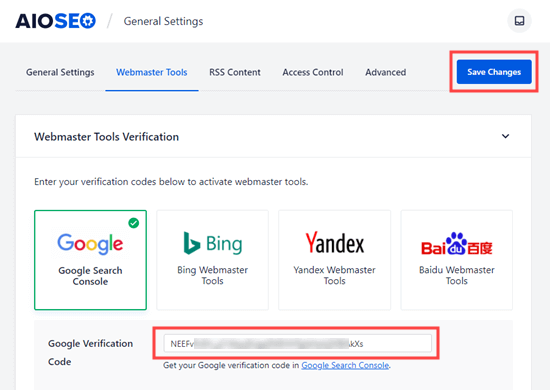
After that, you need to paste the content value from your HTML meta tag into the ‘Google Verification Code’ box. The part you want is the long string of numbers and letters.
Don’t forget to click the ‘Save Changes’ button at the top of the screen.
2. Adding Verification Code in WordPress using Insert Headers and Footers
If you are not using the All in One SEO plugin, then you can use this method to add Google Search Console verification code to your WordPress site.
First, you need to install and activate the Insert Header and Footers plugin. For more details, see our step by step guide on how to install a WordPress plugin.
Upon activation, go to the Settings » Insert Headers and Footers page in your WordPress admin. Then, simply paste the whole HTML meta tag into the ‘Scripts in Header’ box.
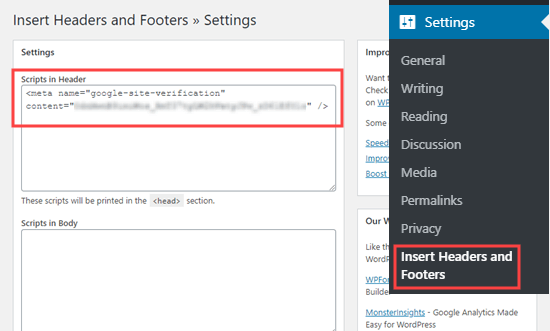
Then, make sure you click the Save button at the bottom of the page.
After adding the meta tag to your site through either method, go back to Google Search Console and click the ‘Verify’ button for the HTML tag method.
You should now see a success message in Google Search Console to let you know that your site has been verified.
If you need more help, check out our step by step guide on adding your WordPress site to Google Search Console.
Creating an XML Sitemap with All in One SEO
An XML sitemap in WordPress is a list of all the content on your website, including all your posts and pages. It helps search engine bots discover your content faster and start showing it in search results.
In the WordPress 5.5 update, XML sitemaps were added as a built-in feature. However, these sitemaps are very basic and can’t be easily customized.
We recommend using All in One SEO to create your sitemap.
All in One SEO is the complete WordPress SEO toolkit and includes a comprehensive sitemaps generator.
It allows you to customize your XML sitemaps by excluding unnecessary or duplicate content. They also have powerful custom sitemap for WooCommerce, news sitemap, and video sitemaps. This gives you a bonus advantage in SEO as your business grows.
First, you need to install and activate the All in One SEO plugin. For more details, see our step by step guide on how to install a WordPress plugin.
Upon activation, All in One SEO will automatically create your sitemap.
To view it, simply go to the All in One SEO » Sitemaps page in your WordPress admin. Then, click the ‘Open Sitemap’ button.
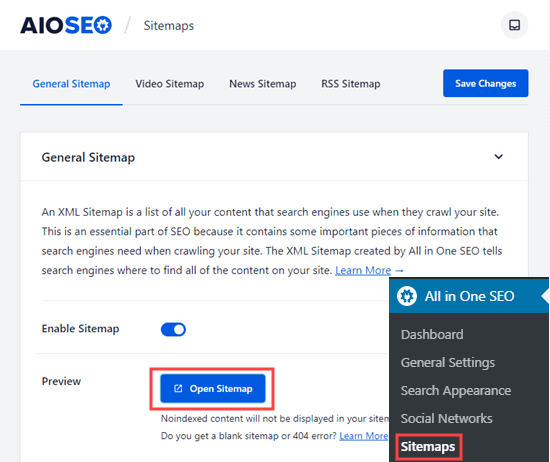
You will then see the sitemap index for your site. This links to all the sitemaps that All in One SEO has created.
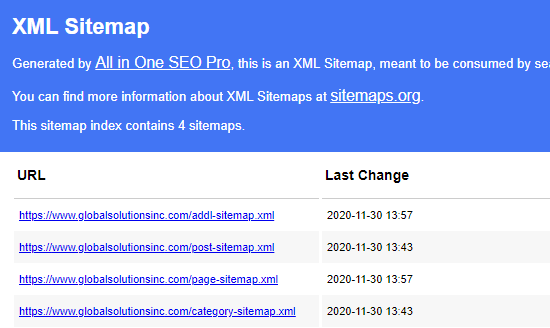
Note: All in One SEO creates multiple sitemaps because it is best practice to split up large sitemaps. By using different sitemaps for different types of content, your sitemaps will load quickly and be a manageable size even as your website grows.
Please keep this page open or save the page URL as you will need it later in the tutorial.
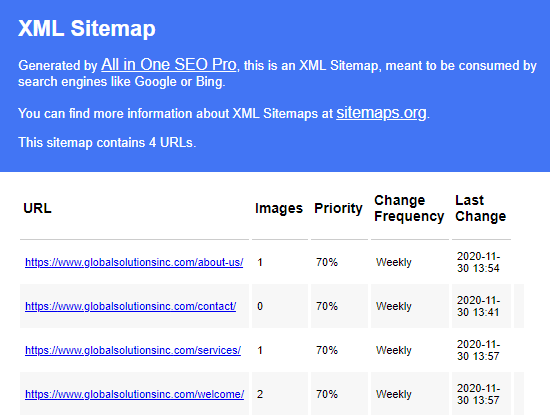
If you want, you can click on any of the links to see the content listed in each individual sitemap. Here is the sitemap for the pages on our demo website.
Add your XML Sitemap to Google Search Console
Now that you have generated your XML sitemap, the next step is to help Google discover it quickly.
The easiest way to do that is by using the Google Search Console.
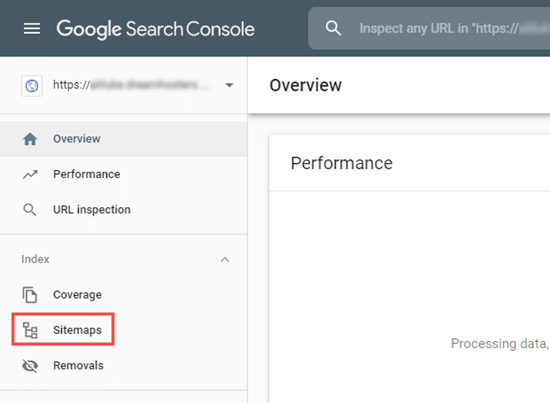
Simply login to your Google Search Console account, and then click on the Sitemaps link in the left-hand toolbar:
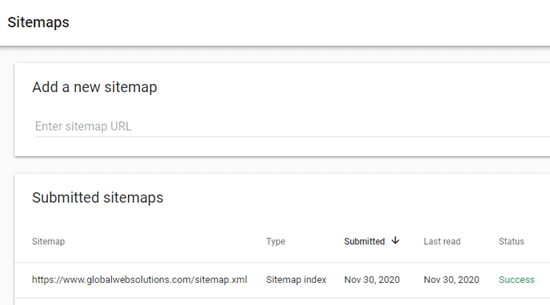
Google Search Console has already put your website domain here. All you need to do is to type sitemap.xml into the box and click the Submit button.

Search Console should show you a message to let you know the sitemap has been successfully submitted. You will also see your website sitemap in the ‘Submitted sitemaps’ list.
How to Submit Your Website to Bing, Yahoo, and DuckDuckGo
Google totally dominates the search engine market with a whopping 92% market share. However, other search engines like Bing, Yahoo, and DuckDuckGo can still be a significant source of traffic for your website.
Submitting Your Website to Bing, Yahoo, and DuckDuckGo
To submit your website to Bing, you need to sign up for Bing Webmaster Tools.
Just click the Sign In button to get started. Then, sign in using your Microsoft, Google, or Facebook account.
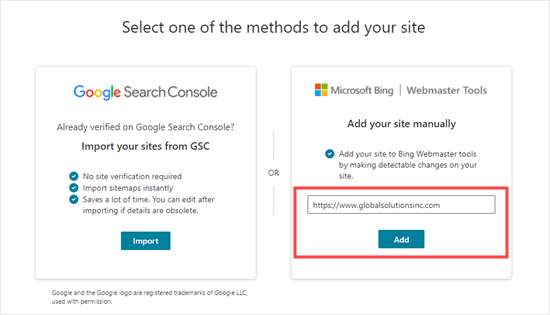
Next, Bing will prompt you to add your site. We recommend using the ‘Add your site manually’ option. It works reliably and doesn’t require you to have verified your site with Google Search Console.
After that, simply enter your website’s domain name (URL) then click the ‘Add’ button.
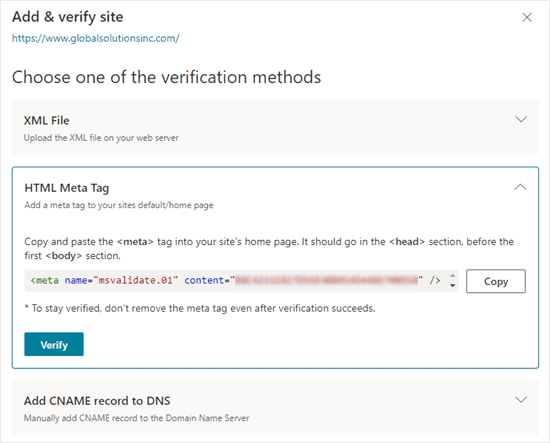
Next, you will see some verification method options. First, click on the HTML Meta Tag method. This will open up the details. Then, click the ‘Copy’ button to copy the meta tag.
The easiest way to add the meta tag to your site is to use All in One SEO. In your WordPress dashboard, go to All in One SEO » General Settings » Webmaster Tools page.
Then, click on the Bing Webmaster Tools option.
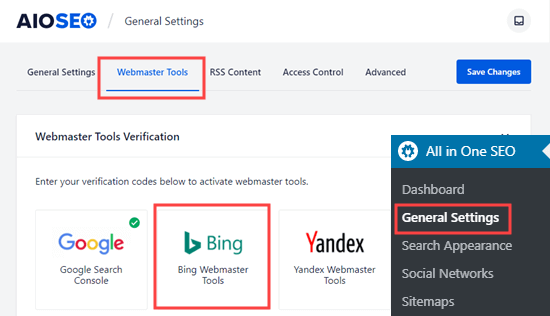
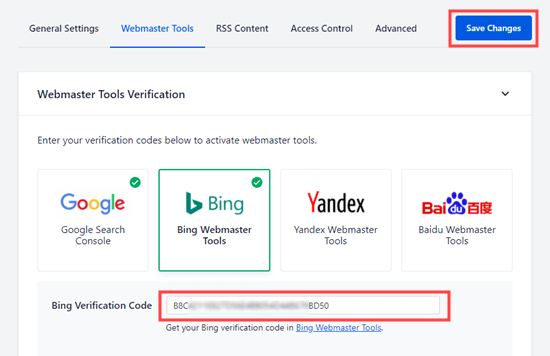
This will open up the box where you can enter the Bing verification code. This is the long string of numbers and letters that forms the content value in the Bing meta tag.
Alternatively, you can install the free Insert Header and Footers plugin for WordPress.
Upon activation, go to the Settings » Insert Headers and Footers page in your WordPress admin. Then, simply paste the whole HTML meta tag into the ‘Scripts in Header’ box.
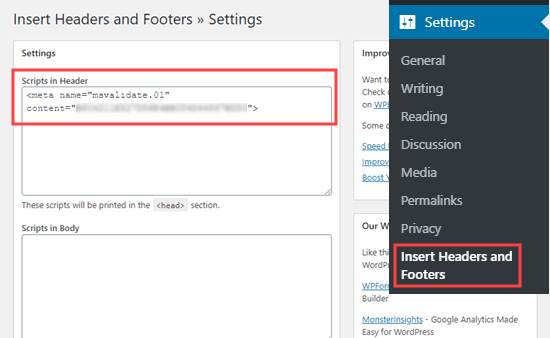
Don’t forget to click the ‘Save’ button further down the page.
After that, you need to return to Bing Webmaster Tools and click the Verify button. You should see a success message to let you know your site has been added.
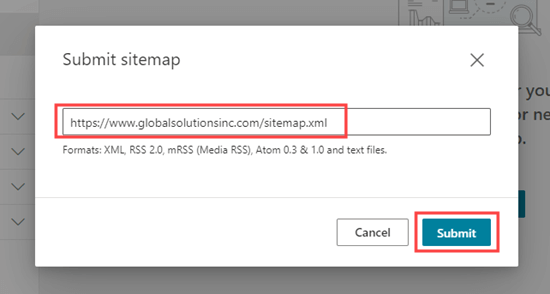
Next, click on the Sitemaps tab on the left-hand sidebar. Then, click the ‘Submit sitemap’ button.
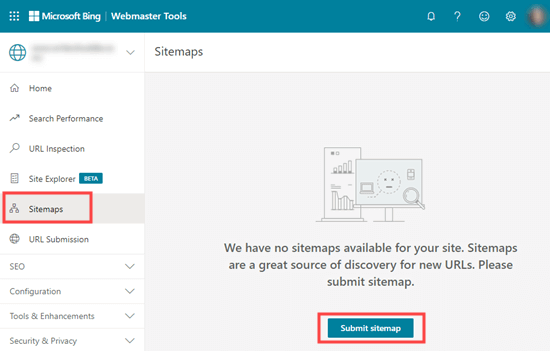
You need to paste in the URL of the sitemap index that All in One SEO created for you. This should be your domain name with sitemap.xml at the end.
After that, just click the ‘Submit’ button.
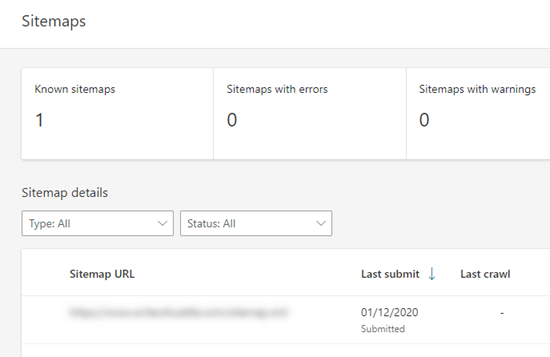
You will now see your sitemap in the sitemap table in Bing Webmaster Tools.
Your Site Will Also Appear in Yahoo and DuckDuckGo’s Search Results
Now that you have submitted your website to Bing, it has also been automatically submitted to Yahoo.
DuckDuckGo also uses Bing’s search results. This means that by submitting your website to Bing, you will also get it indexed on DuckDuckGo as well.
How to Check if Your Website Has Been Indexed
The easiest way to check whether your website has been indexed is to simply go to your chosen search engine’s homepage and type in site:yoursitename.com as the search term.
For WPBeginner website, we would type site:wpbeginner.com into the search engine.
If your site has been indexed, then you should see a list of your content. Your homepage will normally be at the top.
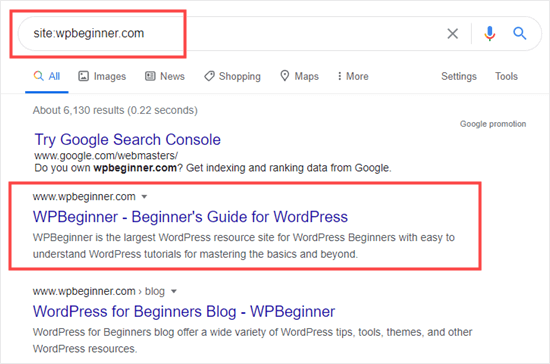
This works for all popular search engines, including Google, Yahoo, Bing, and DuckDuckGo.
Should You Use a Website Submission Service?
No, you should not use a website submission service to submit your WordPress blog or website to search engines.
There is no additional benefit to using a website submission or search engine submission services. They charge you a premium fee to do something that is free, and you can do it yourself.
More importantly, these submission services may submit your website to spammy sources which may harm your website’s SEO.
Troubleshooting and FAQs about Submitting Your Website to Search Engines
Since WPBeginner is the largest free WordPress resource site, we have heard just about every question related to this topic. Here are some common problems and FAQs we hear about submitting your site to search engines.
1. How long will it take for my site to appear in search engines?
It could take several days or several weeks for your website to appear in search engines.
It is up to search engines to index your site. You cannot force Google or any search engine to index your site faster.
However, you should follow our instructions above to help search engines find your site as easily as possible. Getting plenty of backlinks to your site can also help speed up the process.
2. I submitted my website but it isn’t showing up in search engines?
First, check that your site is visible to search engines. In your WordPress admin, go to the Settings » Reading page and make sure that the box ‘Discourage search engines from indexing this site’ is not checked.
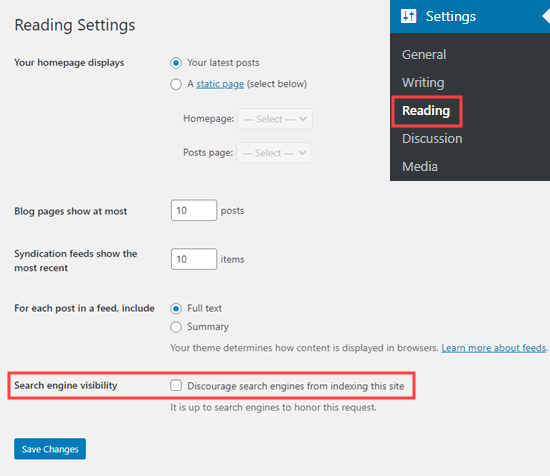
If the box is checked, then it is stopping search engines from crawling your WordPress site. Simply uncheck it then click the ‘Save Changes’ button.
If this setting is correct, then you simply need to be patient. It can take a day or so for Google Search Console to process your sitemap.
3. My site is listed on search engines but I am not getting any traffic?
If you are not getting traffic to your site, then that could be because it is ranking very low in search engine results. You should use All in One SEO to get detailed recommendations about your site’s SEO (search engine optimization).
In particular, it’s important to use keywords appropriately in your site’s content.
You can also use these keyword research tools to write more SEO optimized content, and implement our 27 proven tips to increase your website traffic.
4. How can I submit my website to search engines for free?
All the methods we have covered above are free. We recommend that you do not pay to have your site submitted to search engines.
It is free to create accounts with Google Search Console and Bing Webmaster Tools. Neither of these charges any money.
5. How do search engines find my site?
Search engines use automated software to constantly look through the web for new web pages. This software is often called: search bots, web crawler, or spider. The process of looking for new pages is called ‘crawling’.
The web crawler goes through links to find new pages. This is why an XML sitemap is so important. It has links to all the content on your site and information about them that the web crawler can understand.
6. Is there a submissions site list I can use?
You don’t need to worry about submitting to lots of search engines. The most important one is Google.
Once you have submitted your site to Google, it’s a good idea to also submit it to Bing. This helps Yahoo and DuckDuckGo find your site too.
The other search engines you should consider submitting to are local ones. For instance, you could submit your website to Yandex if you want to get more visitors from Russia.
7. How do I track website traffic coming from Search Engines?
The easiest way to track search engine traffic is by using MonsterInsights. It is the best Google Analytics plugin for WordPress and allows you to see where your users are coming from, what pages they are viewing, and what they do while on your website.
For detailed instructions, follow our step by step guide on how to install Google Analytics in WordPress.
We hope this article helped you learn how to submit your website to search engines. You may also want to see our guide on the best email marketing services to connect with your visitors after they leave your site, and our expert list of the best WordPress plugins for all websites.
If you liked this article, then please subscribe to our YouTube Channel for WordPress video tutorials. You can also find us on Twitter and Facebook.
The post How to Submit Your Website to Search Engines (Beginner’s Guide) appeared first on WPBeginner.
Post a Comment