Do you want to enable GZIP compression in WordPress? GZIP compression makes your website faster by compressing the data and delivering it to the user’s browsers much quickly.
A faster website improves user experience and brings in more sales and conversions for your business.
In this article, we’ll show you exactly how to easily enable GZIP compression in WordPress.

What is GZIP Compression?
GZIP compression is a technology that compresses data files before it is sent to users’ browsers. This reduces the file download time which makes your website faster.
Once the compressed data arrives, all modern browsers automatically unzip the compressed files and display them. GZIP compression doesn’t change how your website looks or functions.
It just makes your website load faster.
GZIP is supported by all popular web browsers, server software, and all best WordPress hosting companies.
How does GZIP compression work?
Gzip compression uses compression algorithms that work on website files like HTML, CSS, JavaScript, and more. When a user requests a page from your website, the algorithm sends the output back in a compressed format.
Depending on data size, the compression can reduce file sizes by up to 70%.
This is why most website speed test tools like Google Pagespeed Insights highly recommend enabling gzip compression. These tools will also show a warning if gzip compression is not enabled onn your website.
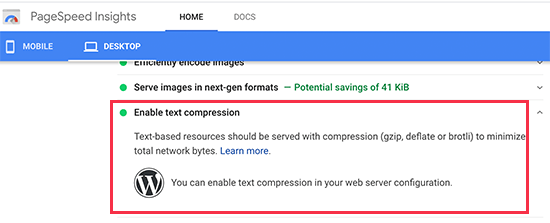
Note: By default, Gzip compression does not compress images or videos. For that you’ll need to optimize images for web on your WordPress site.
Why You Need to Enable GZIP Compression in WordPress?
Plain raw data takes longer to download which affects your page load speed. If several users arrive at the same time, then it will further slow down your WordPress website.
Using GZIP compression allows you to efficiently transfer data, boost page load times, and reduce the load on your website hosting. It is an essential step in improving your website speed and performance.
Now, you might think that GZIP sounds very technical and complicated. However, there are many WordPress plugins that make it super easy to add GZIP compression on your WordPress website.
In some cases, you may even have GZIP already enabled by your WordPress hosting company.
Bluehost an officially recommended WordPress hosting provider automatically enables GZIP compression on all new WordPress sites.
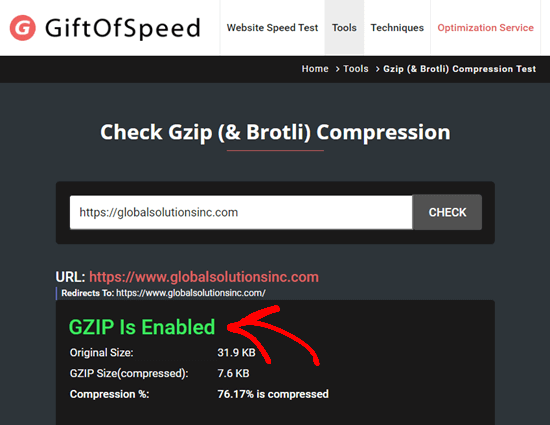
To test if GZIP is enabled on your site, simply go to this GZIP tester and enter the URL of your site. If GZIP is working on your site, you will see a ‘GZIP Is Enabled’ message.
If you need to add GZIP compression by yourself, then you can use any of the following methods to do so:
- Enabling GZIP with WP Rocket (Recommended)
- Enabling GZIP with WP Super Cache
- Enabling GZIP with W3 Total Cache
Enabling GZIP Compression with WPRocket
WP Rocket is the best caching plugin for WordPress. It is incredibly easy to use and turns on all the essential speed optimization features out of the box, including GZIP compression.
First, you need to install and activate the WP Rocket plugin. For more details, see our step by step guide on how to install a WordPress plugin.
Upon activation, your license key should be automatically activated for you. You can check this by going to the Settings » WP Rocket page in your WordPress admin.
You should see a message letting you know that WP Rocket is active and working.
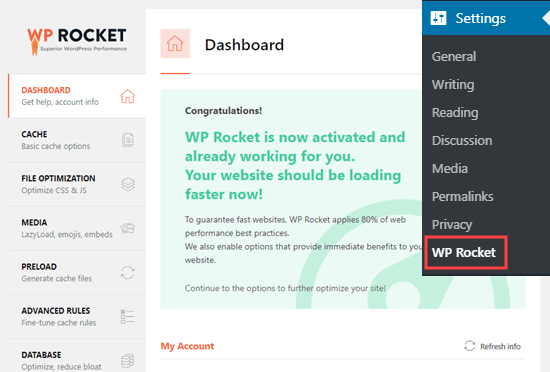
WP Rocket automatically enables GZIP compression for you if you’re using an Apache server. Most WordPress web hosting providers use Apache for their servers. You don’t need to take any additional steps.
For a breakdown of all WP Rocket features, check out our guide on installing and setting up WPRocket.
Enabling GZIP Compression with WP Super Cache
WP Super Cache is a free WordPress caching plugin. It is also a great way to enable GZIP compression on your WordPress site.
First, you need to install and activate the WP Super Cache plugin. For more details, see our step by step guide on how to install a WordPress plugin.
Upon activation, go to the Settings » WP Super Cache page » Advanced in your WordPress dashboard. Then, simply check the box ‘Compress pages so they’re served more quickly to visitors’ box.
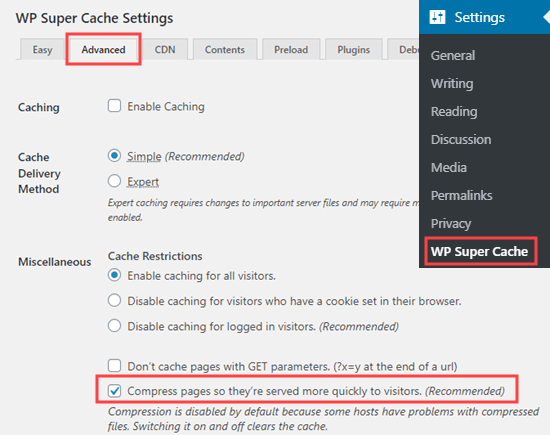
You then need to scroll down the page and click the ‘Update Status’ button to save your changes. WP Super Cache will now enable gZip compression on your WordPress website.
Enabling GZIP Compression with W3 Total Cache
W3 Total Cache is another great WordPress caching plugin. It’s not quite so beginner-friendly as WP Rocket, but there’s a free version. This makes it a good option if the costs of creating a WordPress site are adding up.
First, you need to install and activate the W3 Total Cache plugin. For more details, see our step by step guide on how to install a WordPress plugin.
Upon activation, GZIP compression will be automatically enabled on your website. You can check or change this by going to the Performance » General Settings page in your WordPress dashboard.
Scroll down this page to Browser Cache and make sure there is a check in the Enable box:
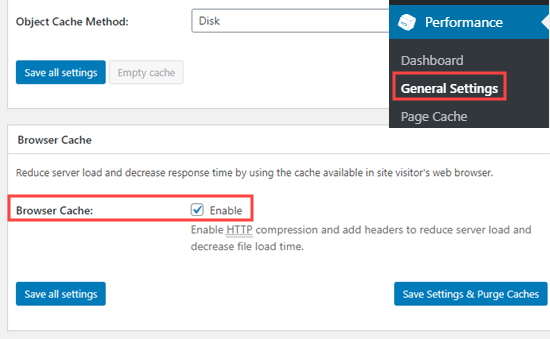
Don’t forget to click the ‘Save all changes’ button if you make any changes.
Checking that GZIP is Enabled on Your Website
After enabling GZIP, you may notice that your website pages load a bit faster. However, if you want to check that GZIP is running, you can simply use a GZIP checker tool.

We hope this article helped you learn how to enable GZIP compression in WordPress. You may also want to see our ultimate guide to speeding up WordPress, and check out our 27 proven tips on how to increase your website traffic.
If you liked this article, then please subscribe to our YouTube Channel for WordPress video tutorials. You can also find us on Twitter and Facebook.
The post How to Enable GZIP Compression in WordPress (3 Ways) appeared first on WPBeginner.
Post a Comment