Do you want to track conversions on your WooCommerce store? Conversion tracking helps you understand what’s working on your online store and what needs more attention.
It helps you keep track of your best-performing products while also allowing you to see what’s stopping customers from completing a purchase.
In this guide, we’ll show you how to easily setup WooCommerce conversion tracking, step by step.
![]()
Why Set up WooCommerce Conversion Tracking?
WooCommerce makes it easy to sell anything online. However, once you have set up your WooCommerce store, you would need to learn what works on your website to grow your business.
You will need to learn which products are popular among your users, what they are viewing the most, how many users end up making a purchase, how are they finding your website, and more.
To get all this information, you need to set up conversion tracking on your WooCommerce store. This helps you get access to insights you need to make informed decisions about growing your business.
Conversion tracking helps you unlock key performance indicators including your eCommerce conversion rate, average order value, shopping cart abandonment, cost per acquisition, top referral sources, and more.
Apart from that you also get to learn about:
- Shopping behavior – It tells you what products users are adding to carts, which products are being abandoned, what pages lead users to a successful purchase, and more.
- Checkout behavior – Helps you view how users successfully complete a checkout.
- Product performance – Tells you which products are bringing you most sales.
- Product list performance – This report allows you to group products and see their performance as a list. This comes in handy when you want to see how different product categories are doing on your store.
That being said, let’s take a look at how to unlock all this useful information by setting up conversion tracking on your store.
Setting up WooCommerce Conversion Tracking
The easiest way to track WooCommerce conversions is by using Google Analytics. It shows you where your visitors are coming from and what they do when they are on your website.
The challenge is that setting up Google Analytics with WooCommerce requires a lot of custom coding, event tracking, etc. The good news is that there are plugins that can make it super easy to setup conversion tracking, and you can do it without writing any code.
For this tutorial, we will be using MonsterInsights. It is the best Google Analytics plugin for WooCommerce, and comes with an eCommerce addon that literally enables all the tracking within few clicks.
See our guide on how to install Google Analytics in WordPress for complete installation instructions.
Once you have installed Google Analytics using MonsterInsights, you can move on to setting up WooCommerce conversion tracking.
Step 1. Turn on Enhanced Ecommerce Tracking in Google Analytics
First, you need to enable enhanced eCommerce tracking in your Google Analytics account. Go to your Google Analytics dashboard and select your website.
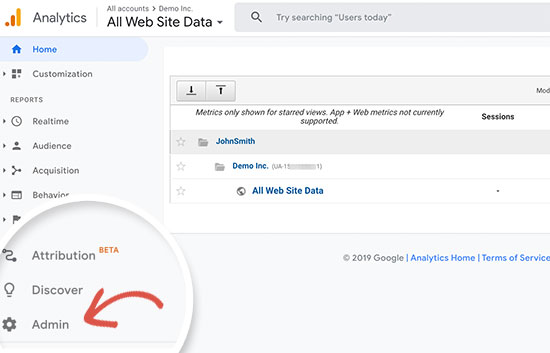
From here, you need to click on the Admin button located at the bottom left corner of the screen.
Next, you need to click on the ‘Ecommerce settings’ option.
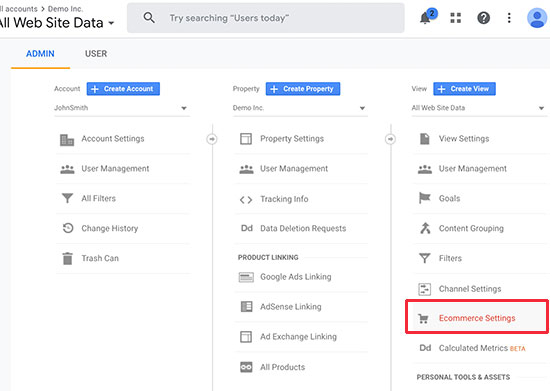
After that, you need to turn on ‘Enable eCommerce’ and ‘Enable Enhanced Commerce’ options.
Google Analytics will now turn on the eCommerce reporting feature for your account.
Step 2. Install eCommerce Addon in MonsterInsights
MonsterInsights comes with the eCommerce addon which helps you properly set up WooCommerce conversion tracking in Google Analytics.
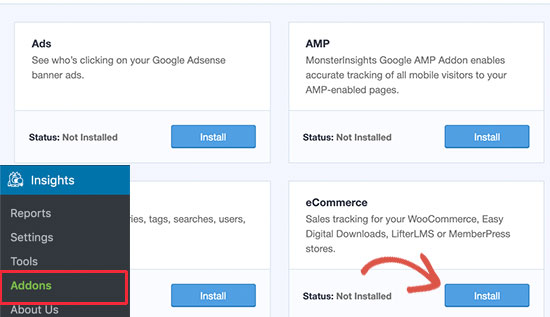
First, you need to visit the Insights » Addons page to install and activate the eCommerce addon.
Next, you need to head over to Insights » Settings page and switch to the eCommerce tab. From here, you need to turn on ‘Use Enhanced Ecommerce’ option.
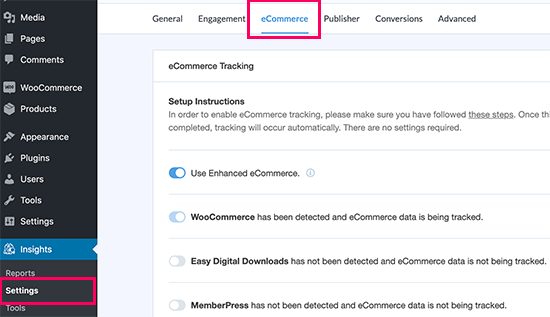
MonsterInsights will automatically detect your eCommerce software. Currently, it supports WooCommerce, Easy Digital Downloads, MemberPress, and LifterLMS.
That’s all, you have successfully setup WooCommerce conversion tracking on your store.
Viewing WooCommerce Conversion Reports
Now that you have setup conversion tracking on your WooCommerce store, you need to give Google Analytics some time to collect data.
After a while, you would be able to view your eCommerce reports in both MonsterInsights and Google Analytics.
Let’s start with your eCommerce reports in MonsterInsights.
Ecommerce Reporting in MonsterInsights
Log in to your WordPress site and go to Insights » Reports page and switch to the eCommerce tab.
![]()
At the top, you’ll get your most important conversion metrics including the conversion rate, transactions, revenue, and average order value.
Below that you will see a list of your top products with quantity, sale percentage, and total revenue.
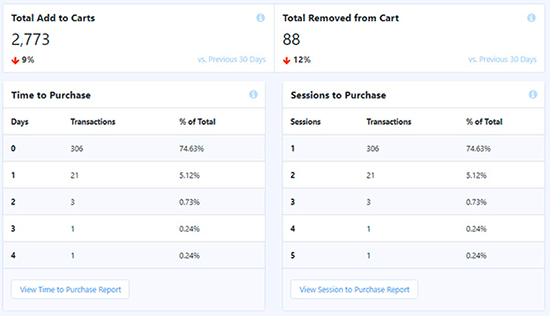
Next, you’ll see your top conversion sources and shopper behavior reports including the number of times products were added and removed from the cart.
That’s not all the data. You can dig down deeper with more advanced reports under your Google Analytics account.
WooCommerce Tracking in Google Analytics
Google Analytics provides even more in-depth reporting for your WooCommerce store.
Simply visit your Google Analytics dashboard and click on Conversions » Ecommerce from the left column.
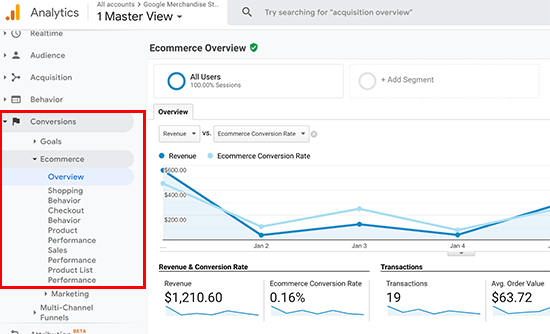
First, the overview report will provide you important numbers such as revenue, conversion rate, transactions, and average order value.
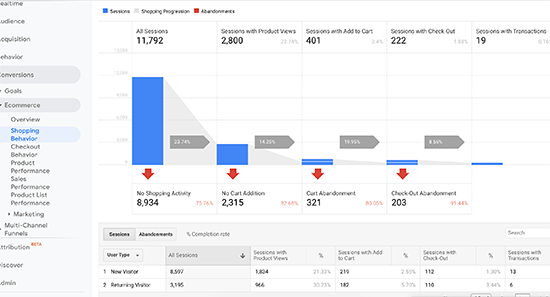
You can then switch to different reports for more in-depth analysis. For example, shopping behavior report will break down user sessions to add to cart, cart abandonment, and sessions that resulted in the checkout.
Boost Your WooCommerce Conversions and Increase Sales
Now that you have the data you needed to track your WooCommerce conversions, let’s take a look at how to improve your conversion rates and make more sales.
1. Improve Speed and Performance
According to a StrangeLoop case study, a 1 second delay in page load time can lead to 7% loss in conversions, 11% fewer page views, and 16% decrease in customer satisfaction.
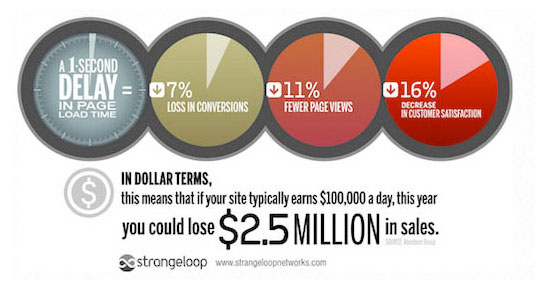
Slower websites create bad user experience which results in lower conversion rates. See our complete step by step guide to improve your WooCommerce speed and performance.
2. Recover Abandoned Cart Sales
On average 60 – 80% of people who “add to cart” do not end up buying. This means if you have an online store, then you’re losing out on a lot of sales.
Luckily, there are several best practices that help you recover some of those abandoned cart sales. See our tips on how to recover abandoned cart sales and increase your conversions.
3. Provide Users Alternatives
If users decide to leave your website without making a purchase, then there is very little chance that they will ever see your website again.
You need to provide users a chance to stay in touch even if they don’t end up making a purchase.
You can do this by creating an email newsletter for your WooCommerce store.
We recommend using Constant Contact or SendinBlue. Both of them are in our list of the best email marketing service for small businesses.
For more techniques, see our guide on how to convert WooCommerce visitors into customers.
We hope this article helped you setup WooCommerce conversion tracking on your eCommerce store. You may also want to see our list of the best WooCommerce plugins that you can install right away.
If you liked this article, then please subscribe to our YouTube Channel for WordPress video tutorials. You can also find us on Twitter and Facebook.
The post How to Setup WooCommerce Conversion Tracking (Step by Step) appeared first on WPBeginner.
Post a Comment