
Do you want to send a custom welcome email to new users in WordPress? If you allow user registration on your WordPress site, then each new user receives an email to set up their WordPress password.
However, they don’t receive a proper welcome email specific to your website. For instance, an email message that guides them about your community, links to the next steps, etc.
In this article, we’ll show you how to easily send a custom welcome to your new WordPress users. We’ll share two methods, and you can choose one that best suits your needs (we like option #2 better since it’s more reliable).

Why Send a Custom Welcome Email to New Users in WordPress?
By default, WordPress sends an email to new users when they sign up. However, this email is not customized to fit each individual website or blog.
Here are some common scenarios when a welcome email can help you set up a proper onboarding process for your new users:
- If you run a WordPress membership website, then you may want to educate users about where they can find all the benefits that come with their membership plan.
- On an eCommerce website, you can direct users to products they would like, their account settings, or shopping cart page.
- On a multi-author website, you can point new authors to your style guide, ask them to fill in their bio and social links, or show them how to get started.
A custom welcome email can improve user experience and ensures that users don’t forget about your website after creating an account.
That being said, let’s take a look at different ways to easily set up a custom welcome email for new users in WordPress.
Method 1. Setting up a Custom Welcome Email using a Plugin
This method is easier but it is not the most flexible. You’ll be able to send just one welcome email to new users when they register on your website.
The first thing you need to do is install and activate the Better Notifications for WP plugin. For more details, see our step by step guide on how to install a WordPress plugin.
Upon activation, you need to visit Notifications » Add New page to create your custom welcome email.
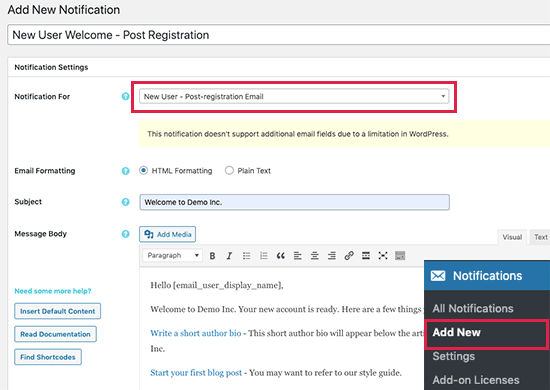
First, you need to provide a title for this new notification that helps you easily identify it.
After that, select ‘New user – post registration email’ next to the ‘Notification for’ option. You can then start writing a custom welcome email by entering email subject and message.
Pro tip: Click on the find shortcodes button for a list of shortcodes that you can use inside your email message. For example, to display the user’s name, you can use the shortcode [email_user_display_name].
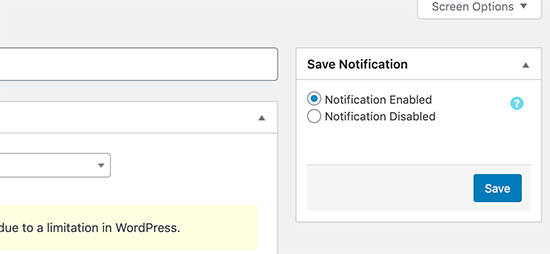
Once you are finished writing your custom welcome email, you can click on the save button to store your changes.
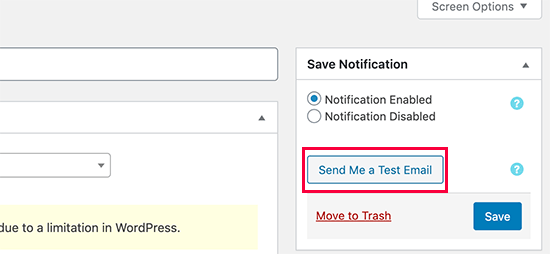
The plugin also allows you to send your self a test notification. Just click on the ‘Send me a test email’ button, and it will send you a test notification to the email address in your user profile.
You can also test the email by creating a new user account.
Ensure Email Deliverability in WordPress
By default, most WordPress hosting companies do not have the mail function configured properly. To prevent their servers from abuse, many hosting companies even turn it off completely.
This means that your WordPress emails will fail to reach users.
Don’t worry, there is an easy fix.
You’ll need to install and activate the WP Mail SMTP plugin. It allows you to use an SMTP server to send your WordPress emails.
For more details, see our guide on how to fix WordPress not sending email issue.
Method 2. Send Custom Welcome Email to New Users via Constant Contact
The first method only allows you to send emails when users perform an action on your website. This is somewhat limited and does not give you full control.
This second method will allow you to send a welcome email and even set up your own welcome funnel with multiple onboarding emails.
You will also be able to communicate with users regularly, which helps you bring them back to your website.
For this part, we’ll be using Constant Contact which is the best email marketing service for small businesses. The same thing can also be done with other email service providers like SendinBlue, ConvertKit, Drip, and more.
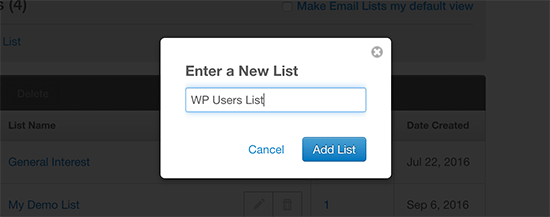
First, you need to sign up for a Constant Contact account. Once you have signed up, go to Contacts page and click on the create button next to email lists.
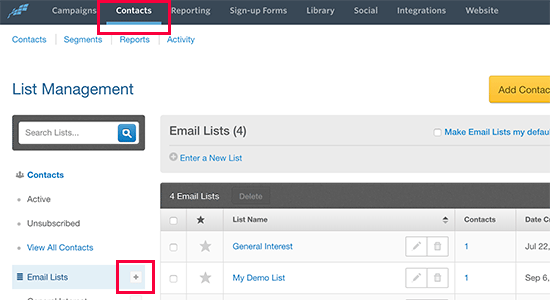
An email list is where you store all the email addresses of your contacts. Simply enter a name for your email list and click ‘Add List’ button.
Next, you need to install and activate the Constant Contact Forms plugin on your website. For more details, see our step by step guide on how to install a WordPress plugin.
This plugin acts as a connector between your website and Constant Contact.
Upon activation, you need to visit Contact Form » Connect Now page and click on the ‘Connect Plugin’ button.
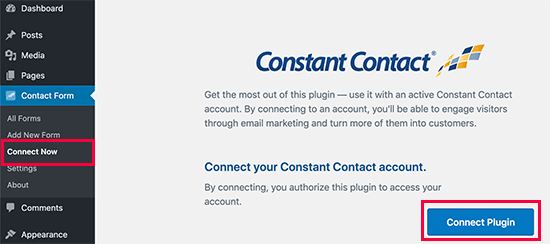
This will take you to Constant Contact website where you will log in with your account to connect your website.
Once you are connected, you need to visit Contact Form » Settings page to configure plugin settings.
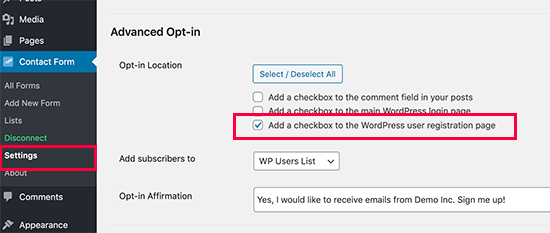
Scroll down to Advanced Optin section and check the box next to ‘Add a checkbox to the WordPress user registration page’ option. After that, select the email list you created earlier from the dropdown next to ‘Add subscribers to’ option.
Below that you can add a message that users will see on screen.
Don’t forget to click on the ‘Save changes’ button to store your plugin settings.
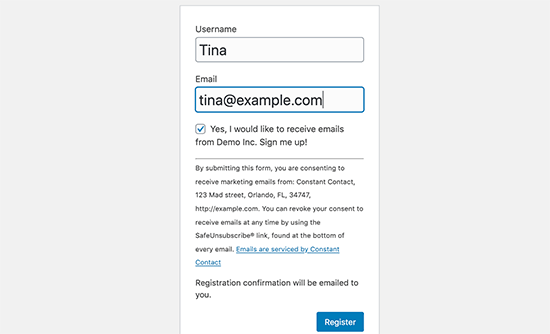
You can now visit your WordPress website’s registration page to see it in action. You’ll see a checkbox for users to sign up for your email list when they register for an account on your website.
Pro tip: You can create a completely custom WordPress user registration form with our guide that also seamlessly integrates with Constant Contact.
Now, let’s create the welcome email that users will receive when they sign up.
Simply go to your Constant Contact dashboard and click on ‘Create’ button under the Campaigns tab.
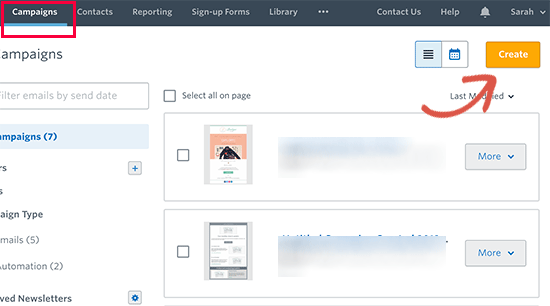
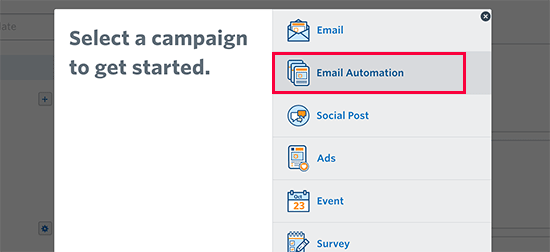
We’ll be setting up an automated sequence of emails for new users. To do that, you need to select ‘Email Automation’ campaign.
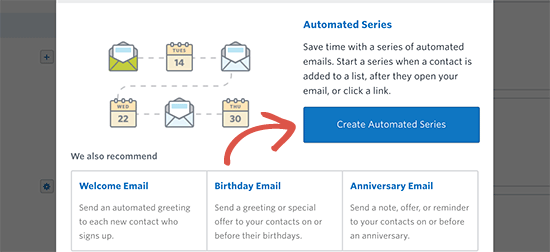
On the next screen, click on the ‘Create Automated Series’ button to get started.
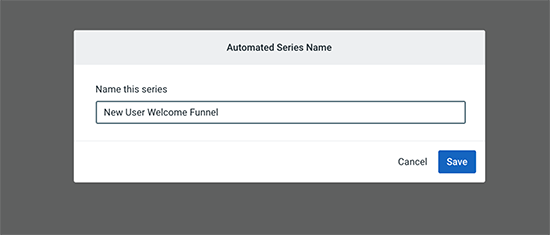
Next, you will be asked to provide a name for this automated series. Use a name that helps you easily identify this campaign later on.
After that, you need to select a trigger. Select ‘A contact joins a list’ from the dropdown menu and then check the box next to the email list you created earlier.
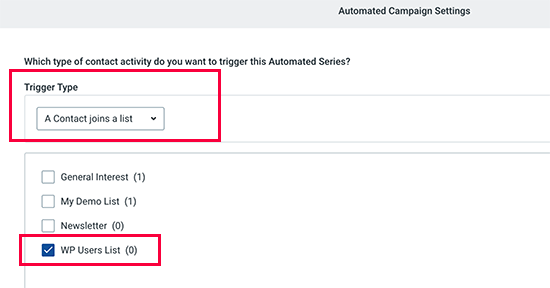
Click on the Save button to continue.
Constant Contact will now set up the automated series for you. Next, you need to select when you want to send your first email and then create your new custom welcome email.
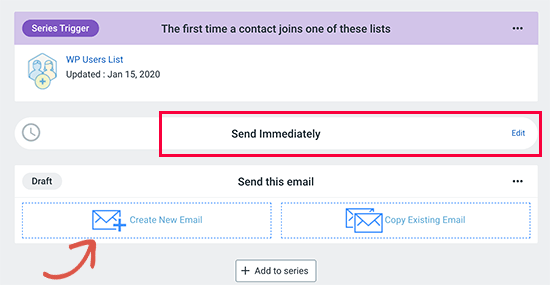
Constant Contact comes with dozens of professionally designed email templates to choose from. You can start with one and then use a drag and drop builder to compose your email.
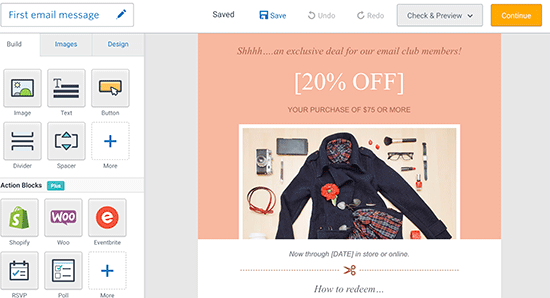
Once you are done writing your welcome email, click on the Continue button to save and exit the editor.
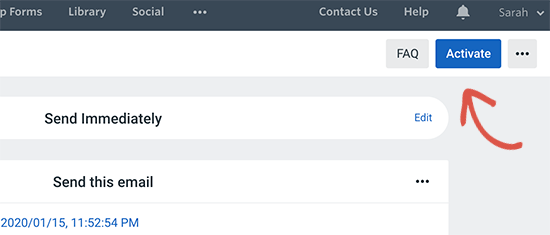
You can now simply click on the ‘Activate Button’ to make this funnel go live.
Set up Subsequent Emails in The Series
The best part about using Constant Contact and an automated welcome email funnel is that you can set multiple emails.
After your first email, you may want to check how the user is doing? Maybe they need a little help.
Let’s set up a second email in the series.
Simply click on the ‘Add to series’ button and then choose how long to wait before sending this email message. After that, click on ‘Create New Email’ button to compose your second email in the welcome series.
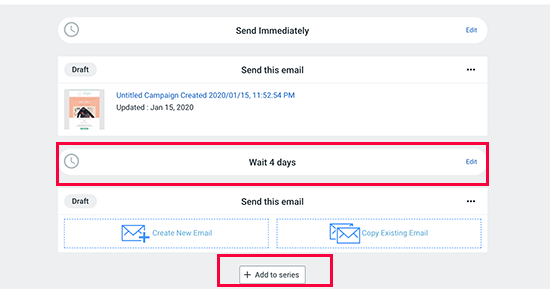
Once you are done creating your welcome email sequence, click on the activate button to apply these changes.
Constant Contact will now set up your welcome series and new WordPress users will get your custom welcome email messages.
We hope this guide helped you send a custom welcome to new users in WordPress. You may also want to see our guide on the best WordPress plugins and the best business phone services for small businesses.
If you liked this article, then please subscribe to our YouTube Channel for WordPress video tutorials. You can also find us on Twitter and Facebook.
The post How to Send A Custom Welcome Email to New Users in WordPress appeared first on WPBeginner.
Post a Comment